Number of Years – 95

Today I have been making a very special card for a very special person. My father in law, Basil will be 95 in early Nov, though you would never think it to look at him. He still lives independently and manages really well with a little help from my sister in law Kate and nephew Chris. He loves his Jazz music, reads a lot, walks his dog and is looking forward to his party.

1-dscf8383I wanted to do a special card for him and was trawling through Pinterest looking for ideas when I came across a card designed by Amanda Bates of The Crafty Spa – http://thecraftspa.blogspot.co.uk/2016/06/number-of-years-double-z-joy-fold-card.html?utm_source=feedburner&utm_medium=email&utm_campaign=Feed:+TheCraftSpa+(The+Craft+Spa)

I loved the elegant look of the card and thought it looked great in masculine colours, so I got out my Number of Years stamp set and the co-ordinating Large Number Framelit dies and started to look through my dsp. I really liked the Dapper Denim papers in the By The Shore dsp pack and chose the thick stripes and the ombre blue paper pattern for my panels.

I made the card base using Soft Sky cardstock. The stamped panels are Very Vanilla and the main stamped panel is layered onto Dapper Denim.

1-dscf8382The numbers 9 and 5 are stamped in Dapper Denim ink onto Very Vanilla and die cut using the Large Number dies. I stamped the ‘look whose turning’ sentiment, from the same stamp set, using the same ink colour. I though this looked a little plain so added the star banner from Tin of Tags stamp set in Soft Sky and Dapper Denim ink. I used the same banner image on the 2 smaller panels of Very Vanilla and added the ‘Happy Birthday’ from the Confetti Celebration stamp set to finish the card off. I made an envelope for the card using the same pack of dsp and the Envelope Punch Board.

I really like the way the card came together, it looks fantastic and thank you Amanda for the idea. Hope my father in law likes it.

Thank you so much for stopping by my blog today. Hope you like the project I shared and that you will drop by again soon

Mo x

Thoughtful Branches Team Challenge

Our team challenge this month asked us to create a project using only a currently available bundle, either a stamp/die combo or a stamp/punch combo. I chose the Thoughtful Branches bundle which is only available until the 31st August. It is an incredibly versatile stamp and die combo and can be used for multiple occasions, including Christmas and comes with some lovely sentiments. We were not allowed to use any dies or punches that were not included in the bundle.

I opted to make a ‘screen style card’ to show off some of the many things you can do with this set.

1-DSCF80831-DSCF80841-DSCF8085Having made this card I decided to step it up by decorating the screen base. I used the Envelope Punch Board to create the breaks in the top of the card and the Decorative Label Punch to create the legs.

1-DSCF8086Supplies

Thoughtful Branches Bundle
Acrylic Blocks A, B, C, D, E and H
Crumb Cake Cardstock
Early Espresso Cardstock
Whisper White Cardstock
Early Espresso Inkpad
Pear Pizzazz Inkpad
Cucumber Crush Inkpad
Crushed Curry Inkpad
Bermuda Bay Inkpad
Rose Red Inkpad
Cajun Craze re-inker
Crushed Curry Re-inker
Cherry Cobbler re-inker
Cucumber Crush re-inker
Stampin Trimmer
Bigshot + Multipurpose Platform
Precision Plate
Simply Scored Scoring Tool
Bone Folder
Stampin Scrub and Stampin Mist

Thank you so much for visiting my blog today, see you again soon

Mo x

Hooray for Confetti Celebration

I’m still playing with the Confetti Celebration stamp set and have CASE’d another card inspired by a card made by a German demo called Christina, check out her website at  https://finepaperarts.wordpress.com/2016/05/11/mein-erstes-werk-mit-den-neuen-farben

1-DSCF7949I love the large ‘hoorah’ stamp from this set and like Christina I chose one of the new 2014 – 2016 in-colors for my card base, in my case Dapper Denim and in hers Sweet Sugarplum. I stamped the ‘hooray’ on a piece of Whisper White cardstock in Emerald Envy, Crushed Curry, Dapper Denim, Rich Razzleberry, Real Red, Night of Navy, Watermelon Wonder and Smoky Slate inks.

I added a piece of dsp from the retired Cherry on Top stack to the bottom, cutting it at a slant and topped it with a small strip of Dapper Denim cardstock to cover the join. Adding this piece to a layer of Dapper Denim cardstock pulls the whole topper together. I then stamped the ‘hooray’ again in Dapper Denim ink and punched it out using the 2” circle punch and backed it onto a piece of Dapper Denim which I die cut using a circle from the Layering Circle Framelits and adding to the card front using dimensionals.

This makes a really cute, quick and easy card.

Having made this card using a lot of ink colours I thought I would strip it back and make a card using just one inkpad and a couple of pieces of cardstock.

1-DSCF7947I chose Night of Navy ink and stamped the ‘Yay’ sentiment on Whisper White cardstock punching it out using the Medium Star punch. If you don’t have the punch this is a really easy image to fussy cut……got to love a straight edge. Using the little star from the Confetti Celebration stamp set I stamped stars diagonally from the right bottom corner to the left top corner and added a scattering of punched Dazzling Diamonds Glimmer cardstock circles from my stash using Tombow. I had punched a pile of these for another project using the ½” and ¼” Handheld Punches; they were perfect for this card. The punched star was added using a dimensional.

Whilst looking for a big enough piece of Night of Navy cardstock on which to mat the stamped piece I came across the slightly shorter, wider piece I ended up using. I really liked the quirky look it gave to the card. I had planned to use a Thick Whisper White card base but I just didn’t like the way it looked and went with Crumb Cake cardstock instead. A really lovely masculine card and again quick and easy to make, great for a beginner.

To purchase any of the products go to http://www.stampinup.net/esuite/home/crafty-rootes/ –   click on the Shop Now tab. If you would like to join my team go to – http://www.stampinup.net/esuite/home/crafty-rootes/ – click on the Join the Fun tab.

Thanks for stopping by my blog, hope to see you again soon.

Mo x

Places You’ll Go

We have had some very good news this past weekend. Our son, after a long and difficult journey and subject to a final medical, has been offered a place at the Royal Military Academy Sandhurst.  Whoop whoop…….this is the first step to his becoming an officer in the Army and because it’s what I do I wanted to make him a card to congratulate him.

1-DSCF7983I chose the Places You’ll Go stamp set which seems appropriate and stamped the stand image in Basic Black Archival ink onto a piece of Whisper White card. The globe image was then stamped in Island Indigo ink, love photopolymer stamps, so much easier to line everything up. I thought it looked a bit bare so added some spots in Cucumber Crush, Pool Party and Chocolate Chip ink using the splatter stamp from the Timeless Textures stamp set. I added the sentiment in Island Indigo ink below the stamped image and as an accent I added a strip of Blooms and Bliss dsp to the bottom of the stamped panel.

I adhered the stamped panel to a smaller but longer piece of Basic Black card; I think it looks really quirky. I rounded the upper right corner of the stamped piece to balance it out before adding the whole piece to the Island Indigo card base.

1-DSCF7950I made a second version with a piece of retired Lost Lagoon washi tape instead of the dsp.

I hope you like the cards.

To purchase any of the products  click on the Shop Now tab. If you would like to join my team go to – http://www.stampinup.net/esuite/home/crafty-rootes/ – click on the Join the Fun tab.

Thanks for stopping by my blog, hope to see you again soon.

Mo x

.

Botanical Suite with Vellum

I am back today with a really quick card made using the gorgeous Botanical Blooms stamp set, with the addition of some vellum. This card was inspired by a card shared by Dena Rekow of the creatativity cave – https://uk.pinterest.com/pin/563724078338793359/

crafty-rootes.co.uk - Stampin Up Botanical Blooms and vellum

crafty-rootes.co.uk – Stampin Up Botanical Blooms and vellum

I used Watermelon Wonder, Wild Wasabi and 2 of the retiring 2014 – 2016 in colours, Hello Honey and Lost Lagoon ink pads. I will be really sad to see these 2 colours go, especially Lost Lagoon, which has been one of my favourites.

crafty-rootes.co.uk - Stampin Up Botanical Blooms and vellum

crafty-rootes.co.uk – Stampin Up Botanical Blooms and vellum

I mounted a selection of the stamps from the Botanical Blooms stamp set onto acrylic blocks and set about, randomly, stamping the images all over a piece of Whisper White cardstock. I then stamped the large Just for You sentiment from the co-ordinating Botanicals for You stamp set, using Archival Black Ink, onto a piece of the lovely, patterned, Botanical Gardens Vellum. Both of these items were in this years’ Sale-A-Bration brochure. When stamping on vellum remember to leave it for a few minutes to dry or it will smear. Ask me how I know……..

crafty-rootes.co.uk - Stampin Up Botanical Blooms and vellum

crafty-rootes.co.uk – Stampin Up Botanical Blooms and vellum

I adhered the Vellum piece to the stamped panel of Whisper White using the 2 way glue pen. I only applied the glue behind the lettering so that it would be hidden. I then mounted the feature panel to a Thick Whisper White card base using dimentionals.

I think it is a really pretty card. Hope you like and will stop bye in the future

Mo x

Unused Colour Challenge

So, yesterday I was at my upline Mikaela Titheridge’s (http://thecraftyoinkpen.blogspot.co.uk/) house with fellow team member Susan Merrey (http://craftyduckydoodah.blogspot.co.uk/) and the conversation got around to what are our least used Stampin Up! colours. It turns out we all had 3 or 4 colours that we rarely, if ever use. It is just so easy to reach for your favourite colours and colour combinations when designing a project.

The upshot of the conversation is that Mikaela has challenged the team to name our 4 least used colours and to design a project using at least 3 of them. Got to say I love a challenge…….. so, here goes….

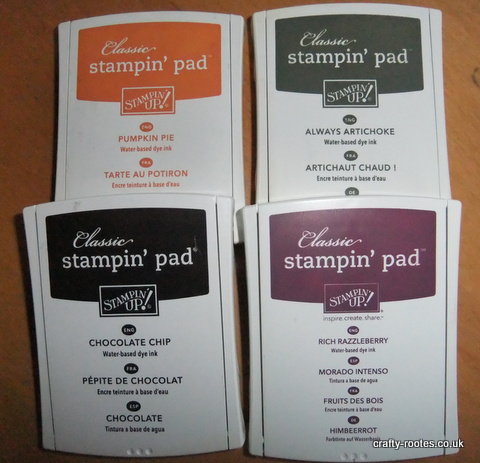
1-DSCF7531

Stampin Up! inkpads

My least used colours are Chocolate Chip (there were cries of horror from Susan when I announced this one), Always Artichoke, Rich Razzleberry, I like the colour but can never seem to combine it successfully with anything else.  And lastly, Pumpkin Pie, I struggle with oranges in general and could just as easily have picked Tangerine Tango or Tangelo Twist, except, I don’t have either of those … says it all really.

My first thought was to use the Gorgeous Grunge stamp set, but on reflection I thought this was a bit of a cop out. I decided I would up the anti by also choosing to use Very Vanilla cardstock and the Happy Patterns stencil pack. I have used both the cardstock and the stencils twice since I bought them and I thought they might work with this colour combo. I also decided to use all 4 of the colours I had selected for the challenge.

1-DSCF7525

I got out some sponge daubers, chose the dotted line stencil pattern and set too. I decided to use a sentiment from the Perfect Pairings stamp set, one of the Sale-A-Bration options which I have not yet used and the Lots of Labels dies, again, I bought these a while ago and haven’t used them. I was so happy with the result; bizarrely the colours seemed to work well together and gave the card quite a masculine look. I added a small amount of the Metallic Gold Thread and some Candy Dots to give the card a bit of texture and called it done.

1-DSCF7526

I decided to try another stencil from the same pack, there are 4 altogether. The sentiment is from Perfect Pairings and I added a small piece of Gold Glitter Tape, another Sale-A-Bration option and used the Banner triple Punch to flag the end of the sentiment.

1-DSCF7528

I have to say, I really like both of the cards and all of the colours I used. What a revelation. I also loved the stencils which were so quick and easy to use.

1-DSCF7529

Hope you like the projects and maybe you could try the challenge for yourself. Let me know how you get on.

Don’t forget Sale-A-Bration ends on the 31St March, so if you would like the Perfect Pairings stamp set or the Glitter tape, or indeed any of the other items go to my online shop at http://www.stampinup.net/esuite/home/crafty-rootes and hit the ‘shop now’ button. You can pick one free item for every £45 you spend.

Looking forward to seeing you again.

Mo x

Number of Years

Mum asked me if I would make a card to celebrate her sister in law’s 70th birthday in May……I know it is only mid-March but Mum does like to be ahead of the game.

I decided to use a card I made at my upline Mikaela Titheridges’ recent stamp-a-stack  (thecraftyoinkpen.blogspot.co.uk) as my base card. The card uses the Number of Years stamp set with the Large Numbers co-ordinating dies and pretty paper from the Birthday Bouquet dsp stack.

1-DSCF7464I stamped the leafy stamp from the Number of Years stamp set twice in Old Olive ink onto a panel of Whisper White cardstock and used Blushing Bride, Watermelon Wonder and Daffodil Delight ink to fill in the sweet little flowers. I then stamped the ‘Happy’ sentiment in Watermelon Wonder ink. I stamped the ‘Birthday’ in Watermelon Wonder and stamped the banner shape around it in Basic Grey ink and die cut the piece using the co-ordinating die.  I stamped the 70 in a couple of different colours before settling on Pool Party and I die cut them using the co-ordinating dies. To give it a bit of sparkle I added the numbers, using dimensionals to a punched circle of the gorgeous Blushing Bride Glimmer Paper, love that stuff, sparkly but not messy. I added a little piece of the shiny Pool Party Glitter ribbon and attached it with the sweet little Bow Paperclips. I added dimensionals to the back of the panel and added it between the 2 pieces of dsp.

Mum loved the card and thinks my Aunt will love it as well. Hope she does.

Thank you for stopping by my blog. Hope to see you again soon.

Mo x

Botanical Builders dies for Mother’s Day

So, last Sunday was Mothering Sunday in the UK and I used the Botanical Builder Framelits to make a card for my lovely Mum. She has a very plain and simple style and with this in mind I designed a fairly unfussy card for her.

I went for a 5 ½” by 5 ½” card base made using Naturals White cardstock which is sadly now retired. I just love the slightly flecked appearance of this cardstock which goes particularly well with flower and leaf stamps and dies. When the cardstock retired last year I bought a couple of packets which have sadly nearly all gone. The card would however, look just as lovely on Whisper White or Very Vanilla cardstock.

1-DSCF7428

I chose to die cut a variety of flowers and foliage using the Botanical Builders dies using Island Indigo, Rose Red, Blushing Bride, Soft Sky and Tip Top Taupe cardstock and inked the edges with the co-ordinating inks and sponge daubers. This gives them a lot of dimension and character

I arranged the flowers and foliage at the bottom right hand side of a panel of Naturals White cardstock and stamped ‘Happy Mother’s Day’ from the Teeny Tiny Sentiments stamp set in Rose Red.

1-DSCF7429

I mounted this piece onto a piece of Rose red cardstock and backed this with a piece of Tip Top Taupe cardstock. I then mounted the whole topper onto the card base using dimensionals.I added some of the gorgeous metal rimmed pearls to the larger flowers and scattered some basic pearls around the other flowers. I then made an envelope for the card from some retired Rose Red dsp.

I really liked the card and luckily, so did Mum. I hope you like it too.

Thanks for stopping by my blog and I hope to see you again

Mo x

Spring/Summer catalogue and Sale-A-Bration brochure

Introducing the Spring/Summer catalogue and the Sale-A-Bration brochure from Stampin Up!

Spring-Summer Occasions 206

Oh Happy Day… the Stampin Up! Spring/Summer Occasions Catalogue goes live today…Whoop Whoop. And, as if that isn’t exciting enough, the Sale-A-Bration brochure also launches today. What a great start to the New Year.

Sale-A-Bration 2016

For those new to Stampin Up, Sale-A-Bration is an annual 3 month event during which you can earn free goodies with qualifying orders. This year Sale-A-Bration runs from January 5th – 31st March and for every £45 you spend (minus P+P) you can choose 1 free item from the gorgeous Sale-A-Bration catalogue. How fab is that, who doesn’t love free stuff!

There are an incredible 7 stamp sets, 2 designer series paper (dsp) packs, 1 vellum stack and 1 Project life card pack in the Sale-A-Bration brochure to choose from and 51 …yes, 51 pages of fabulous goodies in the Spring / Summer Catalogue.

If you would like a copy of either or both catalogue/brochures please let me know and I will post one out to you. Alternatively go to http://www.stampinup.net/esuite/home/crafty-rootes/   click on shop now and the catalogues will reveal themselves in all their glory.

As a demonstrator I was able to pre-order from both catalogues a month ago and have been having a wonderful time playing with some of the lovely things, so check back here over the next few days to see what I have come up with.

You could also become a demonstrator by joining my team and during Sale-A-Bration Stampin Up! have an amazing offer, for £99 you can choose £130 worth of product – anything you like and you will also qualify for free Sale-A-Bration items.

A perk of being a demonstrator is access to new product a month before release to the public and a minimum 20% discount on all purchases. There is no obligation to run classes or host parties, you can join just to get the discount or you can turn it into a flexible business….it is entirely your choice. Contact me if you would like more information.

Mo x

Cutie Pie Christmas Packaging

Still on the theme of Christmas and inspired by my upline Mikaela Titheridge http://thecraftyoinkpen.blogspot.co.uk/2015/12/christmas-gift-packaging-voucher.html, I decided to make some Christmas boxes using the Cutie Pie die set. I bought this set a while ago but this is the first time I have used it and I have to say I love it.

Cutie Pie Christmas

Cutie Pie Christmas

The boxes are so easy to put together and the shape is much more versatile than it appears at first glance.

1-DSCF7239

The first Cutie Pie box I made was a CASE of a project on Mikaela’s blog.

I used the retired Naturals White cardstock which I absolutely loved. I was so sad when this retired from the catalogue in June. You could however, use any cardstock for this project. I used the large snowflake from the Holly Jolly Greetings stamp set stamped in Cherry Cobbler ink. I randomly stamp the tiny snowy star image from the same set in Sahara Sand ink as a background. To give some dimension to the box I attached one of the larger Snowflake Elements with a glue dot and added a basic rhinestone for the obligatory Christmas bling. A piece of retired Cherry Cobbler Ribbon was used to tie around the box.
1-DSCF7238

I decided to try the box again in a different colour and with different ribbon on the same cardstock. I used Cucumber Crush, one of the 2015 – 2017 in colours for the stamped snowflake and added a smaller wooden snowflake from my stash with a dimensional. I coloured the wooden snowflake using my Craft Whisper White ink and added a basic rhinestone. The background snowy stars I again stamped using Sahara Sand ink. The soft bow was made using the Dotted Lace Trim in Cucumber Crush. I think this colourway looks very fresh and modern compared to the richer Cherry Cobbler version, loved them both.

Mo x