


Hello and thank you for joining me for the Stamp ‘n Hop Blog Hop where we have been asked to CASE each other. CASEing means copy and share everything or copy and selectively edit and I have chosen the second version.
After a lot of research and fun looking at the blogs of my fellow demos I have chosen to CASE this card designed by Annette Elias
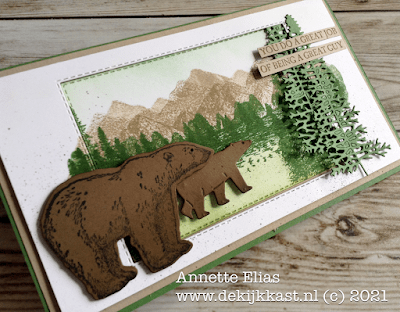
Annette Elias card featuring a Bear
I love her style, so different from mine. I tend to go for clean and simple where Annette loves to layer and embellish. I just wish I had her talent.
Here is my simplified version of her beautiful card using 2 of my favourite bundles.
Colours used in this project are:
To recreate the CASEd card, you will need:
Thick Basic White card base – 11¾” by 4⅛” scored at 5⅞”
Shaded Spruce card – 5⅜” by 3⅝”
Basic White card – 5¼” by 3½”
Soft Suede card – 3½” by 2”
Scrap Shaded Spruce card
Using Misty Moonlight ink, I inked up the detailed mountain image and stamped it onto the panel of Basic White card. I cleaned the stamped, reversed it on my block, inked it up again and stamped it off onto scrap paper before stamping it slightly higher and off set to give the mountains some depth.

www.crafty-rootes.co.uk – A bear CASEd card made for the Stamp ‘n Hop Blog Hop using the Arctic Bears & Mountain Air stamp sets
I stamped the row of trees at the base of the mountains in Shaded Spruce ink.
The row of trees image was then inked in Pool Party ink, turned upside down and stamped again three times without re-inking to give the illusion of water.

www.crafty-rootes.co.uk – A bear CASEd card made for the Stamp ‘n Hop Blog Hop using the Arctic Bears & Mountain Air stamp sets
I added a ½” punched circle to the skyline, to mask off a moon. Using a Blending Brush, I added Balmy Blue ink to make the sky. The birds were added with Misty Moonlight ink. The stamped panel was added to the Shaded Spruce layer with Multipurpose Liquid Adhesive and then mounted on the card front using the same glue.

www.crafty-rootes.co.uk – A bear CASEd card made for the Stamp ‘n Hop Blog Hop using the Arctic Bears & Mountain Air stamp sets
A tree was die cut from the scrap Shaded Spruce card using my Stampin’ Cut & Emboss Machine and the Majestic Mountains Dies. I added it to the card front with the liquid glue.

www.crafty-rootes.co.uk – A bear CASEd card made for the Stamp ‘n Hop Blog Hop using the Arctic Bears & Mountain Air stamp sets
The bear was stamped in Early Espresso ink onto the panel of Soft Suede and trimmed out with using scissors. I could have cut it out with the co-ordinating dies but wanted it cut tighter to the stamped edge. The bear was added to the card front on Dimensionals.

www.crafty-rootes.co.uk – A bear CASEd card made for the Stamp ‘n Hop Blog Hop using the Arctic Bears & Mountain Air stamp sets
I love this card almost as much as I loved Annette’s original.
Please click on the link below to see what my demo friend have to share today.
Order goodies/Join My Team
If you don’t have a Stampin’ Up! Demonstrator I would love to be yours! If you don’t have a catalogue and live in the UK, please let me know and I will be delighted to send you one. To order any supplies click on the “shop online” button at the top of the page. Alternatively, contact me and I would be happy to place an order for you. To join my team either click on the link above or click on the contact me button above and I will contact you with more information.
Thank you for visiting my blog today, come back soon.
Details of the products I used for this project can be found below.
Mo x
Supplies used:


