The cards I am sharing today were designed for a Stamp-a-Stack I held yesterday in a village hall near my home, featuring the gorgeous New Horizon designer series paper.
Colours used in these projects are:
Each attendee received a kit pack containing ½ a pack or New Horizon dsp, ½ a pack of Iridescent Rhinestones, 20 card bases, all the card stock layers to make 20 cards, 20 envelopes, Fine Art Ribbon, Denim Ribbon & Fresh Freesia Open Weave Ribbon.
Panelled Dragonfly cards

www.crafty-rootes.com – A card made for the New Horizons Stamp-a-Stack using the New Horizons dsp by Stampin’ Up!
Landscape
Thick Basic White card bases x 2
Garden Green card – 5⅜” by 3⅝” x 2
New Horizons dsp – 5¼” by 3½” x 2
Basic White card – 3” by 2” x 2
Vellum – 6” by 3”

www.crafty-rootes.com – A card made for the New Horizons Stamp-a-Stack using the New Horizons dsp by Stampin’ Up!
Portait
Misty Moonlight card base x 2
Basic White card – 5⅜” by 3⅞” x 2
New Horizon dsp – 5” by 3¾ ” x 2
Basic White card – 3” by 2”
Vellum – 6” by 3”
Basic White 5½” by 3¾” x 2 – inside
Canopy of Trees Cards

www.crafty-rootes.com – A card made for the New Horizons Stamp-a-Stack using the New Horizons dsp by Stampin’ Up!
Landscape
Evening Evergreen card base x 2
Polished Pink card 5 ½” by 3 ¾” x 2
New Horizon DSP 5⅜” by 3⅝” x 2
Basic White card – 5½” by 3¾” x 2 – inside
Basic White ½” strip
Polished Pink card ⅝” strip
Evening Evergreen card 6” by 4” for die cutting x 2

www.crafty-rootes.com – A card made for the New Horizons Stamp-a-Stack using the New Horizons dsp by Stampin’ Up!
Portrait
Fresh Freesia card bases x 2
New Horizon dsp – 5 ¾” by 4” x 2
Evening Evergreen card – 4 ¼” by 3⅝” x 2
New Horizon dsp – 4⅛” by 3½”
Basic White 2⅛” strip
Basic White – 5½” by 3¾” x 2 – inside
Evening Evergreen card 4” by 4” – die cutting x 2
Horizon Cards

www.crafty-rootes.com – A card made for the New Horizons Stamp-a-Stack using the New Horizons dsp by Stampin’ Up!
Small Panel
Soft Succulent card base x 2
Basic White card – 5⅝” by 2⅝”
New Horizon DSP 5½” by 2½” x 2
Basic White 5½” by 3¾” x 2
Basic White card ¼” strip

www.crafty-rootes.com – A card made for the New Horizons Stamp-a-Stack using the New Horizons dsp by Stampin’ Up!
Larger Panel
Calypso Coral card base x 2
Basic White – 5½” by 3¾” x 4 – 2 for the inside
New Horizon DSP 5⅜” by 3⅝” x 2
Scrap Basic White and Evening Evergreen card
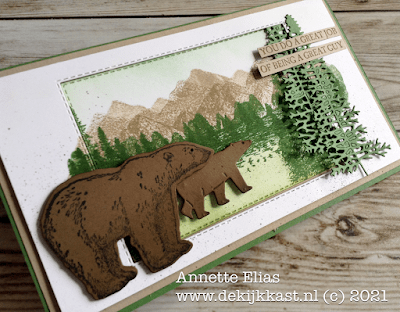
Mountain Scenery

www.crafty-rootes.com – A card made for the New Horizons Stamp-a-Stack using the New Horizons dsp by Stampin’ Up!
Portrait
Soft Succulent card base x 2
Basic White card – 5⅝” by 2⅝”
New Horizon DSP 5½” by 2½” x 2
Basic White 5½” by 3¾” x 2
Basic White card ¼” strip

www.crafty-rootes.com – A card made for the New Horizons Stamp-a-Stack using the New Horizons dsp by Stampin’ Up!
Landscape
Calypso Coral card base x 2
Basic White – 5½” by 3¾” x 4 – 2 for the inside
New Horizon DSP 5⅜” by 3⅝” x 2
Scrap Basic White and Evening Evergreen card
Sail Boat Cards

www.crafty-rootes.com – A card made for the New Horizons Stamp-a-Stack using the New Horizons dsp by Stampin’ Up!
Portrait
Misty Moonlight card base x 2
Fresh Freesia card – 4⅞” by 3⅛” x 2
New Horizon dsp 4¾” by 3” x 2
Basic White 5½” by 3¾” x 2
Basic White strip ⅜”
New Horizon Cards

www.crafty-rootes.com – A card made for the New Horizons Stamp-a-Stack using the New Horizons dsp by Stampin’ Up!
Landscape
Blackberry Bliss card base x 2
Fresh Freesia card – 5⅝” by 3⅞” x 2
Basic White 5½” by 3¾” x 4 – 2 for the inside
Misty Moonlight card – 3¼” by 3¼”
Basic White card – 3¼” by 3¼”
Scrap Basic White
Basic White ⅜” strips

www.crafty-rootes.com – A card made for the New Horizons Stamp-a-Stack using the New Horizons dsp by Stampin’ Up!
The ladies really enjoyed making these cards, we had such a fun day.
Order goodies/Join My Team
If you don’t have a Stampin’ Up! Demonstrator I would love to be yours! If you don’t have a catalogue and live in the UK, please let me know and I will be delighted to send you one. To order any supplies click on the “shop online” button at the top of the page. Alternatively, contact me and I would be happy to place an order for you. To join my team either click on the link above or click on the contact me button above and I will contact you with more information.
Details of the products I used for this project can be found below.
Mo x
Supplies used: