I love the Garden Gatherings stamp set and dies and I sorry that they will be leaving us soon. I have used them to make a pretty, feminine birthday card.
I created the garden gatherings card using the following supplies:
Bubble Bath card base – 8¼” by 5⅞” scored at 4⅛” on the long side Melon Mambo – 3⅞” by 3⅛” – rounded upper right corner Basic White – 3¾” by 3”- rounded upper right corner Basic White, Daffodil Delight & Peaceful Pine strips – ¾” by ⅜ Basic White – 5½” by 3¾” – for the inside Scrap Basic White and Velvet Meadow dsp
I began by tamping the sentiment onto the smaller panel of Basic White card using Peaceful Pine ink. I stamped the words one at a time as I wanted them stacked rather than side by side. The stamped panel was then adhered to the Melon Mambo and then mounted onto to the Bubble Bath card front on Dimensionals.
A handmade card made using Stampin’ Up! product featuring the Garden Gatherings stamp set and dies.
The group of stems were stamped, twice with Peaceful Pine ink onto scrap Basic White card. The flowers were added with Daffodil Delight ink before die cutting them out.
A handmade card made using Stampin’ Up! product featuring the Garden Gatherings stamp set and dies.
From scrap Velvet Meadow designer series paper (dsp) I die cut the wide, squat vase. I glued the stems of the blossoms to the back of the vase and added the whole piece to the card front on Dimensionals.
A handmade card made using Stampin’ Up! product featuring the Garden Gatherings stamp set and dies.
I flagged the ends of the three strips of card and tucked them up under the raised panel.
A handmade card made using Stampin’ Up! product featuring the Garden Gatherings stamp set and dies.
A trio of 2025 – 2027 In Color finished the card.
A handmade card made using Stampin’ Up! product featuring the Garden Gatherings stamp set and dies.
Order goodies/Join My Team
I would love to be your demonstrator if you don’t already have one and live in the UK. I would also be delighted to send you a catalogue if you do not have a demonstrator. I would be happy to place an order for you, or you can order directly by clicking on the “shop online” button.
Contact me for information about joining my team or click on the ‘Join My Team’ button
Details of the products I used for this project can be found below.
Hello and welcome to the Ink. Stamp. Share Blog Hop where we are sharing side easel cards. I have made my version using the Flowering Meadow stamp set, dies and Velvet Meadow dsp.
I created the meadow side easel card using the following supplies:
Thick Basic White card base – 8¼” by 5⅞” scored at 4⅛” on the long side Peaceful Pine – 4” by 2⅜” Velvet Meadow dsp – 3⅞” by 2¼” Peaceful Pine – 3⅞” by 3” Velvet Meadow dsp – 3¾” by 2⅞” Scrap Basic White & Peaceful Pine
Using the Paper Trimmer and with the 5⅞” side of the card base at the top, I cut down at the 2½” mark to the central scoreline. I rotated the card to the right and cut away the 2½” panel leaving a 3⅜” panel. I then scored the remaining panel at 2¼” to form the easel section.
www.crafty-rootes.co.uk – The Flowering Meadow stamp set and co-ordinating dies used with the Velvet Meadow dsp to make a side easel birthday card – Ink. Stamp. Share Blog Hop
I adhered the 3⅞” by 2¼” piece of Velvet Meadow dsp to the slightly larger panel of Peaceful Pine card and then to the right-hand side of the Thick Basic White card.
www.crafty-rootes.co.uk – The Flowering Meadow stamp set and co-ordinating dies used with the Velvet Meadow dsp to make a side easel birthday card – Ink. Stamp. Share Blog Hop
On scrap Basic White card, I stamped the double flowers with Bubble Bath ink and added the flower centres with Berry Burst ink. The cluster of small flowers were stamped twice with Berry Burst ink and added the centres with Peaceful Pine ink.
www.crafty-rootes.co.uk – The Flowering Meadow stamp set and co-ordinating dies used with the Velvet Meadow dsp to make a side easel birthday card – Ink. Stamp. Share Blog Hop
The pom-pom flowers were stamped with Daffodil Delight ink. The three types of stems were stamped with Peaceful Pine ink.
www.crafty-rootes.co.uk – The Flowering Meadow stamp set and co-ordinating dies used with the Velvet Meadow dsp to make a side easel birthday card – Ink. Stamp. Share Blog Hop
I die cut all the images and a couple of leafy sprigs from scrap Peaceful Pine card. The flowers were arranged on the remaining piece of Velvet Meadow dsp using Dimensionals and /or Liquid Adhesive which was then glued to the larger panel of Peaceful Pine card.
www.crafty-rootes.co.uk – The Flowering Meadow stamp set and co-ordinating dies used with the Velvet Meadow dsp to make a side easel birthday card – Ink. Stamp. Share Blog Hop
I stamped the sentiment, from the Banner Sayings stamp set on scrap Basic White card with Peaceful Pine ink and punched it out using the Three Banner Punch. I added the sentiment with Dimensionals.
www.crafty-rootes.co.uk – The Flowering Meadow stamp set and co-ordinating dies used with the Velvet Meadow dsp to make a side easel birthday card – Ink. Stamp. Share Blog Hop
The floral panel was then glued to the bottom flap of the easel portion. I added the second cluster of Berry Burst flowers to add as the stopper for the easel portion of the card.
Please hop on to see what my crafty friends have created to share with us today.
I would love to be your demonstrator if you don’t already have one and live in the UK. I would also be delighted to send you a catalogue if you do not have a demonstrator. I would be happy to place an order for you, or you can order directly by clicking on the “shop online” button.
Contact me for information about joining my team or click on the ‘Join My Team’ button
Details of the products I used for this project can be found below.
Mo x
I created the velvet meadow card using the following supplies:
Thick Basic White card base – 8¼” by 5⅞” scored at 4⅛” on the long side Cloud Cover – 5⅜” by 3⅝” Velvet Meadow dsp – 5¼” by 3½” Cloud Cover – 4⅛” by 2⅜” Basic White – 4” by 2¼” Peaceful Pine – 2½” by ¾” Scrap Velvet Meadow dsp
The large dsp panel was glued to the larger Cloud Cover layer with Multipurpose Liquid Adhesive.
www.crafty-rootes.co.uk – The Flowering Meadow stamp set and co-ordinating dies used with the Velvet Meadow dsp to make to make a pretty card
A length of Peaceful Pine Bordered Ribbon was wrapped around the panel and secured on the back with Sellotape. The panel was then glued to the Thick Basic White card front.
www.crafty-rootes.co.uk – The Flowering Meadow stamp set and co-ordinating dies used with the Velvet Meadow dsp to make to make a pretty card
From scrap Velvet Meadow dsp I die cut a couple of pairs of pink flowers and placed them on the small white piece of card to get an idea of position.
www.crafty-rootes.co.uk – The Flowering Meadow stamp set and co-ordinating dies used with the Velvet Meadow dsp to make to make a pretty card
I moved the flowers aside and stamped the double stem, bases for the pom-pom flowers and a couple of sprigs with Peaceful Pine ink. The pom-pom flowers were then added in Cloud Cover ink. The stamped piece was then glued to the smaller piece of Cloud Cover card before the whole piece was added to the card front on Dimensionals.
www.crafty-rootes.co.uk – The Flowering Meadow stamp set and co-ordinating dies used with the Velvet Meadow dsp to make to make a pretty card
I stamped the sentiment in Versamark ink on the small piece of Peaceful Pine card. I covered it with White Embossing Powder and set it using a Heat Tool. I punched it out with the Three Banner Punch before adding it to the card front.
www.crafty-rootes.co.uk – The Flowering Meadow stamp set and co-ordinating dies used with the Velvet Meadow dsp to make to make a pretty card
A ribbon bow and a trio of 2025 – 2027 In Color Flat Pearls finished the card.
Order goodies/Join My Team
I would love to be your demonstrator if you don’t already have one and live in the UK. I would also be delighted to send you a catalogue if you do not have a demonstrator. I would be happy to place an order for you, or you can order directly by clicking on the “shop online” button.
Contact me for information about joining my team or click on the ‘Join My Team’ button
Details of the products I used for this project can be found below.
Hello and welcome to the Stampin’ Dreams Blog Hop where we are sharing anything but a card. I have made a self-closing box and decorated it with the lovely Velvet Meadow dsp.
I created the self-closing box using the following supplies:
Berry Burst card – 8½” by 6” Velvet Meadow dsp – 3¾” by 3¾” Scrap Basic White card
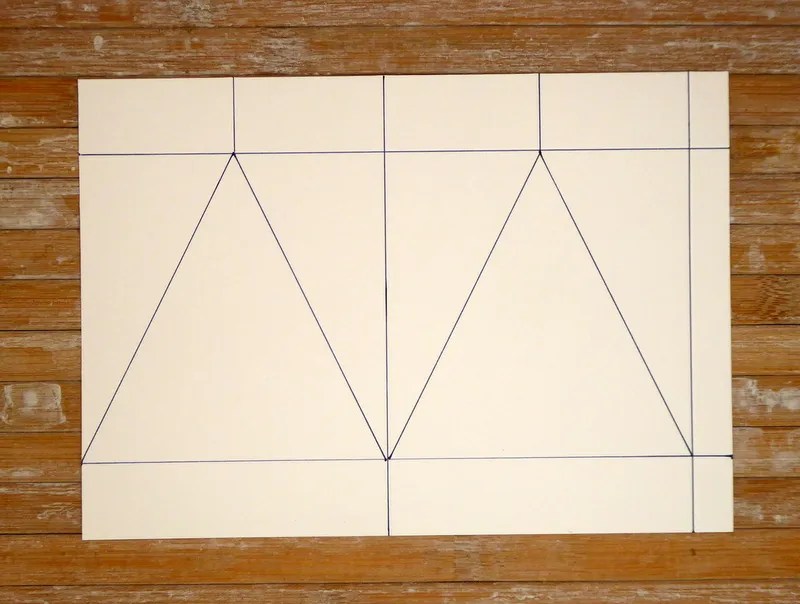
Using my Simply Scored Scoring Tool, I scored the Berry Burst card. On the long side at 4” and 8”. On the short side at 1” and 5”.
www.crafty-rootes.co.uk – The Velvet Meadow designer series paper used to make a pretty self-closing box – Stampin’ Dreams Blog Hop
With the long side at the top of the scoreboard and the ½” strip on the right I scored at 2” and 6” but only as far as the first scoreline. I repeated this on White cardstock to make it easier for you to see.
www.crafty-rootes.co.uk – The Velvet Meadow designer series paper used to make a pretty self-closing box – Stampin’ Dreams Blog Hop
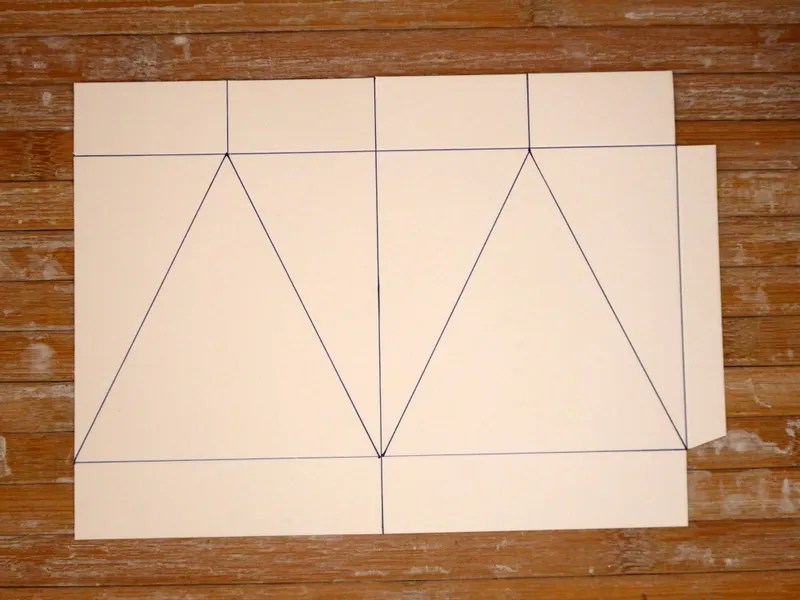
Taking a ruler and the Take Your Pick Scoring Attachment I scored from the bottom of the 2” scoreline to the right-hand corner of the rectangle and then again to the left-hand corner. I repeated this from the bottom of the 6” scoreline to both other corners.
www.crafty-rootes.co.uk – The Velvet Meadow designer series paper used to make a pretty self-closing box – Stampin’ Dreams Blog Hop
I cut away the small rectangles at either end of the ½” tab and cut up all the remaining scorelines along the long sides. I folded and burnished on all the scorelines beginning with the diagonal scorelines. The cardstock was then folded on the 4” fold and glued to the ½” tab to close the box.
www.crafty-rootes.co.uk – The Velvet Meadow designer series paper used to make a pretty self-closing box – Stampin’ Dreams Blog Hop
Using a pencil, I marked one side of the 3¾” square of Velvet Meadow dsp at 1⅞”. I used my Paper Trimmer to cut from the 1⅞” mark to the lower right corner and then the lower left corner giving three triangles. These were glued to the front of the self-closing box. The four tabs forming the bottom of the box were then glued together.
www.crafty-rootes.co.uk – The Velvet Meadow designer series paper used to make a pretty self-closing box – Stampin’ Dreams Blog Hop
I wrapped a length of retired Silver Edged Berry Burst Ribbon around the box and tied it in a bow at the front of the box.
www.crafty-rootes.co.uk – The Velvet Meadow designer series paper used to make a pretty self-closing box – Stampin’ Dreams Blog Hop
The sentiment was then stamped on scrap Basic White card in Berry Burst ink. I die cut it using the Fragrant Layers Dies, passing it through the machine twice to make the label smaller. I added the label to the box with a Mini Glue Dot.
Please hop on to see what my fellow crafters are sharing with us today.
I would love to be your demonstrator if you don’t already have one and live in the UK. I would also be delighted to send you a catalogue if you do not have a demonstrator. I would be happy to place an order for you, or you can order directly by clicking on the “shop online” button.
Contact me for information about joining my team or click on the ‘Join My Team’ button
Details of the products I used for this project can be found below.
Hello and Welcome to the Share It Sunday Blog Hop where we are sharing a project we have been working on. I have chosen to share the cards I designed for my recent Summer Stamp-a-Stack using the Flowering Meadow stamp set and co-ordinating dies along with the gorgeous Velvet Meadow designer series paper (dsp).
In their kit each person received the Flowering Meadow stamp set and the Flowering Meadow dies, half a pack of Velvet Meadow designer series paper – 4 ink spots filled with Bubble Bath, Berry Burst, Daffodil Delight and Peaceful Pine inks, a pack of Iridescent Pearl Jewels, 20 Basic White Envelopes, 20 card bases and all the layers and die cut labels need to make 20 cards – 2 each of 10 designs plus a little chocolate treat. I also labelled each piece of dsp, front and back and provided a cheat sheet so that the ladies knew which sheet to use for which cards.
Card 1- Pink Floral Card
Berry Burst card bases – 8¼” by 5⅞” – scored at 4⅛” x 2 Basic White – 5” by 3¼” x 2 Velvet Meadow dsp – 5” by 3¼” x 2 – Sheet 5A Basic White circle x 2 – die cut with Stylish Shapes dies Basic White – 2⅝” by ½” x 2 Basic White – 5½” by 3¾” x 2 – for the inside
www.crafty-rootes.co.uk – The Flowering Meadow stamp set and co-ordinating dies used with the Velvet Meadow designer series paper to make cards for my June 2026 Stamp-a-Stack
Card 2 – Abstract dsp
Berry Burst card base – 8¼” by 5⅞” scored at 4⅛” x 2 Velvet Meadow dsp – 5¾” by 4¼” x 2 – Sheet 1A Basic White circle x 2 – die cut with Stylish Shapes dies Basic White – 2⅝” by ⅜ x 2 Basic White card – 5½” by 3¾” x 2- for the inside Velvet Meadow dsp – Sheet 3A
www.crafty-rootes.co.uk – The Flowering Meadow stamp set and co-ordinating dies used with the Velvet Meadow designer series paper to make cards for my June 2026 Stamp-a-Stack
Card 3 – Lots of Pink Flowers
Bubble Bath card base – 8¼” by 5⅞” – scored at 4⅛” x 2 Berry Burst – 5⅜” by 3⅝” x 2 Velvet Meadow dsp – 5¼” by 3½” x 2 – Sheet 3A Basic White circle x 2 – die cut with Stylish Shapes dies Basic White – 2⅝” by ⅜ x 2 Basic White – 5½” by 3¾” x 2 for the inside Scrap Peaceful Pine card
www.crafty-rootes.co.uk – The Flowering Meadow stamp set and co-ordinating dies used with the Velvet Meadow designer series paper to make cards for my June 2026 Stamp-a-Stack
Card 4 – Floral Arch
Cloud Cover card base – 8¼” by 5⅞” – scored at 4⅛” x 2 Peaceful Pine – 4⅛” by 2⅜” – x 4 – x 2 Velvet Meadow – 4⅛” by ½” – x 2 – Sheet 6A Velvet Meadow – 4⅛” by 1” – x 2 – Sheet 5B Velvet Meadow – 4⅛” by ½” – x 2 – Sheet 2A Berry Burst Arch x 2 – die cut with Everyday Arches dies Basic White circle x 2 – die cut with Everyday Arches dies Scrap Bubble Bath, Berry Burst and Peaceful Pine card
www.crafty-rootes.co.uk – The Flowering Meadow stamp set and co-ordinating dies used with the Velvet Meadow designer series paper to make cards for my June 2026 Stamp-a-Stack
Card 5 – Dark Pink Daisies
Cloud Cover card base – 8¼” by 5⅞” – scored at 4⅛” x 2 Peaceful Pine – 5¼” by 3½” x 2 Velvet Meadow – 5⅛” by 1⅞” – x 2 – Sheet 4A Velvet Meadow – 5⅛” by ½” – x 2 – Sheet 6A Berry Burst – 5⅛” by ⅛” x 2 Basic White labels x 2 – die cut with Stylish Shapes Dies Basic White – 5½” by 3¾” x 2 – for the inside Scrap Bubble Bath, Berry Burst and Peaceful Pine
www.crafty-rootes.co.uk – The Flowering Meadow stamp set and co-ordinating dies used with the Velvet Meadow designer series paper to make cards for my June 2026 Stamp-a-Stack
Card 6 – Wildflowers
Thick White card bases – 8¼” by 5⅞” – scored at 4⅛” x 2 Velvet Meadow dsp – 5⅞” by 2¾” x 2 – Sheet 2A Berry Burst – 5⅞” by ⅜” x 4 Basic White – 2½” by ½” x 2 Berry Burst – 2½” by ⅜” x 2
www.crafty-rootes.co.uk – The Flowering Meadow stamp set and co-ordinating dies used with the Velvet Meadow designer series paper to make cards for my June 2026 Stamp-a-Stack
Card 7 – Bunch of Flowers
Peaceful Pine card base – 8¼” by 5⅞” – scored at 4⅛” x 2 Basic White – 5⅜” by 3⅝” x 2 Velvet Meadow dsp – 5⅛” by 3½ “x 2 – Sheet 2B or 3B Berry Burst – die cut Arch x 2 using Everyday Arches Dies Basic White – die cut Arch x 2 using Everyday Arches Dies Basic White – 5½” by 3¾” x 2 – for the inside Strip of Berry Burst and Bubble Bath – 4⅛” by ⅜” – 2 of each colour Basic White – 2” by ⅜” x 2 Scrap Basic White and Peaceful Pine
www.crafty-rootes.co.uk – The Flowering Meadow stamp set and co-ordinating dies used with the Velvet Meadow designer series paper to make cards for my June 2026 Stamp-a-Stack
Card 8 – Just a Note
Thick White card base – 8¼” by 5⅞” – scored at 4⅛” x 2 Peaceful Pine – 5⅝” by 3⅞” x 2 Velvet Meadow dsp – 5½” by 3¾” x 2 – Sheet 2A Berry Burst – 5⅝” by ⅛” x 2 Basic White circle x 2 – die cut with Stylish Shapes dies
www.crafty-rootes.co.uk – The Flowering Meadow stamp set and co-ordinating dies used with the Velvet Meadow designer series paper to make cards for my June 2026 Stamp-a-Stack
Card 9 – Elegant Bouquet
Peaceful Pine card base – 8¼” by 5⅞” – scored at 4⅛” x 2 Basic White – 5⅜” by 3⅝” x 2 Velvet Meadow dsp – 5¼” by 3½” x 2 – Sheet 2A or 6B Basic White – 5½” by 3¾” x 4 – 2 for the inside Scrap Basic White & dsp sheet 5A, 2A or 6B
www.crafty-rootes.co.uk – The Flowering Meadow stamp set and co-ordinating dies used with the Velvet Meadow designer series paper to make cards for my June 2026 Stamp-a-Stack
Card 10 – Puzzle Slider
Thick White card base – 9½” by 4” – scored at 1”, 2”, 7½” and 8½” x 2 Thick Basic White – 5½” by 4”, cut at 2” on short side and then each 2” strip cut at 3¼” Velvet Meadows dsp – 5¼” by 3¾” x 2 – Sheet 6A Berry Burst – circle x 2 – die cut with Stylish Shapes dies Basic White – circle x 2 – die cut with Stylish Shapes dies Velvet Meadow dsp – 5⅜” by 3⅞” – for the inside – Sheet 5B or 2B
www.crafty-rootes.co.uk – The Flowering Meadow stamp set and co-ordinating dies used with the Velvet Meadow designer series paper to make cards for my June 2026 Stamp-a-Stack
www.crafty-rootes.co.uk – The Flowering Meadow stamp set and co-ordinating dies used with the Velvet Meadow designer series paper to make cards for my June 2026 Stamp-a-Stack
Please hop on to see what my crafty friends have been using lately.
I would love to be your demonstrator if you don’t already have one and live in the UK. I would also be delighted to send you a catalogue if you do not have a demonstrator. I would be happy to place an order for you, or you can order directly by clicking on the “shop online” button.
Contact me for information about joining my team or click on the ‘Join My Team’ button
Details of the products I used for this project can be found below.
Hello and welcome to the Ink & Inspirations Blog Hop where we are creating projects inspired by a sketch. I have made my card using the pretty Pop-Up Petals stamp set and co-ordinating dies.
I created the rose in a vase card using the following supplies:
Bubble Bath card base – 8¼” by 5⅞” scored at 4⅛” on the long side Lost Lagoon – 5” by 3⅜” Basic White – 5½” by 3¾” x 2 – one for the inside Velvet Meadow dsp – 2⅞” by ½” Bubble Bath – 3⅜” by 2⅛” Basic White – 3¼” by 2” Bubble Bath – 1⅝” by ½” Scrap Basic White and Artisan Sketched Garden dsp
I ran one of the largest panels of Basic White card through the Cut & Emboss Machine inside the Lovely Stripes Embossing Folder. The embossed panel was then trimmed down to 4⅞” by 3 ¼” before it was adhered to the Lost lagoon layer. The whole piece was glued to the Bubble Bath card front.
www.crafty-rootes.co.uk – The Pop-up Petals stamp set and co-ordinating dies used with the Lovely Stripes Embossing Folder to make a thank you card – Ink & Inspirations Blog Hop
The three pieces of Velvet Meadow dsp were added to the card front using Mini Glue Dots.
I glued the smaller piece of Basic White card to the slightly larger layer of Bubble Bath card and added it over the strips of dsp on Dimensionals.
www.crafty-rootes.co.uk – The Pop-up Petals stamp set and co-ordinating dies used with the Lovely Stripes Embossing Folder to make a thank you card – Ink & Inspirations Blog Hop
The rose image, from the Pop-Up Petals stamp set was stamped with Black ink onto scrap Basic White card and coloured using Blends Pens – Bubble Bath and Lost Lagoon.
www.crafty-rootes.co.uk – The Pop-up Petals stamp set and co-ordinating dies used with the Lovely Stripes Embossing Folder to make a thank you card – Ink & Inspirations Blog Hop
The vase was die cut from a scrap of Artisan Sketched Garden dsp – I actually die cut the vase from several different dsp scraps before settling on this one. The rose was cut down and added to the back of the vase with a Mini Glue Dot before the vase and flower were glued to the card front.
www.crafty-rootes.co.uk – The Pop-up Petals stamp set and co-ordinating dies used with the Lovely Stripes Embossing Folder to make a thank you card – Ink & Inspirations Blog Hop
The sentiment was stamped in Lost Lagoon ink onto the small piece of Bubble Bath card and added to the card front. I used tape to mask off the words I didn’t want to use before stamping it down.
www.crafty-rootes.co.uk – The Pop-up Petals stamp set and co-ordinating dies used with the Lovely Stripes Embossing Folder to make a thank you card – Ink & Inspirations Blog Hop
To finish the card I added three small black dots from my stash, a trio of Sunset Sparkle Sequins and a Baker’s Twine bow.
Please hop on to see what my fellow demos have created using this sketch.
I would love to be your demonstrator if you don’t already have one and live in the UK. I would also be delighted to send you a catalogue if you do not have a demonstrator. I would be happy to place an order for you, or you can order directly by clicking on the “shop online” button.
Contact me for information about joining my team or click on the ‘Join My Team’ button
Details of the products I used for this project can be found below.
Here are the cards I have made for the Christmas Stampathon where our theme is trees, trees, trees. I have made my cards using the Ornamental Christmas Dies and the Velvet Meadow designer series paper.
I created the Velvet Tree card using the following supplies:
Card bases – 8¼” by 5⅞” scored at 4⅛” on the long side – I chose 2 Fresh Freesia and 2 Lost Lagoon Pretty Peacock – 5⅛” by 3⅜” x 4 Basic White -5” by 3¼” x 4 Basic White – 5½” by 3¾” x 4 for the inside Velvet Meadow dsp
Using a Blending Brush I added Fresh Freesia ink to the centre of the 5” by 3¼” panels of Basic White card.
www.crafty-rootes.co.uk – The Ornamental Christmas dies and Velvet Meadow designer series paper (dsp) used to tree themed Christmas cards – Christmas Stampathon
The sentiment, from the Festive Friends stamp set, currently on the last chance list was stamped with Pretty Peacock ink below the inked area. The panel was then glued to the Pretty Peacock layer and then to the card base.
www.crafty-rootes.co.uk – The Ornamental Christmas dies and Velvet Meadow designer series paper (dsp) used to tree themed Christmas cards – Christmas Stampathon
I die cut the trees from Velvet Meadow designer series paper (dsp) using the Ornamental Christmas dies.
www.crafty-rootes.co.uk – The Ornamental Christmas dies and Velvet Meadow designer series paper (dsp) used to tree themed Christmas cards – Christmas Stampathon
I used a Blending Brush to add Lost Lagoon ink to the edges of the die cut trees to give a little definition. The trees were then mounted onto the inked panel on Dimensionals.
www.crafty-rootes.co.uk – The Ornamental Christmas dies and Velvet Meadow designer series paper (dsp) used to tree themed Christmas cards – Christmas Stampathon
A trio of Purple Adhesive-backed Sequins completed the cards.
www.crafty-rootes.co.uk – The Ornamental Christmas dies and Velvet Meadow designer series paper (dsp) used to tree themed Christmas cards – Christmas Stampathon
Order goodies/Join My Team
I would love to be your demonstrator if you don’t already have one and live in the UK. I would also be delighted to send you a catalogue if you do not have a demonstrator. I would be happy to place an order for you, or you can order directly by clicking on the “shop online” button.
Contact me for information about joining my team or click on the ‘Join My Team’ button
Details of the products I used for this project can be found below.
Mo x
Supplies used:
Loading Comments...
By continuing to use the site, you agree to the use of cookies. more information
The cookie settings on this website are set to "allow cookies" to give you the best browsing experience possible. If you continue to use this website without changing your cookie settings or you click "Accept" below then you are consenting to this.