An Easter Bunny card made using the adorable Fluffiest Friends stamp set and the Artistic Mix Decorative Masks from Stampin' Up!

Easter Bunny card

I have an Easter Bunny card to share with you today, made using the Fluffiest Friends stamps set.

Colours in this card are:


To recreate the Easter bunny card, you will need:

Balmy Blue card base – 8¼” by 5⅞” – scored at 4⅛” – Rounded upper left corner
Basic Black card – 5¼” by 3½” – Rounded upper left corner
Granny Apple Green card – 5⅛” by 3⅜” – Rounded upper left corner
Basic White card – 5” by 3¼” – Rounded upper left corner
Basic White card – 5½” by 3¾” – Rounded upper left corner
Scrap Basic White & Granny Apple Green card


Using a Blending Brush and the Artistic Mix Masks, I added some Balmy Blue ink to make a background on the 5” by 3¼” piece of Basic White card. The inked panel was adhered to the Granny Apple Green layer, then to the Basic Black panel and finally to the Balmy Blue card base.


An Easter Bunny card made using the adorable Fluffiest Friends stamp set and the Artistic Mix Decorative Masks from Stampin' Up!

www.crafty-rootes.com – The adorable Fluffiest Friends stamp set and the Artistic Mix Decorative Masks used to make an Easter Bunny card

The sentiment, from the retired Itty Bitty Greetings stamp set, was stamped at the bottom of the card front in Memento Tuxedo Black ink.


An Easter Bunny card made using the adorable Fluffiest Friends stamp set and the Artistic Mix Decorative Masks from Stampin' Up!

www.crafty-rootes.com – The adorable Fluffiest Friends stamp set and the Artistic Mix Decorative Masks used to make an Easter Bunny card

The sweet little bunny from the Fluffiest Friends stamp set, was stamped on Scrap Basic White card in Memento Tuxedo Black ink. I coloured the image using the following Blends Pens – Petal Pink, Bubble Bath, Berry Burst, Lemon Lolly, Balmy Blue and Crumb Cake.


An Easter Bunny card made using the adorable Fluffiest Friends stamp set and the Artistic Mix Decorative Masks from Stampin' Up!

www.crafty-rootes.com – The adorable Fluffiest Friends stamp set and the Artistic Mix Decorative Masks used to make an Easter Bunny card

The bunny was die cut using the Fluffiest Friends Dies. I also die cut a couple of strips of ‘grass’ were die cut from scrap Granny Apple Green card. The bunny was added to the card front on Dimensionals and the grass added.


An Easter Bunny card made using the adorable Fluffiest Friends stamp set and the Artistic Mix Decorative Masks from Stampin' Up!

www.crafty-rootes.com – The adorable Fluffiest Friends stamp set and the Artistic Mix Decorative Masks used to make an Easter Bunny card

A trio of Adhesive -Backed Solid Gems completed the card. Adorable, if I say so myself.


An Easter Bunny card made using the adorable Fluffiest Friends stamp set and the Artistic Mix Decorative Masks from Stampin' Up!

www.crafty-rootes.com – The adorable Fluffiest Friends stamp set and the Artistic Mix Decorative Masks used to make an Easter Bunny card

Order goodies/Join My Team

If you don’t have a Stampin’ Up! Demonstrator I would love to be yours!  If you don’t have a catalogue and live in the UK, please let me know and I will be delighted to send you one.  To order any supplies click on the “shop online” button at the top of the page. Alternatively, contact me and I would be happy to place an order for you. To join my team either click on the link above or click on the contact me button above and I will contact you with more information.

Details of the products I used for this project can be found below.

Mo x

Supplies used:


The stamp etching technique demonstrated using the pretty Splendid Thoughts stamp set by Stampin' Up! for the Stamping Inkspirations Blog Hop

Splendid Thoughts card – Stamping Inkspirations Blog Hop

Hello and welcome to the Stamping Inkspirations Blog Hop where we are sharing projects made using the stamp etching technique. Now, I have to confess I hadn’t heard of this technique but after a little research found out enough to try it and it is such fun. I have used the Splendid Thoughts stamp set to make my card.

Colours used in this card are:


To recreate the splendid thoughts card, you will need:

Basic Black card base – 8¼” by 5⅞” – scored at 4⅛”
Poppy Parade card – 5½” by 3¾”
Basic White card – 5⅜” by 3⅝”
Poppy Parade card – 4¼” by 3”
Basic Black card – 4⅛” by 2⅞”
Basic White card – 4¼” by 3”
Poppy Parade card – 2½” by 1¼”
Basic White card – 2½” by 1¼”
Basic White card – 5½” by 3¾” – for the inside


 I embossed the 5⅜” by 3⅝” panel of Basic White card using the Distressed Tile Embossing Folder. The embossed panel was then glued to the larger Poppy Parade layer.


The stamp etching technique demonstrated using the pretty Splendid Thoughts stamp set by Stampin' Up! for the Stamping Inkspirations Blog Hop

www.crafty-rootes.co.uk – The pretty Splendid Thoughts stamp set used to demonstrate the stamp etching technique for the Stamping Inkspirations Blog Hop

A length of Gingham Ribbon was wrapped around the embossed panel before it was glued down to the Basic Black card front. The 4¼” by 3” piece of Poppy Parade was glued into place under the ribbon.


The stamp etching technique demonstrated using the pretty Splendid Thoughts stamp set by Stampin' Up! for the Stamping Inkspirations Blog Hop

www.crafty-rootes.co.uk – The pretty Splendid Thoughts stamp set used to demonstrate the stamp etching technique for the Stamping Inkspirations Blog Hop

The leafy image from the Splendid Thoughts stamp set, was stamped in Memento Tuxedo Black ink onto the 4¼” by 3” panel of Basic White card. I die cut the stamped image using the Deckled Rectangle Dies.


The stamp etching technique demonstrated using the pretty Splendid Thoughts stamp set by Stampin' Up! for the Stamping Inkspirations Blog Hop

www.crafty-rootes.co.uk – The pretty Splendid Thoughts stamp set used to demonstrate the stamp etching technique for the Stamping Inkspirations Blog Hop

Using the Basic Black Marker, I flicked lines onto each leaf in turn to the bottom and top of each leaf. The rolled leaf edges were coloured in completely to add more definition. The bee was then stamped and some lines flicked onto the wings.


The stamp etching technique demonstrated using the pretty Splendid Thoughts stamp set by Stampin' Up! for the Stamping Inkspirations Blog Hop

www.crafty-rootes.co.uk – The pretty Splendid Thoughts stamp set used to demonstrate the stamp etching technique for the Stamping Inkspirations Blog Hop

The die cut piece was then glued to the 4⅛” by 2⅞” panel of Basic Black card. The whole piece was then mounted onto the card front on Dimensionals.


The stamp etching technique demonstrated using the pretty Splendid Thoughts stamp set by Stampin' Up! for the Stamping Inkspirations Blog Hop

www.crafty-rootes.co.uk – The pretty Splendid Thoughts stamp set used to demonstrate the stamp etching technique for the Stamping Inkspirations Blog Hop

The sentiment, from the Something Fancy stamp set was stamped in Memento Tuxedo Black ink onto the 2½” by 1¼” layer of Basic White card. I die cut it using another of the Deckled Rectangle Dies. The sentiment was then glued to the 2½” by 1¼” panel of Poppy Parade card. This was then added to the card base.

A Gingham Ribbon Bow and a trio of Classic Matte Dots finished the card.

Please hop along to see what my crafty friends have to share with us today. Next in line is the lovely Karen Henderson.


Angie McKenzie  ●  Jan Musselman

Tricia Butts  ●  Leonie Stuart   ●   Mo Rootes

Karen Henderson  ●  Aurélie Fabre  Rebecca-Jo Unwin

Order goodies/Join My Team

If you don’t have a Stampin’ Up! Demonstrator I would love to be yours!  If you don’t have a catalogue and live in the UK, please let me know and I will be delighted to send you one.  To order any supplies click on the “shop online” button at the top of the page. Alternatively, contact me and I would be happy to place an order for you. To join my team either click on the link above or click on the contact me button above and I will contact you with more information.

Details of the products I used for this project can be found below.

Mo x

Supplies used:


A gorgeous thank you card made for the Stamp 'n Hop Blog Hop using the Enduring Beauty stamp set and dies and Masks from Stampin' Up!

Embossed Enduring Beauty card for the Stamp ‘n Hop Blog Hop

Hello and welcome to the Stamp ‘n Hop Blog Hop where we are sharing projects inspired by the theme of Flora or Fauna. I have gone with flora and used the stunning Enduring Beauty Bundle to make my card.

Colours in this card are:


To recreate the embossed enduring beauty card, you will need:

Soft Sea Foam card base – 8¼” by 5⅞” – scored at 4⅛”
Basic White card – 4⅞” by 3½”
One Horse Open Sleigh dsp – 5¼” by 4”
Basic White card – 5” by 4”
Soft Sea Foam card – 2¼” by ½”
Basic White card – 5½” by 3¾”


Using the Deckled Rectangles, I die cut a rectangle from the piece of One Horse Open Sleigh dsp. This was then glued to the 5” by 4” piece of Basic White card. I wrapped a piece of Iridescent Ribbon around the panel and adhered the piece to the Soft Sea Foam card base.


A gorgeous thank you card made for the Stamp 'n Hop Blog Hop using the Enduring Beauty stamp set and dies and Masks from Stampin' Up!

www.crafty-rootes.co.uk – The Enduring Beauty stamp set and dies and Masks used to make a gorgeous thank you card for the Stamp ‘n Hop Blog Hop

The large floral image was stamped in Versamark ink. I covered it with Black Embossing Powder and heat set it.


A gorgeous thank you card made for the Stamp 'n Hop Blog Hop using the Enduring Beauty stamp set and dies and Masks from Stampin' Up!

www.crafty-rootes.co.uk – The Enduring Beauty stamp set and dies and Masks used to make a gorgeous thank you card for the Stamp ‘n Hop Blog Hop

Using washi tape I secured the embossed panel of Basic White card to my Glass Mat. The first mask was positioned on top and held in place with more washi tape.


A gorgeous thank you card made for the Stamp 'n Hop Blog Hop using the Enduring Beauty stamp set and dies and Masks from Stampin' Up!

www.crafty-rootes.co.uk – The Enduring Beauty stamp set and dies and Masks used to make a gorgeous thank you card for the Stamp ‘n Hop Blog Hop

I used a Blending Brush to ink through the mask with Highland Heather ink.  Using  mask number 3, a Blending Brush and Gorgeous Grape ink I added the detailed layer of ink to the flowers.


A gorgeous thank you card made for the Stamp 'n Hop Blog Hop using the Enduring Beauty stamp set and dies and Masks from Stampin' Up!

www.crafty-rootes.co.uk – The Enduring Beauty stamp set and dies and Masks used to make a gorgeous thank you card for the Stamp ‘n Hop Blog Hop

The 2nd mask was positioned, exposing the leaves. Using Blending Brushes I lightly inked with Old Olive. I decided not to add the detailed image as the black embossing gives a lot of dimension already.


A gorgeous thank you card made for the Stamp 'n Hop Blog Hop using the Enduring Beauty stamp set and dies and Masks from Stampin' Up!

www.crafty-rootes.co.uk – The Enduring Beauty stamp set and dies and Masks used to make a gorgeous thank you card for the Stamp ‘n Hop Blog Hop

I die cut the floral image using the Enduring Beauty Dies and mounted the die cut piece on Dimensionals to the card front.


A gorgeous thank you card made for the Stamp 'n Hop Blog Hop using the Enduring Beauty stamp set and dies and Masks from Stampin' Up!

www.crafty-rootes.co.uk – The Enduring Beauty stamp set and dies and Masks used to make a gorgeous thank you card for the Stamp ‘n Hop Blog Hop

The sentiment, from the Earthen Textures stamp set was stamped in Gorgeous Grape ink onto the strip of Soft Sea Foam ink. The sentiment was then added to the card front/

A trio of Purple Gems completes the card.

Please hop over to share the inspiration provided by my stamping friend.


Order goodies/Join My Team

If you don’t have a Stampin’ Up! Demonstrator I would love to be yours!  If you don’t have a catalogue and live in the UK, please let me know and I will be delighted to send you one.  To order any supplies click on the “shop online” button at the top of the page. Alternatively, contact me and I would be happy to place an order for you. To join my team either click on the link above or click on the contact me button above and I will contact you with more information.

Details of the products I used for this project can be found below.

Mo x

Supplies used:


A pretty lavender farm themed card made using the Hills of Tuscany stamp set - Share It Sunday Blog Hop

Hills of Italian Lavender – Share It Sunday Blog Hop

Hello and welcome to the Share It Sunday Blog Hop where we are sharing something we have been working on recently. I am loving the Hills of Tuscany stamp set and have used it to make a pretty water coloured card.

Colours used in this card are:


 To recreate the Italian lavender hills card, you will need:

Highland Heather card base – 8¼” by 5⅞” – scored at 4⅛”
Basic White card – 3¾” by 2¾”
Basic Black card – 3⅝” by 2⅝”
Fluid 100 card – 3½” by 2½”
Basic White card – 5½” by 3¾” – for the inside


Using a Spritzer, filled with water, I sprayed the piece of Fluid 100 card with enough water to make it wet.


A pretty lavender farm themed card made using the Hills of Tuscany stamp set - Share It Sunday Blog Hop

www.crafty-rootes.co.uk – The Hills of Tuscany stamp set used to make a pretty lavender farm themed card – Share It Sunday Blog Hop

The large curved image was inked in Highland Heather ink, then lightly spritzed with water before I stamped the image at the bottom of the Fluid 100 card. The colour didn’t look right and I realised the stamp had picked up a little Old Olive ink from the scrap paper the Fluid 100 was resting on – quite liked it so carried on. I stamped again in Highland Heather ink to add more ‘ground’.


A pretty lavender farm themed card made using the Hills of Tuscany stamp set - Share It Sunday Blog Hop

www.crafty-rootes.co.uk – The Hills of Tuscany stamp set used to make a pretty lavender farm themed card – Share It Sunday Blog Hop

The large ‘sky’ image was inked up with Azure Afternoon ink, spritzed  with water and stamped at the top of the panel, I added the small ‘cloud’ like image  using the Azure Afternoon ink in 1st & 2nd generation to add some depth. The panel was set the panel to one side to dry.


A pretty lavender farm themed card made using the Hills of Tuscany stamp set - Share It Sunday Blog Hop

www.crafty-rootes.co.uk – The Hills of Tuscany stamp set used to make a pretty lavender farm themed card – Share It Sunday Blog Hop

When the panel was dry, I added the more defined ‘ground’ images with 1st & 2nd generation Gorgeous Grape ink. This time I didn’t spritze with water. The dotty image was stamped to give the impression of flowers.


A pretty lavender farm themed card made using the Hills of Tuscany stamp set - Share It Sunday Blog Hop

www.crafty-rootes.co.uk – The Hills of Tuscany stamp set used to make a pretty lavender farm themed card – Share It Sunday Blog Hop

The house was stamped in Starry Sky ink and the roof added in Night of Navy ink. I used the Black Stampin’ Write Marker to add some definition to the windows. I managed to stamp the roof slightly squint but quite liked the effect so left it.


A pretty lavender farm themed card made using the Hills of Tuscany stamp set - Share It Sunday Blog Hop

www.crafty-rootes.co.uk – The Hills of Tuscany stamp set used to make a pretty lavender farm themed card – Share It Sunday Blog Hop

The group of trees were stamped in Garden Green ink. I used a Waterpainter to smear the ink on the trees – this gives a greater depth of colour. When completely dry, the finished piece was glued to the Basic Black panel, then to the 3¾” by 2¾” piece of Basic White card.


A pretty lavender farm themed card made using the Hills of Tuscany stamp set - Share It Sunday Blog Hop

www.crafty-rootes.co.uk – The Hills of Tuscany stamp set used to make a pretty lavender farm themed card – Share It Sunday Blog Hop

The whole piece was added to the Highland Heather card front on Dimensionals.

I love this card, hope you like it.

Please hop along to see what my fellow crafters have been using recently.


Order goodies/Join My Team

If you don’t have a Stampin’ Up! Demonstrator I would love to be yours!  If you don’t have a catalogue and live in the UK, please let me know and I will be delighted to send you one.  To order any supplies click on the “shop online” button at the top of the page. Alternatively, contact me and I would be happy to place an order for you. To join my team either click on the link above or click on the contact me button above and I will contact you with more information.

Details of the products I used for this project can be found below.

Mo x

Supplies used:


Cards made for the World Languages Blog Hop using the Inspirational Sketches stamp set used with the Mini Alphabet dies from Stampin' Up!

German/French Inspiration card – World Languages Blog Hop

Hello and welcome to the World Languages Blog Hop where we are – not surprisingly – sharing projects featuring a language not our own. Sadly I don’t have an ear for languages, much to my children’s disgust when they had German or French homework. I have chosen to make a card with a German sentiment using the Inspirational Sketches stamp set.

Colours in this card are:


To recreate the German Inspirations card, you will need:

Thick Basic White card base – 8¼” by 5⅞” – scored at 4⅛”
Basic Black card – 4⅛” by 3”
Berry Burst card – 4¼” by 3⅛”
Basic White card – 4⅜” by 3¼”
Scrap Basic Black card

Using Berry Burst ink, I randomly stamped the pretty floral image all over the panel of Basic White card.


Cards made for the World Languages Blog Hop using the Inspirational Sketches stamp set used with the Mini Alphabet dies from Stampin' Up!

www.crafty-rootes.co.uk – The Inspirational Sketches stamp set used with the Mini Alphabet dies to make cards for the World Languages Blog Hop

I used the Mini Alphabet Dies to die cut the letters I needed from scrap Basic Black card. The word DANKE was added to the card front using Multipurpose Liquid Adhesive. If I had had my wits about me I would have added some Adhesive Sheet to the back of the scrap card .


Cards made for the World Languages Blog Hop using the Inspirational Sketches stamp set used with the Mini Alphabet dies from Stampin' Up!

www.crafty-rootes.co.uk – The Inspirational Sketches stamp set used with the Mini Alphabet dies to make cards for the World Languages Blog Hop

The stamped panel was added to the Berry Burst layer using the same liquid glue.


Cards made for the World Languages Blog Hop using the Inspirational Sketches stamp set used with the Mini Alphabet dies from Stampin' Up!

www.crafty-rootes.co.uk – The Inspirational Sketches stamp set used with the Mini Alphabet dies to make cards for the World Languages Blog Hop

A length of Black Baker’s Twine was wrapped around the panel and secured on the back with Sellotape. The whole piece was mounted onto the Basic Black layer with Dimensionals,


Cards made for the World Languages Blog Hop using the Inspirational Sketches stamp set used with the Mini Alphabet dies from Stampin' Up!

www.crafty-rootes.co.uk – The Inspirational Sketches stamp set used with the Mini Alphabet dies to make cards for the World Languages Blog Hop

The whole piece was added to the Thick Basic White card base with liquid glue. A bow and a trio of Matte Black Dots completed the card.


Cards made for the World Languages Blog Hop using the Inspirational Sketches stamp set used with the Mini Alphabet dies from Stampin' Up!

www.crafty-rootes.co.uk – The Inspirational Sketches stamp set used with the Mini Alphabet dies to make cards for the World Languages Blog Hop

I stepped it up and made a stepped up version in French using Azure Afternoon. Which is your favourite?


Cards made for the World Languages Blog Hop using the Inspirational Sketches stamp set used with the Mini Alphabet dies from Stampin' Up!

www.crafty-rootes.co.uk – The Inspirational Sketches stamp set used with the Mini Alphabet dies to make cards for the World Languages Blog Hop

Please hop along to share the inspiration provided by my crafty friends.


Order goodies/Join My Team

If you don’t have a Stampin’ Up! Demonstrator I would love to be yours!  If you don’t have a catalogue and live in the UK, please let me know and I will be delighted to send you one.  To order any supplies click on the “shop online” button at the top of the page. Alternatively, contact me and I would be happy to place an order for you. To join my team either click on the link above or click on the contact me button above and I will contact you with more information.

Details of the products I used for this project can be found below.

Mo x

Supplies used:


A card made for the Reduce, Recycle Reuse themed Stamping Dreams Blog Hop using left over Stampin' Up! pieces from my craft desk

Left Over Floral Card for the Stamping Dreams Blog Hop

Hello and welcome to the Stamping with Dreams Blog Hop. Today we have a fun theme – Reduce, Recyle, Reuse. I looked around my very messy craft desk and gathered up some left over pieces with similar tones and decided to try and make these left over pieces into a card.

Colours I think are in this project – some of the pieces were stamped, coloured or die cut a long time ago, are:


To recreate the left over floral card, you will need:

Starry Sky card base – 8¼” by 5⅞” – scored at 4⅛”
Lemon Lime Twist card – 5½” by 3¾”
Basic White card – 5⅜” by 3⅝”
Mossy Meadow card – 4¼” by 3¼”
Basic White card – 5½” by 3¾” – for the inside
Scrap Basic White & Granny Apple Green card


The background piece was created using the ink refill and shaving foam technique and a mask. – To see details on how this panel was created, check out the Hot Air Balloon post on the 6th February 2024. The panel was then glued to the Lemon Lime Twist card base and then to the Starry Sky card base.

A card made for the Reduce, Recycle Reuse themed Stamping Dreams Blog Hop using left over Stampin' Up! pieces from my craft desk

www.crafty-rootes.com – The Stippled Roses stamp set and Dies used with the Ink refill and shaving foam technique to make a card for the Reduce, Recycle Reuse themed Stamping Dreams Blog Hop

The left over Mossy Meadow negative die cut was mounted onto the card front on Dimensionals.


A card made for the Reduce, Recycle Reuse themed Stamping Dreams Blog Hop using left over Stampin' Up! pieces from my craft desk

www.crafty-rootes.com – The Stippled Roses stamp set and Dies used with the Ink refill and shaving foam technique to make a card for the Reduce, Recycle Reuse themed Stamping Dreams Blog Hop

I liked the die cut stippled rose and the colour of the flower worked well, the Wild Wheat leaves however looked awful, so I took Mossy Meadow Blends and coloured over the Wild Wheat…….. much better. I added the flower to the to the corner of the raised frame with Dimensionals and liquid glue. The Granny Apple Green leaves – from the Cheerful Daisies Dies, were then added with Mini Glue Dots.


The Stippled Roses stamp set and Dies used with the Ink refill and shaving foam technique to make a card for the Reduce, Recycle Reuse themed Stamping Dreams Blog Hop

www.crafty-rootes.com – The Stippled Roses stamp set and Dies used with the Ink refill and shaving foam technique to make a card for the Reduce, Recycle Reuse themed Stamping Dreams Blog Hop

I looked at the left over sentiments I had on my desk and chose the ‘congratulations sentiment, no idea where this was from. I cut it down and added it to the card front.


A card made for the Reduce, Recycle Reuse themed Stamping Dreams Blog Hop using left over Stampin' Up! pieces from my craft desk

www.crafty-rootes.com – The Stippled Roses stamp set and Dies used with the Ink refill and shaving foam technique to make a card for the Reduce, Recycle Reuse themed Stamping Dreams Blog Hop

At this point I paused…….. I didn’t really like the card, The sentiment was wrong and the negative frame was too bare. What to do…..


After a bit of mulling over I die cut a slightly smaller label, using the Thoughful Expressions Dies from scrap Basic White card. I stamped the sentiment, from the Color & Contour stamp set in Starry Sky ink and added it into the negative space. Much better. I would really like to have removed the congratulations but it was seriously stuck down, so I left it.


A card made for the Reduce, Recycle Reuse themed Stamping Dreams Blog Hop using left over Stampin' Up! pieces from my craft desk

www.crafty-rootes.com – The Stippled Roses stamp set and Dies used with the Ink refill and shaving foam technique to make a card for the Reduce, Recycle Reuse themed Stamping Dreams Blog Hop

A trio of Tinsel Gems finished the card.


A card made for the Reduce, Recycle Reuse themed Stamping Dreams Blog Hop using left over Stampin' Up! pieces from my craft desk

www.crafty-rootes.com – The Stippled Roses stamp set and Dies used with the Ink refill and shaving foam technique to make a card for the Reduce, Recycle Reuse themed Stamping Dreams Blog Hop

Please hop along to see what gorgeousness my fellow crafters have to share with us today.


Blog Hop Index


Order goodies/Join My Team

If you don’t have a Stampin’ Up! Demonstrator I would love to be yours!  If you don’t have a catalogue and live in the UK, please let me know and I will be delighted to send you one.  To order any supplies click on the “shop online” button at the top of the page. Alternatively, contact me and I would be happy to place an order for you. To join my team either click on the link above or click on the contact me button above and I will contact you with more information.

Details of the products I used for this project can be found below.

Mo x

A sweet anniversary card made for the Technique Tuesday Blog Hop using the ink refill and shaving foam technique and the Hot Air Balloons Dies by Stampin' Up!

Hot Air Balloons card for the Technique Tuesday Blog Hop

Hello and welcome to the Technique Tuesday Blog Hop where we are sharing projects made using ink refills. I had such fun with this and ended up using ink refills with having foam to make my hot air balloon anniversary card.

Colours in this card are:


To recreate the hot air balloon card, you will need:

Azure Afternoon card base – 8¼” by 5⅞” – scored at 4⅛”
Basic Black card – 5⅜” by 3⅝”
Basic White card – 5½” by 3¾” – which I cut down to 5 ¼” by 3 ½” after colouring
Basic White card – 2” by ¼”
Basic White card – 5½” by 3¾” – for the inside
Scrap Starry Sky, Azure Afternoon & Lemon Lime Twist card

 Ink Refill and shaving cream technique:

Paper Plate
Shaving foam
Ink Refills
Palette Knives
Kitchen towel


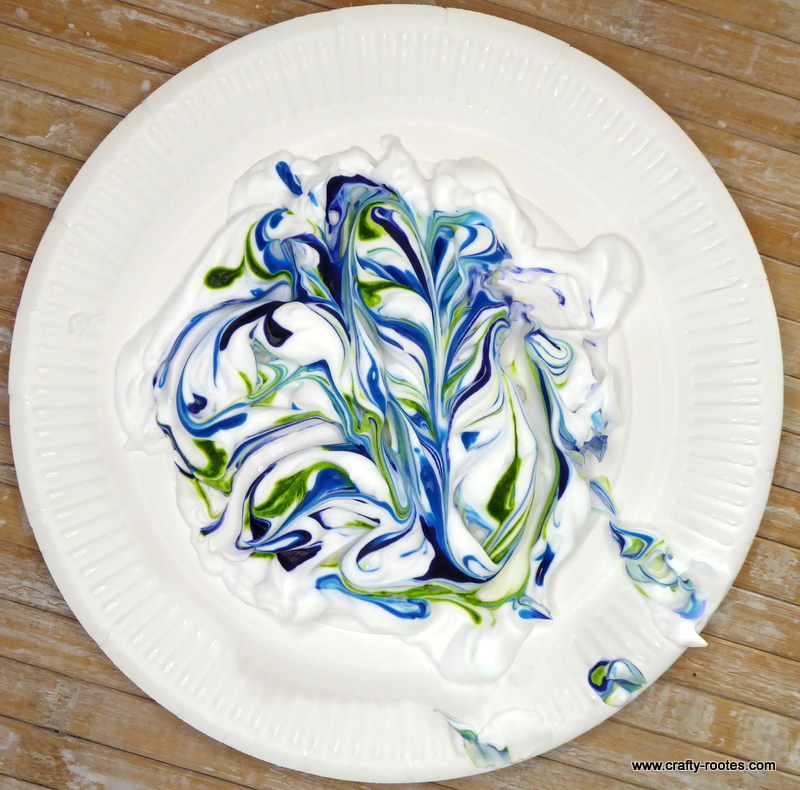
I covered the centre of a paper plate with shaving foam – it has to be foam not gel – spreading it out into a fairly even coating. I dropped dots of re inker randomly over the shaving cream – Azure Afternoon, Lemon Lime Twist and Starry Sky. Using a palette knife I swirled the colours together.


Ink refill and shaving foam technique

www.crafty-rootes.com – Ink refill and shaving foam technique

The 5½” by 3¾” panel of Basic White was then placed on top and gentle pressure applied. I carefully lifted the panel off the foam and scraped the excess off with the palette knife. The panel was left to dry.


Ink refill and shaving foam technique

www.crafty-rootes.com – Ink refill and shaving foam technique

I made multiple panels and used some of the left overs with stencils to see if that would work as well. – Very messy but such fun.


Ink refill and shaving foam technique

www.crafty-rootes.com – Ink refill and shaving foam technique


Ink refill and shaving foam technique

www.crafty-rootes.com – Ink refill and shaving foam technique

When the first panel was dry, I trimmed it down to 5¼” by 3½”and glued it to the Basic Black panel and then added the panel to the Azure Afternoon card base.


A sweet anniversary card made for the Technique Tuesday Blog Hop using the ink refill and shaving foam technique and the Hot Air Balloons Dies by Stampin' Up!

www.crafty-rootes.com – The Hot Air Balloons Dies used with the Ink refill and shaving foam technique to make a sweet anniversary card for the Technique Tuesday Blog Hop

Nest I die cut the hot air balloons, initially in black as I was thinking of a silhouette effect but after messing about for a while I decided the black was too harsh and die cut them in Starry Sky.


A sweet anniversary card made for the Technique Tuesday Blog Hop using the ink refill and shaving foam technique and the Hot Air Balloons Dies by Stampin' Up!

www.crafty-rootes.com – The Hot Air Balloons Dies used with the Ink refill and shaving foam technique to make a sweet anniversary card for the Technique Tuesday Blog Hop

From scrap Azure Afternoon and Lemon Lime Twist card I die cut the coloured panels for the balloons and added them on with Multipurpose Liquid Adhesive – if I had been thinking straight I would have added Adhesive Sheet to the back of the scrap card.


A sweet anniversary card made for the Technique Tuesday Blog Hop using the ink refill and shaving foam technique and the Hot Air Balloons Dies by Stampin' Up!

www.crafty-rootes.com – The Hot Air Balloons Dies used with the Ink refill and shaving foam technique to make a sweet anniversary card for the Technique Tuesday Blog Hop

The balloons and baskets were then added to the card front on Dimensionals.


A sweet anniversary card made for the Technique Tuesday Blog Hop using the ink refill and shaving foam technique and the Hot Air Balloons Dies by Stampin' Up!

www.crafty-rootes.com – The Hot Air Balloons Dies used with the Ink refill and shaving foam technique to make a sweet anniversary card for the Technique Tuesday Blog Hop

I stamped the sentiment in Starry Sky ink onto the thin strip of Basic White card and added it to the front of the card.


A sweet anniversary card made for the Technique Tuesday Blog Hop using the ink refill and shaving foam technique and the Hot Air Balloons Dies by Stampin' Up!

www.crafty-rootes.com – The Hot Air Balloons Dies used with the Ink refill and shaving foam technique to make a sweet anniversary card for the Technique Tuesday Blog Hop

A trio of Basic Rhinestones completed the card. I hope you like it.

Please hop along to share the inspiration provided by my crafty friends.


Blog Hop Index


Order goodies/Join My Team

If you don’t have a Stampin’ Up! Demonstrator I would love to be yours!  If you don’t have a catalogue and live in the UK, please let me know and I will be delighted to send you one.  To order any supplies click on the “shop online” button at the top of the page. Alternatively, contact me and I would be happy to place an order for you. To join my team either click on the link above or click on the contact me button above and I will contact you with more information.

Details of the products I used for this project can be found below.

Mo x

Supplies used:


A stunning Birthday card made for the Ink, Stamp, Share Blog Hop using the gorgeous Hills of Tuscany stamp set by Stampin' Up! used with a water colour technique.

Water Coloured Hills of Tuscany for the Ink, Stamp, Share Blog Hop

Hello and welcome to the Ink, Stamp, Share Blog Hop where we are sharing something We have been working on recently. I am loving the Hills of Tuscany stamp set and have used it to make a pretty water coloured card.

Colours used in this card are:


To recreate the water coloured hills of Tuscany card, you will need:

Old Olive card base – 8¼” by 5⅞” – scored at 4⅛”
Basic White card – 3¾” by 2¾”
Basic Black card – 3⅝” by 2⅝”
Fluid 100 card – 3½” by 2½”
Basic White card – 2⅛” by 1”
Basic White card – 5½” by 3¾” – for the inside


Using a Spritzer, filled with water, I sprayed the piece of Fluid 100 card with enough water to make it wet.


A stunning Birthday card made for the Ink, Stamp, Share Blog Hop using the gorgeous Hills of Tuscany stamp set by Stampin' Up! used with a water colour technique.

www.crafty-rootes.com – The gorgeous Hills of Tuscany stamp set used with a water colour technique to make a stunning Birthday card for the Ink, Stamp, Share Blog Hop

The large curved image was inked in Old Olive ink, then lightly spritzed with water before stamping the image at the bottom of the Fluid 100 card. I repeated this step to add more ‘ground’. I also inked up the smaller curved image with the same colour and spritzed it before adding it to the panel to add more texture.


A stunning Birthday card made for the Ink, Stamp, Share Blog Hop using the gorgeous Hills of Tuscany stamp set by Stampin' Up! used with a water colour technique.

www.crafty-rootes.com – The gorgeous Hills of Tuscany stamp set used with a water colour technique to make a stunning Birthday card for the Ink, Stamp, Share Blog Hop

The large ‘sky’ image was inked up with Misty Moonlight ink, spritzed then stamped at the top of the wet Fluid 100 paper. At this point I set the panel to one side to dry.

When the panel was dry, I added the more defined ‘ground’ images with Mossy Meadow ink and added the dotty image using the same coloured ink.


A stunning Birthday card made for the Ink, Stamp, Share Blog Hop using the gorgeous Hills of Tuscany stamp set by Stampin' Up! used with a water colour technique.

www.crafty-rootes.com – The gorgeous Hills of Tuscany stamp set used with a water colour technique to make a stunning Birthday card for the Ink, Stamp, Share Blog Hop

The house was stamped in Sweet Sorbet ink and the roof added in Pretty Peacock ink. I used the Black Stampin’ Write Marker to add some definition to the windows. I managed to stamp the roof slightly squint and used a Waterpainter to fill in the gap.


A stunning Birthday card made for the Ink, Stamp, Share Blog Hop using the gorgeous Hills of Tuscany stamp set by Stampin' Up! used with a water colour technique.

www.crafty-rootes.com – The gorgeous Hills of Tuscany stamp set used with a water colour technique to make a stunning Birthday card for the Ink, Stamp, Share Blog Hop

The trio of trees were added in Shaded Spruce ink. I used a Waterpainter to smear the ink on the trees – this gives a greater depth of colour. A waterpainter was used to add some Old Olive ink to ‘ground’ the house. When completely dry, the finished piece was glued to the Basic Black panel, then to the 3¾” by 2¾” piece of Basic White card.


A stunning Birthday card made for the Ink, Stamp, Share Blog Hop using the gorgeous Hills of Tuscany stamp set by Stampin' Up! used with a water colour technique.

www.crafty-rootes.com – The gorgeous Hills of Tuscany stamp set used with a water colour technique to make a stunning Birthday card for the Ink, Stamp, Share Blog Hop

The sentiment, from the Garden Meadow stamp set was stamped onto the small piece of Basic White card in Misty Moonlight ink. I tucked the sentiment under the inked panel and glued it in place with some wet glue.


A stunning Birthday card made for the Ink, Stamp, Share Blog Hop using the gorgeous Hills of Tuscany stamp set by Stampin' Up! used with a water colour technique.

www.crafty-rootes.com – The gorgeous Hills of Tuscany stamp set used with a water colour technique to make a stunning Birthday card for the Ink, Stamp, Share Blog Hop

The whole piece was added to the Old Olive card front on Dimensionals.

Such a pretty card, love the moody look of the sky.

Please hop along to see what my fellow crafters have been using recently.


Order goodies/Join My Team

If you don’t have a Stampin’ Up! Demonstrator I would love to be yours!  If you don’t have a catalogue and live in the UK, please let me know and I will be delighted to send you one.  To order any supplies click on the “shop online” button at the top of the page. Alternatively, contact me and I would be happy to place an order for you. To join my team either click on the link above or click on the contact me button above and I will contact you with more information.

Details of the products I used for this project can be found below.

Mo x

Supplies used:


A pretty paper pieced floral card made for the Ink, Stamp, Share Blog Hop using the Lifetime of Love Dies by Stampin' Up!

Lifetime of Love card for the Ink, Stamp, Share Blog Hop

Hello and welcome to the Ink, Stamp, Share Blog Hop where our theme is ‘Something New’. So much to choose from……. Eventually I decided to make a pretty card using the gorgeous Lifetime of Love Dies and one of my favourite techniques, paper piecing.

Colours in this card are:


To recreate the lifetime of love card, you will need:

Thick Basic White card base – 8¼” by 5⅞” – scored at 4⅛”
Gorgeous Grape card – 5⅝” by 3⅞”
Fight & Airy dsp – 5½” by 3¾”
Basic White card – 5” by 3⅜””
Silver Foil Speciality Paper – 5” by 3½”
Scrap Fresh Freesia & Soft Sea Foam
Adhesive sheet


From the panel of Silver Foil Speciality Paper – with a piece of Adhsive Sheet stuck to the back and die cut the arched floral image using the Lifetime of Love Dies, I choose the darkest piece of foil with the slightly purple tone. I popped out the pieces and adhered the outline piece to the panel of Basic White card.


A pretty paper pieced floral card made for the Ink, Stamp, Share Blog Hop using the Lifetime of Love Dies by Stampin' Up!

www.crafty-rootes.com – The Lifetime of Love Dies used to make a pretty paper pieced floral card for the Ink, Stamp, Share Blog Hop

From scrap Fresh Freesia and scrap Soft Sea Foam card, each with adhesive sheet applied to the back, I die the floral part of the die again.


A pretty paper pieced floral card made for the Ink, Stamp, Share Blog Hop using the Lifetime of Love Dies by Stampin' Up!

www.crafty-rootes.com – The Lifetime of Love Dies used to make a pretty paper pieced floral card for the Ink, Stamp, Share Blog Hop

Using my Take Your Pick Tool I picked up each piece from the flowers and leaves, removed the backing from the adhesive sheet and placed the piece into the negative space. I absolutely loved how it came out.


A pretty paper pieced floral card made for the Ink, Stamp, Share Blog Hop using the Lifetime of Love Dies by Stampin' Up!

www.crafty-rootes.com – The Lifetime of Love Dies used to make a pretty paper pieced floral card for the Ink, Stamp, Share Blog Hop

The sentiment was stamped in Gorgeous Grape ink inside the arch and the decorated panel was then glued to the piece of Flight & Airy dsp which was then adhered to the Gorgeous Grape panel. The whole piece was then mounted onto the Thick Basic White card base on Dimensionals.


A pretty paper pieced floral card made for the Ink, Stamp, Share Blog Hop using the Lifetime of Love Dies by Stampin' Up!

www.crafty-rootes.com – The Lifetime of Love Dies used to make a pretty paper pieced floral card for the Ink, Stamp, Share Blog Hop

A trio of Iridescent Pearls completed the card.


A pretty paper pieced floral card made for the Ink, Stamp, Share Blog Hop using the Lifetime of Love Dies by Stampin' Up!

www.crafty-rootes.com – The Lifetime of Love Dies used to make a pretty paper pieced floral card for the Ink, Stamp, Share Blog Hop

Please hop along to see what my crafty friends have to share with us today,


Order goodies/Join My Team

If you don’t have a Stampin’ Up! Demonstrator I would love to be yours!  If you don’t have a catalogue and live in the UK, please let me know and I will be delighted to send you one.  To order any supplies click on the “shop online” button at the top of the page. Alternatively, contact me and I would be happy to place an order for you. To join my team either click on the link above or click on the contact me button above and I will contact you with more information.

Details of the products I used for this project can be found below.

Mo x

Supplies used:


A pretty simply stamped birthday card made using the Cheerful Daisies stamp set by Stampin' Up!

Simply Moody Mauve Daisies card

I’ve gone back to basics with todays card and will showcasing a simple stamping technique using staps, inks and paper and the gorgeous Cheerful Daisies stamp set.

Colours used in this card are:


To recreate the moody mauve daisies card, you will need:

Thick Basic White card – 8¼” by 5⅞” – scored at 4⅛”
Pebbled Path card – 5⅛” by 3⅜”
Basic White card – 5” by 3 ¼”
Scrap Moody Mauve card


Using Pebbled Path ink I randomly stamped the largest daisy flower all over the small panel of Basic White card.


A pretty simply stamped birthday card made using the Cheerful Daisies stamp set by Stampin' Up!

www.crafty-rootes.com -The Cheerful Daisies stamp set used to make a pretty simply stamped birthday card

I added the flower centre using 2nd generation Moody Mauve ink. The stamped panel was then glued, using Multipurpose Liquid Adhesive, to the Pebbled Path layer.


A pretty simply stamped birthday card made using the Cheerful Daisies stamp set by Stampin' Up!

www.crafty-rootes.com -The Cheerful Daisies stamp set used to make a pretty simply stamped birthday card

The same glue was used to add the piece to the Thick Basic White card front.


A pretty simply stamped birthday card made using the Cheerful Daisies stamp set by Stampin' Up!

www.crafty-rootes.com -The Cheerful Daisies stamp set used to make a pretty simply stamped birthday card

The sentiment was stamped in Pebbled Path ink onto a scrap of Moody Mauve which was then added to the card front on Dimensionals.


A pretty simply stamped birthday card made using the Cheerful Daisies stamp set by Stampin' Up!

www.crafty-rootes.com -The Cheerful Daisies stamp set used to make a pretty simply stamped birthday card

A trio of 2023 – 2025 In Color Dots completed the card.


A pretty simply stamped birthday card made using the Cheerful Daisies stamp set by Stampin' Up!

www.crafty-rootes.com -The Cheerful Daisies stamp set used to make a pretty simply stamped birthday card


Order goodies/Join My Team

If you don’t have a Stampin’ Up! Demonstrator I would love to be yours!  If you don’t have a catalogue and live in the UK, please let me know and I will be delighted to send you one.  To order any supplies click on the “shop online” button at the top of the page. Alternatively, contact me and I would be happy to place an order for you. To join my team either click on the link above or click on the contact me button above and I will contact you with more information.

Details of the products I used for this project can be found below.

Mo x

Supplies used: