A striking card for a friend made using the Garden Silhouette Hot Foil dies, the Hot Foiling System and Gold Foil from Stampin' Up!

Hot Foil Garden Silhouette Card

Today I have been playing with the new Hot Foil System and the Garden Silhouette Hot Foil Die to make a pretty card for a special friend. Hot foiling is so much fun and the results are gorgeous.

Colours used in making this card are:


I created the hot foil garden silhouette card using the following supplies:

Blackberry Bliss card base – 8¼” by 5⅞” scored at 4⅛” on the long side
Very Vanilla – 5½” by 3¾” x 2 – one for the inside
Golden Glow – 5⅜” by 3⅝”
Two-Tone Blackberry Bliss (dark side) – 5¼” by 3½”
Very Vanilla – 2⅜” by ½”
Golden Glow – 2⅜” by ⅜”


I began by plugging in the Hot Foil System and setting it to heat up. When it reached temperature I placed the Garden Silhouette Hot Foil Die, flat side down onto the hot plate, added a piece of Gold Foil, gold side facing down and finally, placed the 5¼” by 3½” panel of Two-Tone Blackberry Bliss on top.


A striking card for a friend made using the Garden Silhouette Hot Foil dies, the Hot Foiling System and Gold Foil from Stampin' Up!

www.crafty-rootes.co.uk – The Garden Silhouette Hot Foil dies used with the Hot Foiling System and Gold Foil used to make a striking card for a friend

The Hot Foil Shim and the Hot Foil Spacer were then added and the button pressed to heat up the whole sandwich. When it reached temperature, I slowly ran the whole system through the Cut & Emboss Machine.


A striking card for a friend made using the Garden Silhouette Hot Foil dies, the Hot Foiling System and Gold Foil from Stampin' Up!

www.crafty-rootes.co.uk – The Garden Silhouette Hot Foil dies used with the Hot Foiling System and Gold Foil used to make a striking card for a friend

The excess foil was then peeled away revealing the embossed panel. This panel was then adhered to the Piece of Golden Glow card and then to one of the Very Vanilla card panels. I wrapped a length of Very Vanilla Baker’s Twine was wrapped around the whole piece before it was mounted onto the Blackberry Bliss card front on Dimensionals.


A striking card for a friend made using the Garden Silhouette Hot Foil dies, the Hot Foiling System and Gold Foil from Stampin' Up!

www.crafty-rootes.co.uk – The Garden Silhouette Hot Foil dies used with the Hot Foiling System and Gold Foil used to make a striking card for a friend

The sentiment, from the Cutest Crew stamp set was stamped in Blackberry Bliss ink onto the strip of Very Vanilla card.


A striking card for a friend made using the Garden Silhouette Hot Foil dies, the Hot Foiling System and Gold Foil from Stampin' Up!

www.crafty-rootes.co.uk – The Garden Silhouette Hot Foil dies used with the Hot Foiling System and Gold Foil used to make a striking card for a friend

The strip of Golden Glow card was adhered to the behind the sentiment with a small strip of colour showing along the bottom. This was added to the card front on Dimensionals.

A Baker’s Twine bow finished the card.


Order goodies/Join My Team

I would love to be your demonstrator if you don’t already have one and live in the UK.  I would also be delighted to send you a catalogue if you do not have a demonstrator. I would be happy to place an order for you, or you can order directly by clicking on the “shop online” button.


Contact me for information about joining my team or click on the ‘Join My Team’ button

Details of the products I used for this project can be found below.

Mo x

Supplies used:


A pretty self-closing box made using the Velvet Meadow designer series paper from Stampin' Up!

Self-closing Box – Stampin’ Dreams Blog Hop

Hello and welcome to the Stampin’ Dreams Blog Hop where we are sharing anything but a card. I have made a self-closing box and decorated it with the lovely Velvet Meadow dsp.

Colours used in this project are:


I created the self-closing box using the following supplies:

Berry Burst card – 8½” by 6”
Velvet Meadow dsp – 3¾” by 3¾”
Scrap Basic White card


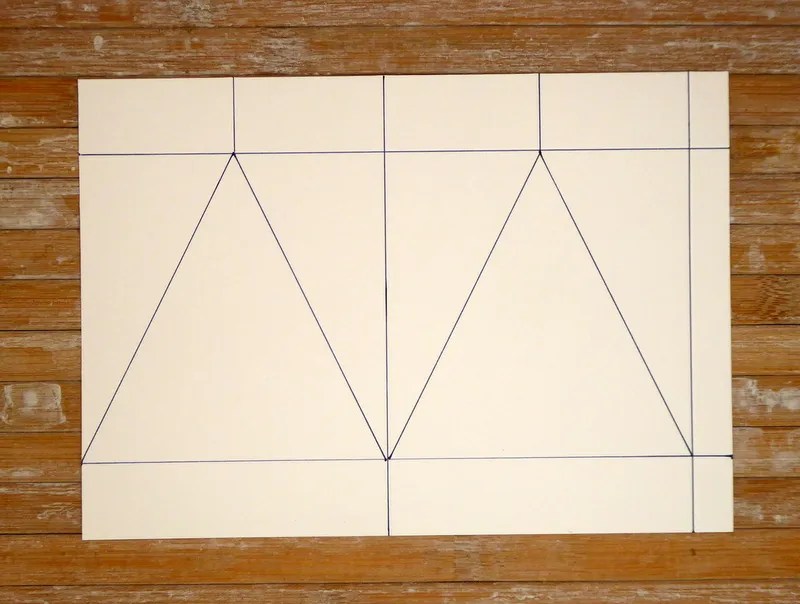
Using my Simply Scored Scoring Tool, I scored the Berry Burst card. On the long side at 4” and 8”. On the short side at 1” and 5”.


A pretty self-closing box made using the Velvet Meadow designer series paper from Stampin' Up!

www.crafty-rootes.co.uk – The Velvet Meadow designer series paper used to make a pretty self-closing box – Stampin’ Dreams Blog Hop

With the long side at the top of the scoreboard and the ½” strip on the right I scored at 2” and 6” but only as far as the first scoreline. I repeated this on White cardstock to make it easier for you to see.


A pretty self-closing box made using the Velvet Meadow designer series paper from Stampin' Up!

www.crafty-rootes.co.uk – The Velvet Meadow designer series paper used to make a pretty self-closing box – Stampin’ Dreams Blog Hop

Taking a ruler and the Take Your Pick Scoring Attachment I scored from the bottom of the 2” scoreline to the right-hand corner of the rectangle and then again to the left-hand corner. I repeated this from the bottom of the 6” scoreline to both other corners.


A pretty self-closing box made using the Velvet Meadow designer series paper from Stampin' Up!

www.crafty-rootes.co.uk – The Velvet Meadow designer series paper used to make a pretty self-closing box – Stampin’ Dreams Blog Hop

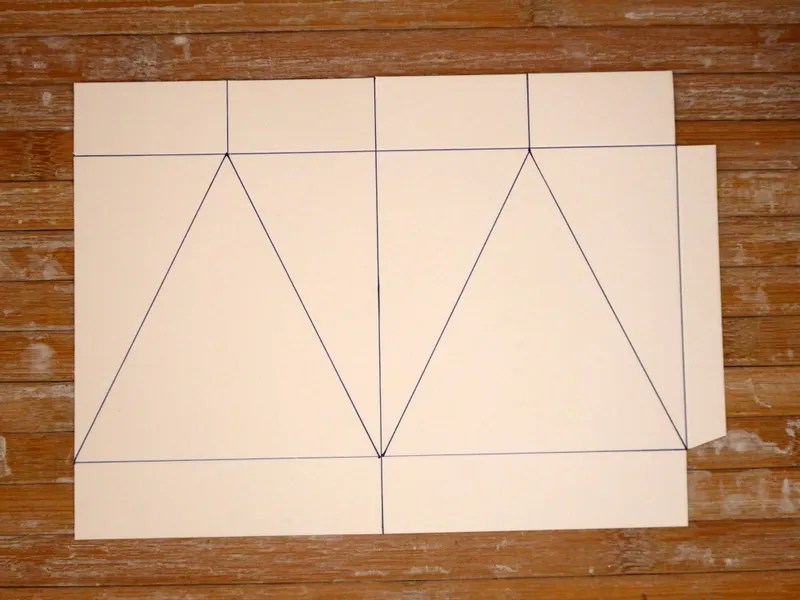
I cut away the small rectangles at either end of the ½” tab and cut up all the remaining scorelines along the long sides. I folded and burnished on all the scorelines beginning with the diagonal scorelines. The cardstock was then folded on the 4” fold and glued to the ½” tab to close the box.


A pretty self-closing box made using the Velvet Meadow designer series paper from Stampin' Up!

www.crafty-rootes.co.uk – The Velvet Meadow designer series paper used to make a pretty self-closing box – Stampin’ Dreams Blog Hop

Using a pencil, I marked one side of the 3¾” square of Velvet Meadow dsp at 1⅞”. I used my Paper Trimmer to cut from the 1⅞” mark to the lower right corner and then the lower left corner giving three triangles. These were glued to the front of the self-closing box. The four tabs forming the bottom of the box were then glued together.


A pretty self-closing box made using the Velvet Meadow designer series paper from Stampin' Up!

www.crafty-rootes.co.uk – The Velvet Meadow designer series paper used to make a pretty self-closing box – Stampin’ Dreams Blog Hop

I wrapped a length of retired Silver Edged Berry Burst Ribbon around the box and tied it in a bow at the front of the box.


A pretty self-closing box made using the Velvet Meadow designer series paper from Stampin' Up!

www.crafty-rootes.co.uk – The Velvet Meadow designer series paper used to make a pretty self-closing box – Stampin’ Dreams Blog Hop

The sentiment was then stamped on scrap Basic White card in Berry Burst ink. I die cut it using the Fragrant Layers Dies, passing it through the machine twice to make the label smaller. I added the label to the box with a Mini Glue Dot.

 Please hop on to see what my fellow crafters are sharing with us today.


Blog Hop Index


Order goodies/Join My Team

I would love to be your demonstrator if you don’t already have one and live in the UK.  I would also be delighted to send you a catalogue if you do not have a demonstrator. I would be happy to place an order for you, or you can order directly by clicking on the “shop online” button.


Contact me for information about joining my team or click on the ‘Join My Team’ button

Details of the products I used for this project can be found below.

Mo x

Supplies used:


A bright balloon birthday card made for the Technique Tuesday Blog Hop using the Balloon Festoon stamp set and co-ordinating dies from Stampin' Up!

Bright Balloon Card – Technique Tuesday Blog Hop

Hello and welcome to the Technique Tuesday Blog Hop where we are sharing background techniques. I have used the Balloon Festoon stamp set and dies to make my card.


Colours used to make this card are:


I created the meadow easel card using the following supplies:

Thick Basic White card base – 5⅞” by 5⅛ scored on the short-side at 4⅛”
Coastal Cabana – 5⅜” by 3⅝”
Basic White – 5¼” by 3½”
Coastal Cabana – 4¼” by 2½”
Basic White – 4⅛” by 2⅜”
Scrap Pool Party & Coastal Cabana


I love taking a single image from a stamp set and using it to create a background for my focal image.

I took the long streamer image and stamped it in alternating Daffodil Delight, Melon Mambo and Coastal Cabana ink. I rotated the image to vary the stamping.


A bright balloon birthday card made for the Technique Tuesday Blog Hop using the Balloon Festoon stamp set and co-ordinating dies from Stampin' Up!

www.crafty-rootes.co.uk -The Balloon Festoon stamp set and co-ordinating dies used to make bright balloon birthday card for the Technique Tuesday Blog Hop

The stamped panel was then adhered to the larger Coastal Cabana card. A length of retired Daffodil Delight ribbon was wrapped around the panel before it was glued to the Thick Basic White card front.

I stamped the confetti image multiple times in 2nd generation Daffodil Delight ink in the upper left corner of the smaller piece of Basic White card.


A bright balloon birthday card made for the Technique Tuesday Blog Hop using the Balloon Festoon stamp set and co-ordinating dies from Stampin' Up!

www.crafty-rootes.co.uk -The Balloon Festoon stamp set and co-ordinating dies used to make bright balloon birthday card for the Technique Tuesday Blog Hop

The sentiment, from the Cutest Crew stamp set was stamped on the same panel with Melon Mambo ink. The stamped panel was then glued to the smaller panel of Coastal Cabana card which was added to the card front using Mini Glue Dots.


A bright balloon birthday card made for the Technique Tuesday Blog Hop using the Balloon Festoon stamp set and co-ordinating dies from Stampin' Up!

www.crafty-rootes.co.uk -The Balloon Festoon stamp set and co-ordinating dies used to make bright balloon birthday card for the Technique Tuesday Blog Hop

The star image was stamped, several times in Coastal Cabana ink on a scrap of Pool Party card. The balloon was then die cut from this stamped piece. I also die cut a balloon strip from scrap Coastal Cabana card and adhered the two together. The balloon was then mounted onto the card front on Dimensionals.


A bright balloon birthday card made for the Technique Tuesday Blog Hop using the Balloon Festoon stamp set and co-ordinating dies from Stampin' Up!

www.crafty-rootes.co.uk -The Balloon Festoon stamp set and co-ordinating dies used to make bright balloon birthday card for the Technique Tuesday Blog Hop

A ribbon bow and a trio of pink sequins finished the card.

Please hop on to see what my friends are sharing with us today.


Blog Hop Index


Order goodies/Join My Team

I would love to be your demonstrator if you don’t already have one and live in the UK.  I would also be delighted to send you a catalogue if you do not have a demonstrator. I would be happy to place an order for you, or you can order directly by clicking on the “shop online” button.


Contact me for information about joining my team or click on the ‘Join My Team’ button

Details of the products I used for this project can be found below.

Mo x

Supplies used:


A pretty card made for the Crafty Collaborations Sketch Challenge using the Violet Dreams designer series paper used and the Cutest Crew stamp set from Stampin' Up!

Violet Dreams Card – Crafty Challenge Blog Hop

Hello and welcome to the Crafty Challenge Blog Hop where we have a sketch to inspire us. I have used the gorgeous Violet Dream designer series paper (dsp) which will be available from my online shop at the beginning of July.

Colours used when making this card are:


I created the violet dreams card using the following supplies:

Fresh Freesia card base – 8¼” by 5⅞” scored at 4⅛” on the long side
Basic White – 5⅜” by 3⅝”
Violet Dreams dsp – 5¼” by 3½”
Peaceful Pine – 3⅜” by 3”
Violet Dreams dsp – 3¼” by 2⅞”
Violet Dreams dsp- 3” by 3”
Basic White – 3” by 1”
Basic White – 5½” by 3¾” – for the inside


The largest panel of Violet Dreams dsp was glued to the 5⅜” by 3⅝” piece of Basic White card and then to the Fresh Freesia card front.


A pretty card made for the Crafty Collaborations Sketch Challenge using the Violet Dreams designer series paper used and the Cutest Crew stamp set from Stampin' Up!

www.crafty-rootes.co.uk – The Violet Dreams designer series paper used with the Cutest Crew stamp set to make a pretty card for the Crafty Collaborations Sketch Challenge Blog Hop

The 3¼” by 2⅞” piece of Violet Dreams dsp was then glued to the Peaceful Pine layer. This piece was then mounted onto the card front on Dimensionals.

A pretty card made for the Crafty Collaborations Sketch Challenge using the Violet Dreams designer series paper used and the Cutest Crew stamp set from Stampin' Up!

www.crafty-rootes.co.uk – The Violet Dreams designer series paper used with the Cutest Crew stamp set to make a pretty card for the Crafty Collaborations Sketch Challenge Blog Hop

Using the Stylish Shapes dies I I cut a stitched circle from the square of Violet Dreams dsp and added it to the card front overlapping the raised rectangle.


A pretty card made for the Crafty Collaborations Sketch Challenge using the Violet Dreams designer series paper used and the Cutest Crew stamp set from Stampin' Up!

www.crafty-rootes.co.uk – The Violet Dreams designer series paper used with the Cutest Crew stamp set to make a pretty card for the Crafty Collaborations Sketch Challenge Blog Hop

I die cut a banner from the small piece of Basic White cared using the same set of dies. The sentiment was stamped on the banner with Peaceful Pine ink and glued it to the card front.


A pretty card made for the Crafty Collaborations Sketch Challenge using the Violet Dreams designer series paper used and the Cutest Crew stamp set from Stampin' Up!

www.crafty-rootes.co.uk – The Violet Dreams designer series paper used with the Cutest Crew stamp set to make a pretty card for the Crafty Collaborations Sketch Challenge Blog Hop

A trio of iridescent faceted gems finished the card.


A pretty card made for the Crafty Collaborations Sketch Challenge using the Violet Dreams designer series paper used and the Cutest Crew stamp set from Stampin' Up!

www.crafty-rootes.co.uk – The Violet Dreams designer series paper used with the Cutest Crew stamp set to make a pretty card for the Crafty Collaborations Sketch Challenge Blog Hop

Please hop on to see what my crafty friends have to share with us today.


Blog Hop Index


Order goodies/Join My Team

I would love to be your demonstrator if you don’t already have one and live in the UK.  I would also be delighted to send you a catalogue if you do not have a demonstrator. I would be happy to place an order for you, or you can order directly by clicking on the “shop online” button.


Contact me for information about joining my team or click on the ‘Join My Team’ button

Details of the products I used for this project can be found below.

Mo x

Supplies used:
 

A pretty card made using the Garden Gatherings stamp set, the Beautiful Bokeh dsp and Vellum from Stampin' Up!

Embossed Vases Card


Here is a sweet card inspired by Wendy Lee of Creativelee Yours – using the pretty Garden Gatherings stamp set and the Beautiful Bokeh dsp.

Colours used in making this card are:


I created the embossed vases card using the following supplies:

Thick Basic White card base – 8¼” by 5⅞” scored at 4⅛” on the long side
Vellum – 5⅜” by 3⅝”
Beautiful Bokeh dsp – 5” by 3¼”
Basic White -2½” by 2”
Scrap Basic White


Using Versamark ink, I randomly stamped both vases from the garden Gatherings stamp set all over the panel of Vellum. I covered the panel with White Embossing Powder and set it using my heat tool. I added dots to some of the vases using the White Gel Pen.


A pretty card made using the Garden Gatherings stamp set, the Beautiful Bokeh dsp and Vellum from Stampin' Up!

www.crafty-rootes.co.uk – The Garden Gatherings stamp set used with the Beautiful Bokeh dsp and Vellum to make a pretty card

I die cut a label from the small piece of Basic White card using the Nested Essentials dies and stamped the sentiment, from the Cutest Crew stamp set with Calypso Coral ink.


A pretty card made using the Garden Gatherings stamp set, the Beautiful Bokeh dsp and Vellum from Stampin' Up!

www.crafty-rootes.co.uk – The Garden Gatherings stamp set used with the Beautiful Bokeh dsp and Vellum to make a pretty card

I adhered the label to the panel of Vellum with Multipurpose Liquid Adhesive trapping a strip of retired Calypso Coral Ribbon. More liquid adhesive was added to the back of the vellum panel where it would be hidden by the label and glued it to the panel of dsp. The whole panel was then mounted onto the Thick Basic White card front on Dimensionals.


A pretty card made using the Garden Gatherings stamp set, the Beautiful Bokeh dsp and Vellum from Stampin' Up!

www.crafty-rootes.co.uk – The Garden Gatherings stamp set used with the Beautiful Bokeh dsp and Vellum to make a pretty card

I adhered a piece of the Extraordinary Flora dsp to scrap Basic White card and die cut my chosen image. This was the adhered to the card front.


A pretty card made using the Garden Gatherings stamp set, the Beautiful Bokeh dsp and Vellum from Stampin' Up!

www.crafty-rootes.co.uk – The Garden Gatherings stamp set used with the Beautiful Bokeh dsp and Vellum to make a pretty card

A bow and a trio of dots from my stash finished the card.


A pretty card made using the Garden Gatherings stamp set, the Beautiful Bokeh dsp and Vellum from Stampin' Up!

www.crafty-rootes.co.uk – The Garden Gatherings stamp set used with the Beautiful Bokeh dsp and Vellum to make a pretty card

Order goodies/Join My Team

I would love to be your demonstrator if you don’t already have one and live in the UK.  I would also be delighted to send you a catalogue if you do not have a demonstrator. I would be happy to place an order for you, or you can order directly by clicking on the “shop online” button.


Contact me for information about joining my team or click on the ‘Join My Team’ button

Details of the products I used for this project can be found below.

Mo x

Supplies used:
 

A card made for the Stamping With Friends Blog Hop product of the month blog hop using the Berry Botanical Vellum,and the Cutest Crew stamp set from Stampin' Up!

Botanical Vellum Card – Stamping With Friends Blog Hop

Hello and welcome to the Stamping With Friends Blog Hop where we are sharing projects made using one of the available products of the months. I have chosen to use the gorgeous Berry Botanicals Vellum which was the offering for May 2026.

Colours in this card are:


I created the botanical vellum card using the following supplies:

Thick Basic White card base – 8¼” by 5⅞” scored at 4⅛” on the long side
Berry Botanicals Vellum – 5” by 3¼”
Basic White – 5” by 3¼”
Basic White – 2¾” by 2¼”
Scrap Berry Botanicals vellum and Basic White


I used Seal + to adhere the piece of Berry Botanicals Vellum to the piece of Basic White card which is the same size.


A card made for the Stamping With Friends Blog Hop product of the month blog hop using the Berry Botanical Vellum,and the Cutest Crew stamp set from Stampin' Up!

www.crafty-rootes.co.uk – The Berry Botanical Vellum, a product of the month used with the Cutest Crew stamp set to make a card for the Stamping With Friends Blog Hop

The vellum piece was then glued to the Thick Basic White card front.


A card made for the Stamping With Friends Blog Hop product of the month blog hop using the Berry Botanical Vellum,and the Cutest Crew stamp set from Stampin' Up!

www.crafty-rootes.co.uk – The Berry Botanical Vellum, a product of the month used with the Cutest Crew stamp set to make a card for the Stamping With Friends Blog Hop

Using the Nested Essentials dies I die cut a label from the smallest piece of Basic White card. The sentiment, from the Cutest Crew stamps set was stamped onto the label with Peaceful Pine ink which was then mounted onto the card front on Dimensionals.


A card made for the Stamping With Friends Blog Hop product of the month blog hop using the Berry Botanical Vellum,and the Cutest Crew stamp set from Stampin' Up!

www.crafty-rootes.co.uk – The Berry Botanical Vellum, a product of the month used with the Cutest Crew stamp set to make a card for the Stamping With Friends Blog Hop

I choose a piece of the pretty Vellum and adhered it to a piece of Basic White card using Seal +. Using sharp Scissors I fussy cut around some of the flowers and leaves and tucked them under the corners of the label using Mini Glue Dots.


A card made for the Stamping With Friends Blog Hop product of the month blog hop using the Berry Botanical Vellum,and the Cutest Crew stamp set from Stampin' Up!

www.crafty-rootes.co.uk – The Berry Botanical Vellum, a product of the month used with the Cutest Crew stamp set to make a card for the Stamping With Friends Blog Hop

A trio of 2026 – 2028 In Color Butterflies finished the card.


A card made for the Stamping With Friends Blog Hop product of the month blog hop using the Berry Botanical Vellum,and the Cutest Crew stamp set from Stampin' Up!

www.crafty-rootes.co.uk – The Berry Botanical Vellum, a product of the month used with the Cutest Crew stamp set to make a card for the Stamping With Friends Blog Hop

Please hop on to see what has inspired my fellow demos.


Blog Hop Index


Order goodies/Join My Team

I would love to be your demonstrator if you don’t already have one and live in the UK.  I would also be delighted to send you a catalogue if you do not have a demonstrator. I would be happy to place an order for you, or you can order directly by clicking on the “shop online” button.


Contact me for information about joining my team or click on the ‘Join My Team’ button

Details of the products I used for this project can be found below.

Mo x

Supplies used:


A dog themed birthday card made using the Cutest Crew stamp set and co-ordinating dies from Stampin' Up!

Cutest Crew Card

I have been playing with the Cutest Crew stamp set and dies and have made a birthday card featuring the row of dogs.

Colours used to make this card are:


I created the cutest crew card using the following supplies:

Poppy Parade card base – 8¼” by 5⅞” scored at 4⅛” on the long side
Pecan Pie – 5½” by 3¾”
Basic Beige – 5⅜” by 3⅝”
Pecan Pie – 4” by ¾”
Basic White – 5½” by 3¾” for the inside
Scrap Basic White


I placed the image of the row of dogs onto the small plate of the new Stamp Positioner, available in my online store from the 5th May 2026. I then stamped the image down the Basic Beige layer using Basic Beige ink. The stamped layer was then adhered to the Pecan Pie panel and then to the Poppy Parade card front.


A dog themed birthday card made using the Cutest Crew stamp set and co-ordinating dies from Stampin' Up!

www.crafty-rootes.co.uk – The Cutest Crew stamp set and co-ordinating dies used to make do themed birthday card

The same image was then stamped on scrap Basic White card with Early Espresso ink and die cut using the Cutest Crew dies.


A dog themed birthday card made using the Cutest Crew stamp set and co-ordinating dies from Stampin' Up!

www.crafty-rootes.co.uk – The Cutest Crew stamp set and co-ordinating dies used to make dog themed birthday card

Using the following Blends Pens I coloured in the image – Light, Medium, Deep, Dark Crumb, Light Pecan. Dark Poppy & light Granny. The die cut piece was then mounted onto the card front on Dimensionals.


A dog themed birthday card made using the Cutest Crew stamp set and co-ordinating dies from Stampin' Up!

www.crafty-rootes.co.uk – The Cutest Crew stamp set and co-ordinating dies used to make dog themed birthday card

From the strip of Pecan Pie card I die cut the row of paw prints and tucked it under the row of dogs having trimmed it down first.


A dog themed birthday card made using the Cutest Crew stamp set and co-ordinating dies from Stampin' Up!

www.crafty-rootes.co.uk – The Cutest Crew stamp set and co-ordinating dies used to make dog themed birthday card

The sentiment, from the Garden Gatherings stamp set was stamped in Poppy Parade ink onto scrap Basic White card. I trimmed it out and added it to the card front.


A dog themed birthday card made using the Cutest Crew stamp set and co-ordinating dies from Stampin' Up!

www.crafty-rootes.co.uk – The Cutest Crew stamp set and co-ordinating dies used to make dog themed birthday card

A trio of Poppy Parade stars from my stash completed the card.

 Order goodies/Join My Team

I would love to be your demonstrator if you don’t already have one and live in the UK.  I would also be delighted to send you a catalogue if you do not have a demonstrator. I would be happy to place an order for you, or you can order directly by clicking on the “shop online” button.


Contact me for information about joining my team or click on the ‘Join My Team’ button

Details of the products I used for this project can be found below.

Mo x

Supplies used:


A floral birthday card made using the Flowers Fair stamp set by Stampin' Up!

Masked Floral Card – Share It Sunday Blog Hop

Hello and welcome to the Share It Sunday Blog Hop where we are sharing something we have been working on recently. This floral card was made using the Flowers Fair stamp with masking and ink blending.

Colours used to make this card are:


I created the Masked Floral card using the following supplies:

Petunia Pop card base – 8¼” by 5⅞” scored at 4⅛” on the long side
Secret Sea – 5½” by 3¾”
Basic White – 5⅝” by 3⅞”
Basic White – 5½” by 3¾” for the inside


Using Masking Paper I masked off the top and bottom of the larger panel of Basic White card at a slant. The Masking Paper was left in position.


A floral birthday card made using the Flowers Fair stamp set by Stampin' Up!

www.crafty-rootes.co.uk – The Flowers Fair stamp set used with masking technique to make a floral birthday card

With the large Flowers Fair stamp mounted on a Stamp Positioner, I stamped the large background stamp on the masked off piece of Basic White card using Secret Sea ink.


A floral birthday card made using the Flowers Fair stamp set by Stampin' Up!

www.crafty-rootes.co.uk – The Flowers Fair stamp set used with masking technique to make a floral birthday card

I added Daffodil Delight ink with a Blending Brush to the left side of the masked image, Petunia Pop ink was added to the centre area and finally, Balmy Blue ink to the right-hand edge and the masking paper was then removed.


A floral birthday card made using the Flowers Fair stamp set by Stampin' Up!

www.crafty-rootes.co.uk – The Flowers Fair stamp set used with masking technique to make a floral birthday card

I stamped the sentiment, from the Cutest Crew stamp set below the inked area with Secret Sea ink.


A floral birthday card made using the Flowers Fair stamp set by Stampin' Up!

www.crafty-rootes.co.uk – The Flowers Fair stamp set used with masking technique to make a floral birthday card

A trio of Sparkle Dots Essentials completed the card.


A floral birthday card made using the Flowers Fair stamp set by Stampin' Up!

www.crafty-rootes.co.uk – The Flowers Fair stamp set used with masking technique to make a floral birthday card

Please hop on to see what my friends have been inspired to use recently.


Blog Hop Index


Order goodies/Join My Team

I would love to be your demonstrator if you don’t already have one and live in the UK.  I would also be delighted to send you a catalogue if you do not have a demonstrator. I would be happy to place an order for you, or you can order directly by clicking on the “shop online” button.


Contact me for information about joining my team or click on the ‘Join My Team’ button

Details of the products I used for this project can be found below.

Mo x

Supplies used:


A friendship card made using the Painted Illusions designer series paper and the Greenery Lane dies from Stampin' Up!

Quilted Painted Illusions Card – Stamping With Friends Blog Hop

Hello and welcome to the Stamping With Friends Blog Hop where we are sharing projects using one of our products of the month. I have chosen to make my card using the Painted Illusions dsp, February’s product of the month which is still available.

Colours used in this card are:


I created the quilted painted illusions card using the following supplies:

Lost Lagoon card base – 8¼” by 5⅞” scored at 4⅛” on the long side
Night of Navy – 5⅜” by 3⅝”
Basic White – 5¼” by 3½”
Painted Illusions dsp – 1” squares x 9
Backing – 3” by 3” – I used grid paper but copy paper would do
Basic White – 3” by ¼” x 4
Basic White – 5½” by 3¾” for the inside
Scrap Night of Navy


I ran the 5¼” by 3½” Basic White layer through the Cut & Emboss Machine using the Lazy Daisy Embossing Folder and adhered the embossed panel to the panel of Night of Navy card. The layer was then glued to the Lost Lagoon card base using Multipurpose Liquid Adhesive.


A friendship card made using the Painted Illusions designer series paper and the Greenery Lane dies from Stampin' Up!

www.crafty-rootes.co.uk -The Painted Illusions designer series paper used with the Greenery Lane dies used to make a friendship card – Stamping With Friends Blog Hop

I laid out the 1” squares of Painted Illusions dsp on the 3” by 3” piece of grid paper creating a pattern. When I was happy with the layout, I used liquid glue to adhere the 1” squares to the grid paper.


A friendship card made using the Painted Illusions designer series paper and the Greenery Lane dies from Stampin' Up!

www.crafty-rootes.co.uk -The Painted Illusions designer series paper used with the Greenery Lane dies used to make a friendship card – Stamping With Friends Blog Hop

I glued the ¼” strips over the dsp panel and ran the whole piece through the Cut & Emboss Machine with the Lazy Daisy Embossing Folder. The panel was added to the card front on Dimensionals.


A friendship card made using the Painted Illusions designer series paper and the Greenery Lane dies from Stampin' Up!

www.crafty-rootes.co.uk -The Painted Illusions designer series paper used with the Greenery Lane dies used to make a friendship card – Stamping With Friends Blog Hop

From scrap Night of Navy card I die cut a spray of leaves using the Greenery Lane Dies and glued it to the quilted piece on the card front.


A friendship card made using the Painted Illusions designer series paper and the Greenery Lane dies from Stampin' Up!

www.crafty-rootes.co.uk -The Painted Illusions designer series paper used with the Greenery Lane dies used to make a friendship card – Stamping With Friends Blog Hop

The sentiment, from the Cutest Crew stamp set was stamped on scrap Night of Navy card with Versamark ink. I covered it with White Embossing Powder and set it using a heat tool. The sentiment was then die cut using the Stylish Shapes Dies before being added to the card front.


A friendship card made using the Painted Illusions designer series paper and the Greenery Lane dies from Stampin' Up!

www.crafty-rootes.co.uk -The Painted Illusions designer series paper used with the Greenery Lane dies used to make a friendship card – Stamping With Friends Blog Hop

A trio of Rainbow Dots finishes the card.

Please hop on to share the inspiration provided by my crafty friends.


Blog Hop Index


Order goodies/Join My Team

 I would love to be your demonstrator if you don’t already have one and live in the UK.  I would also be delighted to send you a catalogue if you do not have a demonstrator. I would be happy to place an order for you, or you can order directly by clicking on the “shop online” button.


Contact me for information about joining my team or click on the ‘Join My Team’ button

Details of the products I used for this project can be found below.

Mo x

Supplies used:


A pretty cat themed note card made using the Cutest Crew stamp set, Lasting Linen stamp set and Stylish Shapes dies from Stampin' Up!

Cutest Cats Card

Here is an adorable card made using the cat images from the Cutest Crew stamp set and dies.

Colours used to make this card are:


I created the cutest cats card using the following supplies:

Fresh Freesia card base – 8¼” by 5⅞” scored at 4⅛” on the long side
Basic White – 5⅛” by 3⅜”
Basic White – 5¼” by 3½”
Gorgeous Grape – 3” by 3”
Basic White – 2½” by 2½”
Basic White – 5½” by 3¾” – for the inside
Scrap Basic White and Gorgeous Grape


I stamped the 5⅛” by 3⅜” piece of Basic White card using Fresh Freesia ink and the Lasting Linen Background stamp. I wrapped a couple of lengths of White Baker’s twine around the stamped panel before adhering it to the slightly larger panel of Basic White card. This was then glued to the Fresh Freesia card front.


A pretty cat themed note card made using the Cutest Crew stamp set, Lasting Linen stamp set and Stylish Shapes dies from Stampin' Up!

www.crafty-rootes.co.uk – The Cutest Crew stamp set, Lasting Linen stamp set and Stylish Shapes dies used to make a pretty cat themed note card

Using the Stylish Shapes dies, I cut 2 stitched circles from the Basic White and Gorgeous Grape cardstock squares.


A pretty cat themed note card made using the Cutest Crew stamp set, Lasting Linen stamp set and Stylish Shapes dies from Stampin' Up!

www.crafty-rootes.co.uk – The Cutest Crew stamp set, Lasting Linen stamp set and Stylish Shapes dies used to make a pretty cat themed note card

I stamped the sentiment onto the White die cut circle using Gorgeous Grape ink before gluing the 2 circles together and adding them to the card front on Dimensionals.


A pretty cat themed note card made using the Cutest Crew stamp set, Lasting Linen stamp set and Stylish Shapes dies from Stampin' Up!

www.crafty-rootes.co.uk – The Cutest Crew stamp set, Lasting Linen stamp set and Stylish Shapes dies used to make a pretty cat themed note card

The row of cats was then stamped onto scrap Basic White card with Memento Tuxedo Black ink. I then fussy cut each of the cats plus one more and then coloured them with the following Blends Pens – Smoky Slate, Gray Granite, Crumb Cake, Pecan Pie and Black. These were then added to the card front around the raised circles.


A pretty cat themed note card made using the Cutest Crew stamp set, Lasting Linen stamp set and Stylish Shapes dies from Stampin' Up!

www.crafty-rootes.co.uk – The Cutest Crew stamp set, Lasting Linen stamp set and Stylish Shapes dies used to make a pretty cat themed note card

A trio of butterflies were die cut using the Cutest Crew dies and scrap Gorgeous Grape card. These were added to the card front along with a trio of Frosted Iridescent Dots and a White Baker’s twine bow.


A pretty cat themed note card made using the Cutest Crew stamp set, Lasting Linen stamp set and Stylish Shapes dies from Stampin' Up!

www.crafty-rootes.co.uk – The Cutest Crew stamp set, Lasting Linen stamp set and Stylish Shapes dies used to make a pretty cat themed note card

Order goodies/Join My Team

I would love to be your demonstrator if you don’t already have one and live in the UK.  I would also be delighted to send you a catalogue if you do not have a demonstrator. I would be happy to place an order for you, or you can order directly by clicking on the “shop online” button.


Contact me for information about joining my team or click on the ‘Join My Team’ button

Details of the products I used for this project can be found below.

Mo x

Supplies used: