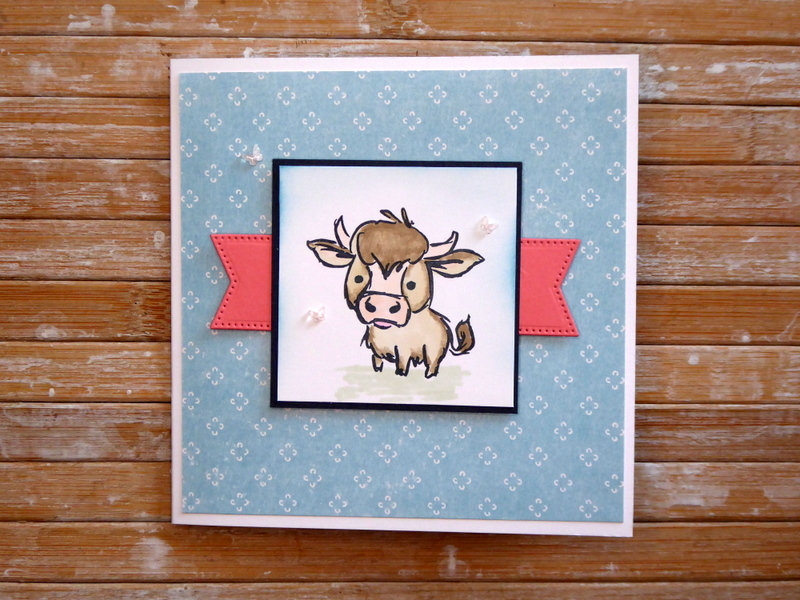
A special birthday card made using the Wild Bunch stamp set and the Mixed-up Patterns designer series paper from Stampin' Up!

Wild Bunch Fun Fold Card

Here is a pretty, fun fold card made using the Wild Bunch stamp set for a friend’s special birthday.


Colours used to make this card are:


I created the wild bunch fun fold card using the following supplies:

Thick Basic White card base – 10” by 5” scored at 5” on the long side
Mixed-up Patterns dsp – 4¾” by 4¾” x 3
Secret Sea – 2⅝” by 2⅝”
Basic White – 2½” by 2½”
Flirty Flamingo – 3½” by 1¼”
Thick Basic White – 10” by 1½” – fold in half on the long side then fold each half in half again
Secret Sea – 2¼” by 2¼” x 3
Basic White – 2⅛” by 2⅛” x 3
Scrap Flirty Flamingo


I began by gluing the 3 panels of Mixed-up Patterns dsp to the Thick Basic White card base measuring 10” by 5”, one on the front and the remaining 2 panels on the inside.


A special birthday card made using the Wild Bunch stamp set and the Mixed-up Patterns designer series paper from Stampin' Up!

www.crafty-rootes.co.uk – The Wild Bunch stamp set used with the Mixed-up Patterns designer series paper to make a fun fold card for a special birthday

The highland cow was stamped on the larger Basic White square using Secret Sea ink. I used Petal Pink and Crumb Cake Blends Pen to colour in the cow. A Soft Sea Foam Blends Pen added some ‘ground’ and I used a Blending Brush and Balmy Blue ink to give the illusion of sky. The decorated panel was then glued to the larger Secret Sea square. I die cut the largest banner from the strip of Flirty Flamingo card using the Stylish Shapes Dies.  The die cut banner was cut in half and added to either side of the decorated panel. The whole piece was then mounted onto the card front on Dimensionals.


A special birthday card made using the Wild Bunch stamp set and the Mixed-up Patterns designer series paper from Stampin' Up!

www.crafty-rootes.co.uk – The Wild Bunch stamp set used with the Mixed-up Patterns designer series paper to make a fun fold card for a special birthday

I folded the 10” by 1 ½” strip as detailed above and glued the left end to the inside of the card base on the left side. The right end was then glued to the right side of the card base on the inside.


A special birthday card made using the Wild Bunch stamp set and the Mixed-up Patterns designer series paper from Stampin' Up!

www.crafty-rootes.co.uk – The Wild Bunch stamp set used with the Mixed-up Patterns designer series paper to make a fun fold card for a special birthday

I stamped one animal on 3 of the smaller pieces of Basic White card. The snail was coloured with Crumb Cake, Flirty Flamingo Blends Pens. The Koala was coloured with Gray Granite, Petal Pink and the penguin with Secret Sea and Daffodil Delight.


A special birthday card made using the Wild Bunch stamp set and the Mixed-up Patterns designer series paper from Stampin' Up!

www.crafty-rootes.co.uk – The Wild Bunch stamp set used with the Mixed-up Patterns designer series paper to make a fun fold card for a special birthday

Ground was added with Soft Sea Foam. I used a Blending Brush to added Balmy Blue ink to each panel giving ‘sky’. Each panel was adhered to a small Secret Sea square and then to the long strip inside the card.


A special birthday card made using the Wild Bunch stamp set and the Mixed-up Patterns designer series paper from Stampin' Up!

www.crafty-rootes.co.uk – The Wild Bunch stamp set used with the Mixed-up Patterns designer series paper to make a fun fold card for a special birthday

On the remaining Basic White square I stamped the HAPPY BIRTHDAY, masking off and stamping one word at a time. The numbers were die cut from scrap Flirty Flamingo using the retired Little Numbers Dies. These were then glued to the panel. I mounted the panel on the remaining Secret Sea square and then added it to the long strip.


A special birthday card made using the Wild Bunch stamp set and the Mixed-up Patterns designer series paper from Stampin' Up!

www.crafty-rootes.co.uk – The Wild Bunch stamp set used with the Mixed-up Patterns designer series paper to make a fun fold card for a special birthday

A trio of 2026 – 2028 In Color Butterflies finished the card.


Order goodies/Join My Team

I would love to be your demonstrator if you don’t already have one and live in the UK.  I would also be delighted to send you a catalogue if you do not have a demonstrator. I would be happy to place an order for you, or you can order directly by clicking on the “shop online” button.


Contact me for information about joining my team or click on the ‘Join My Team’ button

Details of the products I used for this project can be found below.

Mo x

Supplies used:


A pretty celebration card made using the Begonia Belle stamp set, July 2026 product of the month and the Flourish Frames Hot Foil Dies from Stampin' Up!

Purple Begonia Card – Stamping With Friends Blog Hop

Hello and welcome to the Stamping With Friends Blog Hop where we are sharing projects made using a product of the month. I am using the July 2026 offering a pretty two step stamp set called Begonia Belle.


Colours used to make this card are:


I created the purple begonias card using the following supplies:

Thick Basic White card base – 8¼” by 5⅞” scored at 4⅛” on the long side
Silver Foil – 5⅜” by 3⅝”
Violet Dreams dsp – 5¼” by 3½”
Basic White – 4¼” by 3¼”
Basic White– 3” by ½”


I began by adhering the panel of Violet Dreams dsp to the piece of Silver Foil, and yes, I did gut the middle out of the silver foil panel to use in another project. The whole piece was then glued to the Thick Basic White card front.


A pretty celebration card made using the Begonia Belle stamp set, July 2026 product of the month and the Flourish Frames Hot Foil Dies trom Stampin' Up!

www.crafty-rootes.co.uk – The Begonia Belle stamp set, July 2026 product of the month used with the Flourish Frames Hot Foil Dies to make a pretty celebration card

Using the Hot Foil System, Silver Foil and the Flourish and Frames Hot Foil Dies I created a silver foil frame which I then die cut using the same set of dies.


A pretty celebration card made using the Begonia Belle stamp set, July 2026 product of the month and the Flourish Frames Hot Foil Dies from Stampin' Up!

www.crafty-rootes.co.uk – The Begonia Belle stamp set, July 2026 product of the month used with the Flourish Frames Hot Foil Dies to make a pretty celebration card

In the centre of the die cut frame I stamped the outline begonia image with Gorgeous Grape ink. The infill was then added with Highland Heather ink, so pretty.


A pretty celebration card made using the Begonia Belle stamp set, July 2026 product of the month and the Flourish Frames Hot Foil Dies from Stampin' Up!

www.crafty-rootes.co.uk – The Begonia Belle stamp set, July 2026 product of the month used with the Flourish Frames Hot Foil Dies to make a pretty celebration card

I stamped the outline image again on Masking Paper, fussy cut it out and added it over the stamped flower. The outline leaves were then stamped with Peaceful Pine ink and the infill leafy image with 2nd generation Peaceful Pine ink before the mask was removed. The silver foil edged label was then mounted onto the card front on Dimensionals.


A pretty celebration card made using the Begonia Belle stamp set, July 2026 product of the month and the Flourish Frames Hot Foil Dies from Stampin' Up!

www.crafty-rootes.co.uk – The Begonia Belle stamp set, July 2026 product of the month used with the Flourish Frames Hot Foil Dies to make a pretty celebration card

The sentiment, from the Cutest Crew stamp set was stamped on the strip of Basic White card with Gorgeous Grape ink. I flagged the ends before adding it to the card front.


A pretty celebration card made using the Begonia Belle stamp set, July 2026 product of the month and the Flourish Frames Hot Foil Dies from Stampin' Up!

www.crafty-rootes.co.uk – The Begonia Belle stamp set, July 2026 product of the month used with the Flourish Frames Hot Foil Dies to make a pretty celebration card

I used a Dark Highland Heather Blends Pen to add colour to a trio of Basic Rhinestones before adding then to complete the card.


Please hop on to see what my fellow crafters have created using a product of the month.


Blog Hop Index


Order goodies/Join My Team

I would love to be your demonstrator if you don’t already have one and live in the UK.  I would also be delighted to send you a catalogue if you do not have a demonstrator. I would be happy to place an order for you, or you can order directly by clicking on the “shop online” button.


Contact me for information about joining my team or click on the ‘Join My Team’ button

Details of the products I used for this project can be found below.

Mo x

Supplies used:


A card made for the Crafty Challenge Dice Roll Blog Hop using the Begonia Belle stamp set and the Lazy Daisy Embossing Folder from Stampin' Up!

Subtle Begonia Card – Crafty Challenge Blog Hop

Hello and welcome to the Crafty Challenge Blog Hop where we are being inspired to create by a dice roll featuring – Subtles, Standard/Horizontal, masking, ribbon, for you. I have made my card using the Begonia Belle stamp set.


Colours used when making this card are:


I created the subtle begonia card using the following supplies:

Soft Sea Foam card base – 8¼” by 5⅞” scored at 4⅛” on the long side
Fresh Freesia – 5” by 3⅜”
Basic White – 4⅞” by 3¼”
Basic White – 2¼” by 1”
Basic White – 5½” by 3¾” – for the inside
Scrap Basic White card


I stamped the detailed leaf image in the upper left and lower right corners of the Soft Sea Foam card front with Soft Sea Foam ink.


A card made for the Crafty Challenge Dice Roll Blog Hop using the Begonia Belle stamp set and the Lazy Daisy Embossing Folder from Stampin' Up!

www.crafty-rootes.co.uk – The Begonia Belle stamp set used with the Lazy Daisy Embossing Folder to make a card for the Crafty Challenge Dice Roll Blog Hop

I embossed a third of the 5” by 3⅜” Basic White card using the Lazy Daisy Embossing folder.


A card made for the Crafty Challenge Dice Roll Blog Hop using the Begonia Belle stamp set and the Lazy Daisy Embossing Folder from Stampin' Up!

www.crafty-rootes.co.uk – The Begonia Belle stamp set used with the Lazy Daisy Embossing Folder to make a card for the Crafty Challenge Dice Roll Blog Hop

The detailed flower was the stamped on the un-embossed card with Fresh Freesia ink. The infill colour was added with 2nd generation Fresh Freesia ink. I stamped the detailed image on Masking paper and used it to cover the stamped image before stamping the leaves with Soft Sea Foam ink, 1st generation for the detailed image and 2nd generation for the infill colour. I added the small leafy sprig and buds using the same inks.


A card made for the Crafty Challenge Dice Roll Blog Hop using the Begonia Belle stamp set and the Lazy Daisy Embossing Folder from Stampin' Up!

www.crafty-rootes.co.uk – The Begonia Belle stamp set used with the Lazy Daisy Embossing Folder to make a card for the Crafty Challenge Dice Roll Blog Hop

A length of Fresh Freesia Satin Ribbon was wrapped around the embossed and decorated panel before it was added to the Fresh Freesia panel and then to the Soft Sea Foam card front.


A card made for the Crafty Challenge Dice Roll Blog Hop using the Begonia Belle stamp set and the Lazy Daisy Embossing Folder from Stampin' Up!

www.crafty-rootes.co.uk – The Begonia Belle stamp set used with the Lazy Daisy Embossing Folder to make a card for the Crafty Challenge Dice Roll Blog Hop

The sentiment, from the Fragrant Layers stamped set was stamped in Highland Heather ink on scrap Basic White card. It is a much longer sentiment, so I masked off the words I didn’t need before inking up and stamping. The sentiment was then die cut using the Perennial Postage dies. I added it to the card front on Dimensionals.


A card made for the Crafty Challenge Dice Roll Blog Hop using the Begonia Belle stamp set and the Lazy Daisy Embossing Folder from Stampin' Up!

www.crafty-rootes.co.uk – The Begonia Belle stamp set used with the Lazy Daisy Embossing Folder to make a card for the Crafty Challenge Dice Roll Blog Hop

A trio of Iridescent Pearls finished the card.

Please hop on to see what my fellow crafters have made using this dice roll.


Order goodies/Join My Team

I would love to be your demonstrator if you don’t already have one and live in the UK.  I would also be delighted to send you a catalogue if you do not have a demonstrator. I would be happy to place an order for you, or you can order directly by clicking on the “shop online” button.


Contact me for information about joining my team or click on the ‘Join My Team’ button

Details of the products I used for this project can be found below.

Mo x

Supplies used:


A card made for the Ink. Stamp.Share Blog Hop using the Begonia Belle stamp set, Stampin' Up's July 2026 product of the month

Begonia Belle Card – Ink. Stamp.Share Blog Hop

Hello and welcome to the Ink. Stamp. Share Blog Hop where we are showcasing product we have been using recently. I have chosen to share a card made using the Begonia Belle stamp set which is our July Product of the Month to make my card.


Colours used in making this card are:


I created the Begonia Belle card using the following supplies:

Cloud Cover card base – 8¼” by 5⅞” scored at 4⅛” on the long side
Strawberry Slush – 4⅞” by 3⅛”
Basic White – 4¾” by 3”
Basic White – 5½” by 3¾” – for the inside


I stamped the ‘dotty’ image on the right-hand side of the Cloud Cover card front using Cloud Cover ink and set it aside.


A card made for the Ink. Stamp.Share Blog Hop using the Begonia Belle stamp set, Stampin' Up's July 2026 product of the month

www.crafty-rootes.co.uk – The Begonia Belle stamp set, July 2026 product of the month used to make a card for the Ink. Stamp.Share Blog Hop

Using Strawberry Slush ink, I stamped the more detailed flower image onto the smaller panel of Basic White card and added the infill image in 2nd generation Strawberry Slush ink.


A card made for the Ink. Stamp.Share Blog Hop using the Begonia Belle stamp set, Stampin' Up's July 2026 product of the month

www.crafty-rootes.co.uk – The Begonia Belle stamp set, July 2026 product of the month used to make a card for the Ink. Stamp.Share Blog Hop

I stamped the detailed image again on Masking Paper and fussy cut it out and used it to mask off the stamped image.


A card made for the Ink. Stamp.Share Blog Hop using the Begonia Belle stamp set, Stampin' Up's July 2026 product of the month

www.crafty-rootes.co.uk – The Begonia Belle stamp set, July 2026 product of the month used to make a card for the Ink. Stamp.Share Blog Hop

The leaves were then added, the detailed stamp in full strength Granny Apple Green and the infill with 2nd generation Granny Apple Green. The mask was then removed.


A card made for the Ink. Stamp.Share Blog Hop using the Begonia Belle stamp set, Stampin' Up's July 2026 product of the month

www.crafty-rootes.co.uk – The Begonia Belle stamp set, July 2026 product of the month used to make a card for the Ink. Stamp.Share Blog Hop

The dotty image was stamped around the right-hand side of the panel with Cloud Cover ink and the sentiment, from the Banner Sayings was stamped in the lower left corner with Secret Sea Ink.


A card made for the Ink. Stamp.Share Blog Hop using the Begonia Belle stamp set, Stampin' Up's July 2026 product of the month

www.crafty-rootes.co.uk – The Begonia Belle stamp set, July 2026 product of the month used to make a card for the Ink. Stamp.Share Blog Hop

The stamped panel was glued to the Strawberry Slush layer. A loop of Secret Sea Bordered Ribbon was adhered to the back of the panel with Tear & Tape and the panel added to the Cloud Cover card front on Dimensionals.

A trio of Moody Palette Glossy Dots finished the card.


Blog Hop Index


Order goodies/Join My Team

I would love to be your demonstrator if you don’t already have one and live in the UK.  I would also be delighted to send you a catalogue if you do not have a demonstrator. I would be happy to place an order for you, or you can order directly by clicking on the “shop online” button.


Contact me for information about joining my team or click on the ‘Join My Team’ button

Details of the products I used for this project can be found below.

Mo x

Supplies used:


A sweet Koala themed birthday card made using the Wild Bunch stamp set from Stampin' Up! for the Stamping With Friends Product of the Month Blog Hop

Birthday Koala Card – Stamping With Friends Blog Hop

Hello and welcome to the Stamping With Friends Blog Hop where we are sharing projects featuring a product of the month. I have made my card using the Wild Bunch stamp set.


Colours used when creating this card are:


I created the birthday koala card using the following supplies:

Gray Granite card base – 8¼” by 5⅞” scored at 4⅛” on the long side
Poppy Parade – 5⅛” by 3⅜”
Basic White – 5” by 3¼”
Basic White – 5½” by 3¾” – for the inside
Basic White – 2¾” by 1”
Poppy Parade – 2¾” by ⅛”
Scrap Basic White


I stamped the sweet koala with Basic Gray ink onto the smaller panel of Basic White card.


A sweet Koala themed birthday card made using the Wild Bunch stamp set from Stampin' Up! for the Stamping With Friends Product of the Month Blog Hop

www.crafty-rootes.co.uk – The Wild Bunch stamp set used to make a sweet Koala themed birthday card – Stamping With Friends Blog Hop

The image was coloured using the Barely Blush, Gray Granite, Smoky Slate and Basic Black. The panel was then glued to the Poppy Parade layer before being added to the Gray Granite card front on Dimensionals.


A sweet Koala themed birthday card made using the Wild Bunch stamp set from Stampin' Up! for the Stamping With Friends Product of the Month Blog Hop

www.crafty-rootes.co.uk – The Wild Bunch stamp set used to make a sweet Koala themed birthday card – Stamping With Friends Blog Hop

The party hat was stamped on scrap Basic White card. I coloured the pom-pom and added stripes with a Poppy Parade Blends Pen and fussy cut the hat out. I glued it to the head of the koala.


A sweet Koala themed birthday card made using the Wild Bunch stamp set from Stampin' Up! for the Stamping With Friends Product of the Month Blog Hop

www.crafty-rootes.co.uk – The Wild Bunch stamp set used to make a sweet Koala themed birthday card – Stamping With Friends Blog Hop

The sentiment was stamped in Basic Gray ink onto the strip of Basic White card and punched out using the Three Banner Punch.


A sweet Koala themed birthday card made using the Wild Bunch stamp set from Stampin' Up! for the Stamping With Friends Product of the Month Blog Hop

www.crafty-rootes.co.uk – The Wild Bunch stamp set used to make a sweet Koala themed birthday card – Stamping With Friends Blog Hop

The strip of Poppy Parade card was glued to the back of the sentiment label and the whole piece glued to the card front.


A sweet Koala themed birthday card made using the Wild Bunch stamp set from Stampin' Up! for the Stamping With Friends Product of the Month Blog Hop

www.crafty-rootes.co.uk – The Wild Bunch stamp set used to make a sweet Koala themed birthday card – Stamping With Friends Blog Hop

A trio of Adhesive-backed Peppermints completed the card.

Please hop on to see what my crafty friends have to share with us today.


Blog Hop Index


Order goodies/Join My Team

I would love to be your demonstrator if you don’t already have one and live in the UK.  I would also be delighted to send you a catalogue if you do not have a demonstrator. I would be happy to place an order for you, or you can order directly by clicking on the “shop online” button.


Contact me for information about joining my team or click on the ‘Join My Team’ button

Details of the products I used for this project can be found below.

Mo x

Supplies used:


An adorable penguin themed thank you card made using the Wild Bunch stamp set from Stampin' Up!

Adorable Penguins Card

Today I am sharing an adorable Penguin card made using the Wild Bunch stamp set and a simple masking technique.

Colours used when making this card are:


I created the adorable penguins card using the following supplies:

Cloud Cover card base – 8¼” by 5⅞” scored at 4⅛” on the long side
Basic Black – 5⅛” by 3⅜”
Basic White – 5” by 3¼”
Basic White – 5½” by 3¾” – for the inside


I stamped a penguin in the centre of the smaller piece of Basic White card using Black ink.


An adorable penguin themed thank you card made using the Wild Bunch stamp set from Stampin' Up!

www.crafty-rootes.co.uk – The Wild Bunch stamp set used to make an adorable penguin themed thank you card

The same image was then stamped onto Masking Paper and fussy cut out using sharp scissors. The mask was then added over the original stamped image.


An adorable penguin themed thank you card made using the Wild Bunch stamp set from Stampin' Up!

www.crafty-rootes.co.uk – The Wild Bunch stamp set used to make an adorable penguin themed thank you card

A penguin was the stamped on either side of the original penguin using the same ink. The mask was then removed.


An adorable penguin themed thank you card made using the Wild Bunch stamp set from Stampin' Up!

www.crafty-rootes.co.uk – The Wild Bunch stamp set used to make an adorable penguin themed thank you card

I added colour using the Dark Smoky Slate and Light Black Blends Pens. The feet and beak were coloured using the Dark Lemon Lolly Blends Pen and I outlined the images with the Light Cloud Cover Blends Pen. I used the Color Lifter to blur the colour around the penguins.


An adorable penguin themed thank you card made using the Wild Bunch stamp set from Stampin' Up!

www.crafty-rootes.co.uk – The Wild Bunch stamp set used to make an adorable penguin themed thank you card

The sentiment was stamped with Black ink and a Journaling Pen used to add a frame around the panel.


An adorable penguin themed thank you card made using the Wild Bunch stamp set from Stampin' Up!

www.crafty-rootes.co.uk – The Wild Bunch stamp set used to make an adorable penguin themed thank you card

A trio of Moody Palette Glossy Dots finished the card.


Order goodies/Join My Team

I would love to be your demonstrator if you don’t already have one and live in the UK.  I would also be delighted to send you a catalogue if you do not have a demonstrator. I would be happy to place an order for you, or you can order directly by clicking on the “shop online” button.


Contact me for information about joining my team or click on the ‘Join My Team’ button

Details of the products I used for this project can be found below.

Mo x

Supplies used:


A card made for the Stamping With Friends Blog Hop product of the month blog hop using the Berry Botanical Vellum,and the Cutest Crew stamp set from Stampin' Up!

Botanical Vellum Card – Stamping With Friends Blog Hop

Hello and welcome to the Stamping With Friends Blog Hop where we are sharing projects made using one of the available products of the months. I have chosen to use the gorgeous Berry Botanicals Vellum which was the offering for May 2026.

Colours in this card are:


I created the botanical vellum card using the following supplies:

Thick Basic White card base – 8¼” by 5⅞” scored at 4⅛” on the long side
Berry Botanicals Vellum – 5” by 3¼”
Basic White – 5” by 3¼”
Basic White – 2¾” by 2¼”
Scrap Berry Botanicals vellum and Basic White


I used Seal + to adhere the piece of Berry Botanicals Vellum to the piece of Basic White card which is the same size.


A card made for the Stamping With Friends Blog Hop product of the month blog hop using the Berry Botanical Vellum,and the Cutest Crew stamp set from Stampin' Up!

www.crafty-rootes.co.uk – The Berry Botanical Vellum, a product of the month used with the Cutest Crew stamp set to make a card for the Stamping With Friends Blog Hop

The vellum piece was then glued to the Thick Basic White card front.


A card made for the Stamping With Friends Blog Hop product of the month blog hop using the Berry Botanical Vellum,and the Cutest Crew stamp set from Stampin' Up!

www.crafty-rootes.co.uk – The Berry Botanical Vellum, a product of the month used with the Cutest Crew stamp set to make a card for the Stamping With Friends Blog Hop

Using the Nested Essentials dies I die cut a label from the smallest piece of Basic White card. The sentiment, from the Cutest Crew stamps set was stamped onto the label with Peaceful Pine ink which was then mounted onto the card front on Dimensionals.


A card made for the Stamping With Friends Blog Hop product of the month blog hop using the Berry Botanical Vellum,and the Cutest Crew stamp set from Stampin' Up!

www.crafty-rootes.co.uk – The Berry Botanical Vellum, a product of the month used with the Cutest Crew stamp set to make a card for the Stamping With Friends Blog Hop

I choose a piece of the pretty Vellum and adhered it to a piece of Basic White card using Seal +. Using sharp Scissors I fussy cut around some of the flowers and leaves and tucked them under the corners of the label using Mini Glue Dots.


A card made for the Stamping With Friends Blog Hop product of the month blog hop using the Berry Botanical Vellum,and the Cutest Crew stamp set from Stampin' Up!

www.crafty-rootes.co.uk – The Berry Botanical Vellum, a product of the month used with the Cutest Crew stamp set to make a card for the Stamping With Friends Blog Hop

A trio of 2026 – 2028 In Color Butterflies finished the card.


A card made for the Stamping With Friends Blog Hop product of the month blog hop using the Berry Botanical Vellum,and the Cutest Crew stamp set from Stampin' Up!

www.crafty-rootes.co.uk – The Berry Botanical Vellum, a product of the month used with the Cutest Crew stamp set to make a card for the Stamping With Friends Blog Hop

Please hop on to see what has inspired my fellow demos.


Blog Hop Index


Order goodies/Join My Team

I would love to be your demonstrator if you don’t already have one and live in the UK.  I would also be delighted to send you a catalogue if you do not have a demonstrator. I would be happy to place an order for you, or you can order directly by clicking on the “shop online” button.


Contact me for information about joining my team or click on the ‘Join My Team’ button

Details of the products I used for this project can be found below.

Mo x

Supplies used:


A thinking of you cardmade using the Boutique Blossoms stamp set and co-ordinating dies used with the Berry Botanicals Vellum from Stampin' Up!

Roses For Sympathy Card

I have made a pretty roses for sympathy card using the Boutique Blossoms stamp set and dies and the Berry Botanicals Designer Vellum.

Colours used to make this card are:


I created the roses for sympathy card using the following supplies:

Blackberry Bliss card base – 8¼” by 5⅞” scored at 4⅛” on the long side
Basic White – 5½” by 3¾” x 2 – one for the inside
Berry Botanicals Vellum – 5⅜” by 3⅝”
Scrap Basic White


I used a little Seal Adhesive to tack down the panel of Berry Botanicals Vellum to one of the Basic White panels. I love that this vellum is so thick that you can’t see the adhesive through it.


A thinking of you cardmade using the Boutique Blossoms stamp set and co-ordinating dies used with the Berry Botanicals Vellum from Stampin' Up!

www.crafty-rootes.co.uk – The Boutique Blossoms stamp set and co-ordinating dies used with the Berry Botanicals Vellum to make a thinking of you card.

The panel was then adhered to the Blackberry Bliss card front.


A thinking of you cardmade using the Boutique Blossoms stamp set and co-ordinating dies used with the Berry Botanicals Vellum from Stampin' Up!

www.crafty-rootes.co.uk – The Boutique Blossoms stamp set and co-ordinating dies used with the Berry Botanicals Vellum to make a thinking of you card.

On scrap Basic White card, I stamped the Outline of both flowers using full strength Blackberry Bliss ink. The solid infill image for each flower was then stamped in 2nd generation Blackberry Bliss. The flowers were then die cut using the Boutique Blossoms Dies.


A thinking of you cardmade using the Boutique Blossoms stamp set and co-ordinating dies used with the Berry Botanicals Vellum from Stampin' Up!

www.crafty-rootes.co.uk – The Boutique Blossoms stamp set and co-ordinating dies used with the Berry Botanicals Vellum to make a thinking of you card.

Using the same dies, I die cut 3 of the small leafy sprigs from scrap Basic White card. I added the largest flower on Dimensionals and the other flower and the leaves using Mini Glue Dots.


A thinking of you cardmade using the Boutique Blossoms stamp set and co-ordinating dies used with the Berry Botanicals Vellum from Stampin' Up!

www.crafty-rootes.co.uk – The Boutique Blossoms stamp set and co-ordinating dies used with the Berry Botanicals Vellum to make a thinking of you card.

The sentiment, from the Sunshine & Tulips stamp set was stamped on scrap Basic White card using Peaceful Pine ink. I punched it out using the Three Banner Punch and added it to the card front.


A thinking of you cardmade using the Boutique Blossoms stamp set and co-ordinating dies used with the Berry Botanicals Vellum from Stampin' Up!

www.crafty-rootes.co.uk – The Boutique Blossoms stamp set and co-ordinating dies used with the Berry Botanicals Vellum to make a thinking of you card.

A trio of Iridescent Faceted Gems finished the card.

Order goodies/Join My Team

I would love to be your demonstrator if you don’t already have one and live in the UK.  I would also be delighted to send you a catalogue if you do not have a demonstrator. I would be happy to place an order for you, or you can order directly by clicking on the “shop online” button.


Contact me for information about joining my team or click on the ‘Join My Team’ button

Details of the products I used for this project can be found below.

Mo x

Supplies used:


A pretty birthday card made using the Balloon Festoon stamp set and co-ordinating dies with the Berry Botanical Vellum from Stampin' Up!

Berry Botanical Balloons Card – Ink. Stamp. Share Blog Hop

Hello and welcome to the Ink. Stamp. Share Blog Hop where we are showcasing something we have been working on. I am sharing my first play with the gorgeous Berry Botanical Vellum, our June product of the month. I have used it with the Balloon Festoon stamp set and dies.

Colours used in this project are:


I created the Berry Botanical Balloons card using the following supplies:

Strawberry Slush card base – 11¾” by 4⅛” scored at 5⅞” on the short side
Misty Moonlight – 5⅜” by 3⅝”
Strawberry Slush – 2” by 1½”
Misty Moonlight – 2½” by ½”
Basic White – 5½” by 3¾” for the inside
Scrap Berry Botanical Vellum, Basic White, Strawberry Slush and Misty Moonlight


Using the So Swirly Embossing Folder I embossed the 2” by 1½” piece of Basic White card and adhered it to the Misty Moonlight panel and then to the Strawberry Slush card front.


A pretty birthday card made using the Balloon Festoon stamp set and co-ordinating dies with the Berry Botanical Vellum from Stampin' Up!

www.crafty-rootes.co.uk – The Balloon Festoon stamp set and co-ordinating dies used with the Berry Botanical Vellum to make a pretty birthday card – Ink. Stamp. Share Blog Hop

I used the Balloon Festoon dies to die cut the second smallest balloon from the scrap of Berry Botanical Vellum. I die cut the same balloon from scrap Basic White card and adhered them together with a little Seal.


A pretty birthday card made using the Balloon Festoon stamp set and co-ordinating dies with the Berry Botanical Vellum from Stampin' Up!

www.crafty-rootes.co.uk – The Balloon Festoon stamp set and co-ordinating dies used with the Berry Botanical Vellum to make a pretty birthday card – Ink. Stamp. Share Blog Hop

I die cut the smallest balloon from scrap Strawberry Slush card. Using Strawberry Slush ink, I randomly stamped the group of stars onto the die cut balloon.


A pretty birthday card made using the Balloon Festoon stamp set and co-ordinating dies with the Berry Botanical Vellum from Stampin' Up!

www.crafty-rootes.co.uk – The Balloon Festoon stamp set and co-ordinating dies used with the Berry Botanical Vellum to make a pretty birthday card – Ink. Stamp. Share Blog Hop

From scrap Misty Moonlight card, I die cut the pair of balloon strings and added them to the bottom of each balloon with a rolled up Mini Glue Dot. The large balloon was added to the card front on Dimensionals and tucked the smaller balloon under the right side.


A pretty birthday card made using the Balloon Festoon stamp set and co-ordinating dies with the Berry Botanical Vellum from Stampin' Up!

www.crafty-rootes.co.uk – The Balloon Festoon stamp set and co-ordinating dies used with the Berry Botanical Vellum to make a pretty birthday card – Ink. Stamp. Share Blog Hop

The sentiment, from the Banner Sayings was stamped in Versamark ink on the strip of Misty Moonlight card. I covered it with White Embossing Folder and set it using a Heat Tool. I punched it out using the Three Banner Punch and added it to the card front on Dimensionals.


A pretty birthday card made using the Balloon Festoon stamp set and co-ordinating dies with the Berry Botanical Vellum from Stampin' Up!

www.crafty-rootes.co.uk – The Balloon Festoon stamp set and co-ordinating dies used with the Berry Botanical Vellum to make a pretty birthday card – Ink. Stamp. Share Blog Hop

A trio of 2025 – 2027 In Color Flat Pearls finished the card.


Order goodies/Join My Team

I would love to be your demonstrator if you don’t already have one and live in the UK.  I would also be delighted to send you a catalogue if you do not have a demonstrator. I would be happy to place an order for you, or you can order directly by clicking on the “shop online” button.


Contact me for information about joining my team or click on the ‘Join My Team’ button

Details of the products I used for this project can be found below.

Mo x

Supplies used:


A pretty birthday card made using the Boutique Blossoms stamp set and co-ordinating dies and the Eyelet Blooms Dies from Stampin' Up!

Boutique Blossoms Card

Hello and welcome to the Stamping With Friends Blog Hop where we are sharing projects made using the April or May Product of the month. I have made a pretty, floral birthday card made using the Eyelet Blooms Die and the Boutique Blossoms stamp set.

Colours used to make this card are:


I created the boutique blossoms card using the following supplies:

Crisp Cantaloupe card base – 8¼” by 5⅞” scored at 4⅛” on the long side
Peaceful Pine – 4⅞” by 3⅛”
Basic White – 4¾” by 3”
Peaceful Pine – 2” by ⅝”
Basic White – 5½” by 3¾ “- for the inside
Scrap Basic White


I began by stamping the solid large flower image with 2nd generation Crisp Cantaloupe ink in the upper left and lower right corner of the Crisp Cantaloupe card front.


A pretty birthday card made using the Boutique Blossoms stamp set and co-ordinating dies and the Eyelet Blooms Dies from Stampin' Up!

www.crafty-rootes.co.uk – The Boutique Blossoms stamp set and co-ordinating dies used with the Eyelet Blooms Dies to make a pretty birthday card

I die cut the 4¾” by 3” piece of Basic White card using the Eyelet Blooms Die and glued it to the panel of Peaceful Pine card. This was then glued to the card front.


A pretty birthday card made using the Boutique Blossoms stamp set and co-ordinating dies and the Eyelet Blooms Dies from Stampin' Up!

www.crafty-rootes.co.uk – The Boutique Blossoms stamp set and co-ordinating dies used with the Eyelet Blooms Dies to make a pretty birthday card

The outline large and small flower were stamped in Crisp Cantaloupe ink onto scrap Basic White card. The solid flowers were then added with 2nd generation Crisp Cantaloupe ink and the flowers were die cut using the Boutique Blossoms Dies. The flowers were added to the card front on Dimensionals.


A pretty birthday card made using the Boutique Blossoms stamp set and co-ordinating dies and the Eyelet Blooms Dies from Stampin' Up!

www.crafty-rootes.co.uk – The Boutique Blossoms stamp set and co-ordinating dies used with the Eyelet Blooms Dies to make a pretty birthday card

The single leaf and trio of leaves were stamped in Peaceful Pine ink, full strength for the outline and 2nd generation for the infill. The leaves were tucked in around the flowers.


A pretty birthday card made using the Boutique Blossoms stamp set and co-ordinating dies and the Eyelet Blooms Dies from Stampin' Up!

www.crafty-rootes.co.uk – The Boutique Blossoms stamp set and co-ordinating dies used with the Eyelet Blooms Dies to make a pretty birthday card

The sentiment, from the Banner Sayings stamp set was stamped on the strip of Peaceful Pine card with Versamark ink. I covered it with White Embossing Powder and set it with my Heat Tool. I punched it out using the Three Banner Punch before adding it to the card front.


A pretty birthday card made using the Boutique Blossoms stamp set and co-ordinating dies and the Eyelet Blooms Dies from Stampin' Up!

www.crafty-rootes.co.uk – The Boutique Blossoms stamp set and co-ordinating dies used with the Eyelet Blooms Dies to make a pretty birthday card

A trio of 2026 -2028 In Color Dots finished the card.

Please hop on to share the inspiration provided by my crafty friends.


Blog Hop Index


Order goodies/Join My Team

I would love to be your demonstrator if you don’t already have one and live in the UK.  I would also be delighted to send you a catalogue if you do not have a demonstrator. I would be happy to place an order for you, or you can order directly by clicking on the “shop online” button.


Contact me for information about joining my team or click on the ‘Join My Team’ button

Details of the products I used for this project can be found below.

Mo x

Supplies used: