A gorgeous thank you card made for the Stamp 'n Hop Blog Hop using the Enduring Beauty stamp set and dies and Masks from Stampin' Up!

Embossed Enduring Beauty card for the Stamp ‘n Hop Blog Hop

Hello and welcome to the Stamp ‘n Hop Blog Hop where we are sharing projects inspired by the theme of Flora or Fauna. I have gone with flora and used the stunning Enduring Beauty Bundle to make my card.

Colours in this card are:


To recreate the embossed enduring beauty card, you will need:

Soft Sea Foam card base – 8¼” by 5⅞” – scored at 4⅛”
Basic White card – 4⅞” by 3½”
One Horse Open Sleigh dsp – 5¼” by 4”
Basic White card – 5” by 4”
Soft Sea Foam card – 2¼” by ½”
Basic White card – 5½” by 3¾”


Using the Deckled Rectangles, I die cut a rectangle from the piece of One Horse Open Sleigh dsp. This was then glued to the 5” by 4” piece of Basic White card. I wrapped a piece of Iridescent Ribbon around the panel and adhered the piece to the Soft Sea Foam card base.


A gorgeous thank you card made for the Stamp 'n Hop Blog Hop using the Enduring Beauty stamp set and dies and Masks from Stampin' Up!

www.crafty-rootes.co.uk – The Enduring Beauty stamp set and dies and Masks used to make a gorgeous thank you card for the Stamp ‘n Hop Blog Hop

The large floral image was stamped in Versamark ink. I covered it with Black Embossing Powder and heat set it.


A gorgeous thank you card made for the Stamp 'n Hop Blog Hop using the Enduring Beauty stamp set and dies and Masks from Stampin' Up!

www.crafty-rootes.co.uk – The Enduring Beauty stamp set and dies and Masks used to make a gorgeous thank you card for the Stamp ‘n Hop Blog Hop

Using washi tape I secured the embossed panel of Basic White card to my Glass Mat. The first mask was positioned on top and held in place with more washi tape.


A gorgeous thank you card made for the Stamp 'n Hop Blog Hop using the Enduring Beauty stamp set and dies and Masks from Stampin' Up!

www.crafty-rootes.co.uk – The Enduring Beauty stamp set and dies and Masks used to make a gorgeous thank you card for the Stamp ‘n Hop Blog Hop

I used a Blending Brush to ink through the mask with Highland Heather ink.  Using  mask number 3, a Blending Brush and Gorgeous Grape ink I added the detailed layer of ink to the flowers.


A gorgeous thank you card made for the Stamp 'n Hop Blog Hop using the Enduring Beauty stamp set and dies and Masks from Stampin' Up!

www.crafty-rootes.co.uk – The Enduring Beauty stamp set and dies and Masks used to make a gorgeous thank you card for the Stamp ‘n Hop Blog Hop

The 2nd mask was positioned, exposing the leaves. Using Blending Brushes I lightly inked with Old Olive. I decided not to add the detailed image as the black embossing gives a lot of dimension already.


A gorgeous thank you card made for the Stamp 'n Hop Blog Hop using the Enduring Beauty stamp set and dies and Masks from Stampin' Up!

www.crafty-rootes.co.uk – The Enduring Beauty stamp set and dies and Masks used to make a gorgeous thank you card for the Stamp ‘n Hop Blog Hop

I die cut the floral image using the Enduring Beauty Dies and mounted the die cut piece on Dimensionals to the card front.


A gorgeous thank you card made for the Stamp 'n Hop Blog Hop using the Enduring Beauty stamp set and dies and Masks from Stampin' Up!

www.crafty-rootes.co.uk – The Enduring Beauty stamp set and dies and Masks used to make a gorgeous thank you card for the Stamp ‘n Hop Blog Hop

The sentiment, from the Earthen Textures stamp set was stamped in Gorgeous Grape ink onto the strip of Soft Sea Foam ink. The sentiment was then added to the card front/

A trio of Purple Gems completes the card.

Please hop over to share the inspiration provided by my stamping friend.


Order goodies/Join My Team

If you don’t have a Stampin’ Up! Demonstrator I would love to be yours!  If you don’t have a catalogue and live in the UK, please let me know and I will be delighted to send you one.  To order any supplies click on the “shop online” button at the top of the page. Alternatively, contact me and I would be happy to place an order for you. To join my team either click on the link above or click on the contact me button above and I will contact you with more information.

Details of the products I used for this project can be found below.

Mo x

Supplies used:


A beautiful birthday card made using the Enduring Beauty masks and Blending Brushes by Stampin' Up!

Simple Enduring Beauty card

I have had my first play with the gorgeous Enduring Beauty Bundle today and this simple birthday card was made using only the masks.

Colours in this card are:


To recreate the simple enduring beauty card, you will need:

Calypso Coral card base – 8¼” by 5⅞” – scored at 4⅛” – rounded upper left & lower right corners
Granny Apple Green card – 5⅜” by 3⅝” – rounded upper left & lower right corners
Basic White card – 5½” by 3⅜” – rounded upper left & lower right corners
Garden Green card – 2⅝” by ⅜
Basic White card – 5½” by 3¾” – rounded upper left & lower right corners – for the inside


The masks are number 1 – 5, 1 & 3 are for colouring the flowers, 2 & 4 add colour to the leaves and 5 is for the flower centres.


A beautiful birthday card made using the Enduring Beauty masks and Blending Brushes by Stampin' Up!

www.crafty-rootes.com – The Enduring Beauty masks used with Blending Brushes to make a beautiful birthday card

Using washi tape I secured the 5½” by 3⅜” panel of Basic White card to my Glass Mat. The first mask was positioned on top and held in place with more washi tape.

I used a Blending Brush to ink through the mask with Calypso Coral ink. This lays down a basic layer of colour. Using  mask number 3, Poppy Parade ink and a Blending Brush I added the detailed layer of ink to the flowers.


A beautiful birthday card made using the Enduring Beauty masks and Blending Brushes by Stampin' Up!

www.crafty-rootes.com – The Enduring Beauty masks used with Blending Brushes to make a beautiful birthday card

The 2nd mask was inked with Granny Apple Green ink to give a base coat to the leaves and the veining on the leaves was added with Garden Green ink and mask number 4.

A beautiful birthday card made using the Enduring Beauty masks and Blending Brushes by Stampin' Up!

www.crafty-rootes.com – The Enduring Beauty masks used with Blending Brushes to make a beautiful birthday card

I used Early Espresso ink and the number 5 mask to add the flower centre. The whole panel was glued to the Garden Green layer and then to the Calyps Coral card front.


A beautiful birthday card made using the Enduring Beauty masks and Blending Brushes by Stampin' Up!

www.crafty-rootes.com – The Enduring Beauty masks used with Blending Brushes to make a beautiful birthday card

The sentiment, from the Stippled Roses stamp set was stamped onto the strip of Garden Green card using Versamark ink. I covered it with White Embossing Powder and set it with my Heat Tool.


A beautiful birthday card made using the Enduring Beauty masks and Blending Brushes by Stampin' Up!

www.crafty-rootes.com – The Enduring Beauty masks used with Blending Brushes to make a beautiful birthday card

A Gold ribbon bow was added to the card front with a piece of Tear ‘n Tape. The sentiment was added over the ribbon with Dimensionals. A couple of Rainbow Dots completed the card.


Order goodies/Join My Team

If you don’t have a Stampin’ Up! Demonstrator I would love to be yours!  If you don’t have a catalogue and live in the UK, please let me know and I will be delighted to send you one.  To order any supplies click on the “shop online” button at the top of the page. Alternatively, contact me and I would be happy to place an order for you. To join my team either click on the link above or click on the contact me button above and I will contact you with more information.

Details of the products I used for this project can be found below.

Mo x

Supplies used:


A pretty, soft pastel card made using the Hand-Penned Petals stamp set by Stampin' Up!

Spring Flowers

Here is a pretty Spring Flowers card made using the pretty Hand Penned Petals stamp set and Penned Flowers Dies. I made a similar card back in the early Autumn and wanted to recreate it with some changes.


Colours used in this project are:


To recreate the hand penned card, you will need:

Highland Heather card base – 8¼” by 5⅞” scored and folded at 4⅛”
Smoky Slate card – 5⅜” by 3⅝”
Basic White card – 5¼” by 3½”
Basic White card – 5½” by 3¾”
Scrap Basic White card


I placed one of the Artistic Mix Decorative Masks onto the smaller panel of Basic White card, holding it in place with a Post It Note. Using a Blending Brush, I added Pale Papaya ink over the mask. The mask was the removed and the pattern revealed.


A pretty, soft pastel card made using the Hand-Penned Petals stamp set by Stampin' Up!

www.crafty-rootes.co.uk – The Hand-Penned Petals stamp set used with soft pastel colours for a pretty, delicate card

I stamped the sentiment from the Hand Penned Petals stamp set, in the lower left corner of the inked panel in Highland Heather ink.


A pretty, soft pastel card made using the Hand-Penned Petals stamp set by Stampin' Up!

www.crafty-rootes.co.uk – The Hand-Penned Petals stamp set used with soft pastel colours for a pretty, delicate card

Using Smoky Slate ink, I stamped the larger group of flowers onto scrap Basic White card in. A length of the Pale Papaya Open Weave Ribbon was wrapped around the panel and secured on the back with Sellotape. The whole piece was then mounted onto the Highland Heather card base with Multipurpose Liquid Adhesive.


A pretty, soft pastel card made using the Hand-Penned Petals stamp set by Stampin' Up!

www.crafty-rootes.co.uk – The Hand-Penned Petals stamp set used with soft pastel colours for a pretty, delicate card

I used the following Blends Pens to colour in the flowers and leaves – Fresh Freesia, Pale Papaya, So Saffron and Mint Macaron. The completed piece was mounted over the ribbon to the card front on Dimensionals.


A pretty, soft pastel card made using the Hand-Penned Petals stamp set by Stampin' Up!

www.crafty-rootes.co.uk – The Hand-Penned Petals stamp set used with soft pastel colours for a pretty, delicate card

A scattering of Pastel Pearls completed the card. I love the Pale Papaya/ Highland Heather combo. I hope you like it.


A pretty, soft pastel card made using the Hand-Penned Petals stamp set by Stampin' Up!

www.crafty-rootes.co.uk – The Hand-Penned Petals stamp set used with soft pastel colours for a pretty, delicate card

Order goodies/Join My Team

If you don’t have a Stampin’ Up! Demonstrator I would love to be yours!  If you don’t have a catalogue and live in the UK, please let me know and I will be delighted to send you one.  To order any supplies click on the “shop online” button at the top of the page. Alternatively, contact me and I would be happy to place an order for you. To join my team either click on the link above or click on the contact me button above and I will contact you with more information.

Details of the products I used for this project can be found below.

Mo x

Supplies used:


The Artistic Mix Decorative Masks, Hand Penned Petals stamp set, Penned Flowers Dies by Stampin' Up! used to make a pretty thank you card.

Hand Penned Flowers card

Today I am sharing a pretty card inspired by fellow demonstrator Lorna Carter.  I loved how Lorna used the Artistic Mix Decorative masks as backgrounds. I have used the same Hand Penned Petals stamp set to make my card but have changed up the colours.

Colours used in this project are:


To recreate the hand penned card, you will need:

Fresh Freesia card base – 8¼” by 5⅞” scored and folded at 4⅛” – rounded upper left corner
Smoky Slate card – 5⅜” by 3⅝” – rounded upper left corner
Basic White card – 5¼” by 3½” – rounded upper left corner
Basic White card – 5½” by 3¾” – rounded upper left corner
Scrap Basic White card


I placed one of the Artistic Mix Decorative Masks onto the smaller panel of Basic White card, holding it in place with a Post It Note. Using a Blending Brush, I added Fresh Freesia ink over the mask. The mask was the removed and the pattern revealed.


The Artistic Mix Decorative Masks, Hand Penned Petals stamp set, Penned Flowers Dies by Stampin' Up! used to make a pretty thank you card.

www.crafty-rootes.co.uk – A pretty thank you card made using the Hand Penned Petals stamp set, Penned Flowers Dies & the Artistic Mix Decorative Masks by Stampin’ Up!

I stamped the sentiment from the Hand Penned Petals stamp set, in the lower left corner of the inked panel in Smoky Slate ink.


The Artistic Mix Decorative Masks, Hand Penned Petals stamp set, Penned Flowers Dies by Stampin' Up! used to make a pretty thank you card.

www.crafty-rootes.co.uk – A pretty thank you card made using the Hand Penned Petals stamp set, Penned Flowers Dies & the Artistic Mix Decorative Masks by Stampin’ Up!

Using the same Smoky Slate ink, I stamped the larger group of flowers onto scrap Basic White card. A length of the Silver Metallic Mesh Ribbon was wrapped around the panel and secured on the back with Sellotape. The whole piece was then mounted onto the Fresh Freesia card base with Multipurpose Liquid Adhesive.


The Artistic Mix Decorative Masks, Hand Penned Petals stamp set, Penned Flowers Dies by Stampin' Up! used to make a pretty thank you card.

www.crafty-rootes.co.uk – A pretty thank you card made using the Hand Penned Petals stamp set, Penned Flowers Dies & the Artistic Mix Decorative Masks by Stampin’ Up!

I used the following colours to stamp the infill images for the flowers and leaves – Fresh Freesia, Blushing Bride, So Saffron and Pear Pizzazz. The completed piece was mounted over the ribbon to the card front on Dimensionals.


The Artistic Mix Decorative Masks, Hand Penned Petals stamp set, Penned Flowers Dies by Stampin' Up! used to make a pretty thank you card.

www.crafty-rootes.co.uk – A pretty thank you card made using the Hand Penned Petals stamp set, Penned Flowers Dies & the Artistic Mix Decorative Masks by Stampin’ Up!

A scattering of Iridescent Rhinestones completed the card. So pretty, I love the soft colour palette. Thank you for the inspiration, Lorna.


The Artistic Mix Decorative Masks, Hand Penned Petals stamp set, Penned Flowers Dies by Stampin' Up! used to make a pretty thank you card.

www.crafty-rootes.co.uk – A pretty thank you card made using the Hand Penned Petals stamp set, Penned Flowers Dies & the Artistic Mix Decorative Masks by Stampin’ Up!

Order goodies/Join My Team

If you don’t have a Stampin’ Up! Demonstrator I would love to be yours!  If you don’t have a catalogue and live in the UK, please let me know and I will be delighted to send you one.  To order any supplies click on the “shop online” button at the top of the page. Alternatively, contact me and I would be happy to place an order for you. To join my team either click on the link above or click on the contact me button above and I will contact you with more information.

Details of the products I used for this project can be found below.

Mo x

Supplies used:


The Celebrate Sunflower stamp set and Sunflower Dies by Stampin' Up! used to make an Autumn themed card for the Stamping Dreams Blog Hop

Autumn Sunflower for the Stamping With Dreams Blog Hop

Hello and welcome to the Stamping Dreams Blog Hop where we are sharing Autumn themed projects. I have used the Celebrate Sunflowers stamp set to make my card.

Colours used in this project are:


To recreate the Autumn sunflower card, you will need:

Soft Succulent card base – 8¼” by 5⅞” scored and folded at 4⅛” – Rounded lower left corner
Basic Black card – 5⅜” by 3⅝” – Rounded lower left corner
Basic White card – 5¼” by 3½” – Rounded lower left corner
Basic White card – 5½” by 3¾” for the inside – Rounded lower left corner
Scrap Basic White & Basic Black card


I placed one of the Artistic Mix Decorative Masks onto the 5¼” by 3½” panel of Basic White card and used a Blending Brush to add So Saffron ink to the panel. Looks like I used the brush with a orange colour before as the background has a touch of peach colour! The inked panel was added to the Basic Black layer with Multipurpose Liquid Adhesive.


The Celebrate Sunflower stamp set and Sunflower Dies by Stampin' Up! used to make an Autumn themed card for the Stamping Dreams Blog Hop

www.crafty-rootes.co.uk – A gorgeous Autumn sunflower themed card made using the Celebrate Sunflowers stamp set and Sunflower Dies for the Stamping Dreams Blog Hop

A length of Gingham Ribbon was wrapped around the panel and secured it on the back with Sellotape. The panel was then added to the Soft Succulent card base with the same liquid glue.


The Celebrate Sunflower stamp set and Sunflower Dies by Stampin' Up! used to make an Autumn themed card for the Stamping Dreams Blog Hop

www.crafty-rootes.co.uk – A gorgeous Autumn sunflower themed card made using the Celebrate Sunflowers stamp set and Sunflower Dies for the Stamping Dreams Blog Hop

I stamped the large sunflower and 3 large leaves onto scrap Basic White card with Memento Tuxedo Black ink and coloured the images in with the following Blends Alcohol Pens – So Saffron, Daffodil Delight, Soft Succulent & Soft Suede.


The Celebrate Sunflower stamp set and Sunflower Dies by Stampin' Up! used to make an Autumn themed card for the Stamping Dreams Blog Hop

www.crafty-rootes.co.uk – A gorgeous Autumn sunflower themed card made using the Celebrate Sunflowers stamp set and Sunflower Dies for the Stamping Dreams Blog Hop

The large sunflower was then die cut using my Stampin’ Cut & Emboss Machine and the Sunflower Dies. The leaves were fussy cut then added behind the flower using a little Seal +. The image was then added to the card front on Dimensionals.


The Celebrate Sunflower stamp set and Sunflower Dies by Stampin' Up! used to make an Autumn themed card for the Stamping Dreams Blog Hop

www.crafty-rootes.co.uk – A gorgeous Autumn sunflower themed card made using the Celebrate Sunflowers stamp set and Sunflower Dies for the Stamping Dreams Blog Hop

The sentiment, from the Art Gallery stamp set was stamped onto a scrap of Basic Black card, after I had used the Embossing Buddy, in Versamark ink. I covered it with White Embossing Powder and set it using my Heat Tool. I trimmed it down and added it to the card front.


The Celebrate Sunflower stamp set and Sunflower Dies by Stampin' Up! used to make an Autumn themed card for the Stamping Dreams Blog Hop

www.crafty-rootes.co.uk – A gorgeous Autumn sunflower themed card made using the Celebrate Sunflowers stamp set and Sunflower Dies for the Stamping Dreams Blog Hop

A gingham bow and Black Matte Dots completed the card. I hope you like it.

Please continue around the hop as I know my crafty friends have lots of inspiration to share with you.


Order goodies/Join My Team

If you don’t have a Stampin’ Up! Demonstrator I would love to be yours!  If you don’t have a catalogue and live in the UK, please let me know and I will be delighted to send you one.  To order any supplies click on the “shop online” button at the top of the page. Alternatively, contact me and I would be happy to place an order for you. To join my team either click on the link above or click on the contact me button above and I will contact you with more information.

Details of the products I used for this project can be found below.

Mo x

Supplies used:


The Plenty of Patterns Masks and Dog Punch by Stampin' Up! used to make a pretty kissing dogs congratulations card for the Share It Sunday Blog Hop

Kissing Dogs for the Share It Sunday Blog Hop

Hello and welcome to the Share It Sunday Blog Hop where we are sharing something we have been working on. I am sharing a kissing dogs; congratulations card made using the Dog Builder Punch and the Plenty of Patterns Masks.

Colours used in this card are:


To recreate the kissing dogs’ card, you will need:

Poppy Parade card base – 8 ¼” by 5⅝” scored at 4⅛” – rounded left upper corner
Basic Black card – 5½” by 3¾” – rounded left upper corner
Basic White card – 5⅜” by 3⅝” – rounded left upper corner
Basic White card – 5½” by 3¾” – rounded left upper corner – for the inside
Scrap Soft Suede, Basic Black & Poppy Parade


I chose one of the masks from the Plenty of Patterns mask pack, placed it on top of the smaller Basic White panel and added ink using Blending Brushes. I started with Blushing Bride, then added Calypso Coral and finished with Poppy Parade. The mask was then removed.


The Plenty of Patterns Masks and Dog Punch by Stampin' Up! used to make a pretty kissing dogs congratulations card for the Share It Sunday Blog Hop

www.crafty-rootes.co.uk – A sweet kissing dogs card made using the Plenty of Pattern Masks and the dog punch for the Share It Sunday Blog Hop

The inked panel was then added to the Basic Black layer using Multipurpose Liquid Adhesive. I used the same adhesive to glue the panel to the Poppy Parade card base.


The Plenty of Patterns Masks and Dog Punch by Stampin' Up! used to make a pretty kissing dogs congratulations card for the Share It Sunday Blog Hop

www.crafty-rootes.co.uk – A sweet kissing dogs card made using the Plenty of Pattern Masks and the dog punch for the Share It Sunday Blog Hop

I punched a dog from scrap Soft Suede card and another from Basic Black card and added the collars, cut from scrap card, with the same liquid glue. The dogs were added to the card front on Dimensionals.


The Plenty of Patterns Masks and Dog Punch by Stampin' Up! used to make a pretty kissing dogs congratulations card for the Share It Sunday Blog Hop

www.crafty-rootes.co.uk – A sweet kissing dogs card made using the Plenty of Pattern Masks and the dog punch for the Share It Sunday Blog Hop

The sentiment was stamped in Versamark ink onto scrap Basic Black card, covered with White Embossing Powder and heat set using a Heat Tool. I flagged the ends and added it to the card front with glue.


The Plenty of Patterns Masks and Dog Punch by Stampin' Up! used to make a pretty kissing dogs congratulations card for the Share It Sunday Blog Hop

www.crafty-rootes.co.uk – A sweet kissing dogs card made using the Plenty of Pattern Masks and the dog punch for the Share It Sunday Blog Hop

To finish the card I punched the heart, using the Dog Punch, and added it with a Dimensional. A Red Rhinestone was added to the heart.


The Plenty of Patterns Masks and Dog Punch by Stampin' Up! used to make a pretty kissing dogs congratulations card for the Share It Sunday Blog Hop

www.crafty-rootes.co.uk – A sweet kissing dogs card made using the Plenty of Pattern Masks and the dog punch for the Share It Sunday Blog Hop

This card was made for some dog loving friends who have just got engaged. I hope they like it.

Please hop on to see what my fellow demos have been playing with recently.


Blog Hop Index


Order goodies/Join My Team

If you don’t have a Stampin’ Up! Demonstrator I would love to be yours!  If you don’t have a catalogue and live in the UK, please let me know and I will be delighted to send you one.  To order any supplies click on the “shop online” button at the top of the page. Alternatively, contact me and I would be happy to place an order for you. To join my team either click on the link above or click on the contact me button above and I will contact you with more information.

Details of the products I used for this project can be found below.

Mo x

Supplies used:

The Basic Patterns Masks and Poinsettia Dies by Stampin' Up! used to make a pretty golden poinsettia Christmas card

Golden Poinsettia Christmas card

I am sharing a pretty golden poinsettia Christmas card today and made using the Basic Patterns Decorative Masks and the Poinsettia Dies.

Colours used in this project are:

To recreate the golden poinsettia card, you will need:

Basic Black card base – 8¼” by 5⅞” scored at 4⅛”
Bumblebee card – 5⅜” by 3⅝”
Basic White card – 5¼” by 3½”
Basic White card – 5½” by 3¾”
Gold Shimmer paper – 8¼” by 3¼”

The Basic Patterns Masks and Poinsettia Dies by Stampin' Up! used to make a pretty golden poinsettia Christmas card

www.crafty-rootes.com – A pretty gold poinsettia themed Christmas card made using the Poinsettia Dies and the Basic Patterns Masks

For this card I used the Basic Patterns Decorative Masks to emboss the pattern onto the smaller panel of Basic White card. I used the Stampin’ Cut & Emboss Machine, the Base plate followed by a Clear acrylic plate. I then added my Silicon Mat, placed the Basic White card on top then the decorative mask and finally the Gray 3D Embossing Plate.


The Basic Patterns Masks and Poinsettia Dies by Stampin' Up! used to make a pretty golden poinsettia Christmas card

www.crafty-rootes.com – A pretty gold poinsettia themed Christmas card made using the Poinsettia Dies and the Basic Patterns Masks

The embossed panel was then added to the layer of Bumblebee cardstock with Multicoloured Liquid Adhesive. The panel was added to the Basic Black card front using the same glue.


The Basic Patterns Masks and Poinsettia Dies by Stampin' Up! used to make a pretty golden poinsettia Christmas card

www.crafty-rootes.com – A pretty gold poinsettia themed Christmas card made using the Poinsettia Dies and the Basic Patterns Masks

I die cut the 3 layers of poinsettia petals from the Gold Shimmer paper using the Stampin’ Cut & Emboss Machine and the Poinsettia Dies.


The Basic Patterns Masks and Poinsettia Dies by Stampin' Up! used to make a pretty golden poinsettia Christmas card

www.crafty-rootes.com – A pretty gold poinsettia themed Christmas card made using the Poinsettia Dies and the Basic Patterns Masks

The poinsettia layers were adhered together with Mini Glue Dots, each layer offset to the next. I added a trio of Black Matte Dots to the centre of the flower. The flower was then added with a Glue Dot to the card front.


The Basic Patterns Masks and Poinsettia Dies by Stampin' Up! used to make a pretty golden poinsettia Christmas card

www.crafty-rootes.com – A pretty gold poinsettia themed Christmas card made using the Poinsettia Dies and the Basic Patterns Masks

I stamped the greeting in Memento Tuxedo Black ink onto scrap Basic White card and trimmed it out using Scissors. It was added to the card front with liquid glue.


The Basic Patterns Masks and Poinsettia Dies by Stampin' Up! used to make a pretty golden poinsettia Christmas card

www.crafty-rootes.com – A pretty gold poinsettia themed Christmas card made using the Poinsettia Dies and the Basic Patterns Masks

To complete the card, I added a trio of Wonderful Gems.

Pretty card, I hope you like it.

Order goodies/Join My Team

If you don’t have a Stampin’ Up! Demonstrator I would love to be yours!  If you don’t have a catalogue and live in the UK, please let me know and I will be delighted to send you one.  To order any supplies click on the “shop online” button at the top of the page. Alternatively, contact me and I would be happy to place an order for you. To join my team either click on the link above or click on the contact me button above and I will contact you with more information.

Details of the products I used for this project can be found below.

Mo x

Supplies used:


Doily Builder Swaps for OnStage

Today I am sharing the swaps I made using the gorgeous Doily Builder dies for this weekend’s OnStage event in Telford. This is a demonstrator only event where we get to meet friends, see new product, play with new stuff and generally have a lot of fun.

Making the Doily Builder card swap

Swaps for OnStage made using the gorgeous Doily Builder dies by Stampin' Up!

www.crafty-rootes.com – A glorious Spring coloured card front using the Doily Builder dies by Stampin’ Up!

You will need;
Window Sheet 5⅜” by 3⅝”
Whisper White cardstock 5⅛” by 3½” – Rounded upper right corner
Either Coastal Cabana, Flirty Flamingo or So Saffron cardstock 5⅜” by 3⅝” – Rounded upper right corner
Scraps of Coastal Cabana, Flirty Flamingo, So Saffron cardstock, Whisper White & Gray Granite cardstock for die cutting and punching

I began by cutting the large doily into the Window sheet using my Big Shot. This gave me a sturdy stencil that could be used multiple times over.

I placed the mask onto the Whisper White panel, holding it in place with my finger. I inked up the stencil using So Saffron, Flirty Flamingo and Coastal Cabana inks in random orders. I moved the stencil and repeated again using the colours randomly.

I stamped the sentiment in Gray Granite ink onto scrap Whisper White and punched it out using the Classic Label punch. This was added to the stamped panel on Dimensionals.

You will need; Window Sheet 5⅜” by 3⅝” Whisper White cardstock 5⅛” by 3½” - Rounded upper right corner Either Coastal Cabana, Flirty Flamingo or So Saffron cardstock 5⅜” by 3⅝” - Rounded upper right corner Scraps of Coastal Cabana, Flirty Flamingo, So Saffron cardstock, Whisper White & Gray Granite cardstock for die cutting and punching

www.crafty-rootes.com – A glorious Spring coloured card front using the Doily Builder dies by Stampin’ Up!

I die cut the medium and small doilies using the same three colours and added one small and one medium doily to the stamped panel using Mini Glue Dots.

The Gray Granite butterfly was punched out using the Butterfly Duet punch and this was added to the stamped panel with a Mini Glue Dot. The panel was then added to a panel of Coastal Cabana, Flirty Flamingo or So Saffron cardstock and a trio of Iridescent Sequins added to complete the card front.

I really liked the combination of Spring like colours. Ihope you like it.

If you don’t have a Stampin’ Up! Demonstrator I would love to be yours!  If you don’t have a catalogue and live in the UK please let me know and I will be delighted to send you one.  To order any supplies click on the “shop online” button at the top of the page. Alternatively, contact me and I would be happy to place an order for you.

Thanks for visiting my blog today, I love to read what you think of my projects so please do let me know. In line with new Data Protection Legislation (GDPR), by commenting you do so in the knowledge that your name & comment are visible to all who visit this blog and you thereby consent to the use of that personal information for that specific purpose. Please stop by again soon.

Details of the products I used for this project can be found below.

Mo x

Supplies used:


Unused Colour Challenge

So, yesterday I was at my upline Mikaela Titheridge’s (http://thecraftyoinkpen.blogspot.co.uk/) house with fellow team member Susan Merrey (http://craftyduckydoodah.blogspot.co.uk/) and the conversation got around to what are our least used Stampin Up! colours. It turns out we all had 3 or 4 colours that we rarely, if ever use. It is just so easy to reach for your favourite colours and colour combinations when designing a project.

The upshot of the conversation is that Mikaela has challenged the team to name our 4 least used colours and to design a project using at least 3 of them. Got to say I love a challenge…….. so, here goes….

1-DSCF7531

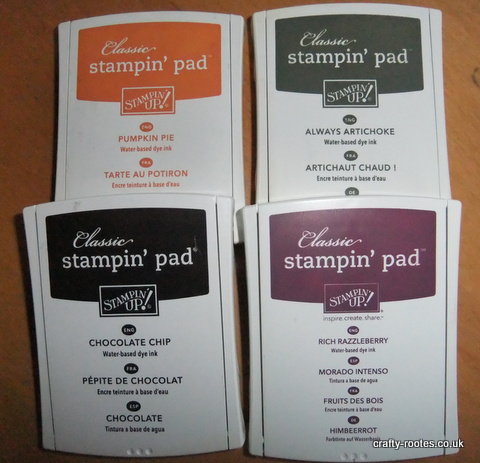
Stampin Up! inkpads

My least used colours are Chocolate Chip (there were cries of horror from Susan when I announced this one), Always Artichoke, Rich Razzleberry, I like the colour but can never seem to combine it successfully with anything else.  And lastly, Pumpkin Pie, I struggle with oranges in general and could just as easily have picked Tangerine Tango or Tangelo Twist, except, I don’t have either of those … says it all really.

My first thought was to use the Gorgeous Grunge stamp set, but on reflection I thought this was a bit of a cop out. I decided I would up the anti by also choosing to use Very Vanilla cardstock and the Happy Patterns stencil pack. I have used both the cardstock and the stencils twice since I bought them and I thought they might work with this colour combo. I also decided to use all 4 of the colours I had selected for the challenge.

1-DSCF7525

I got out some sponge daubers, chose the dotted line stencil pattern and set too. I decided to use a sentiment from the Perfect Pairings stamp set, one of the Sale-A-Bration options which I have not yet used and the Lots of Labels dies, again, I bought these a while ago and haven’t used them. I was so happy with the result; bizarrely the colours seemed to work well together and gave the card quite a masculine look. I added a small amount of the Metallic Gold Thread and some Candy Dots to give the card a bit of texture and called it done.

1-DSCF7526

I decided to try another stencil from the same pack, there are 4 altogether. The sentiment is from Perfect Pairings and I added a small piece of Gold Glitter Tape, another Sale-A-Bration option and used the Banner triple Punch to flag the end of the sentiment.

1-DSCF7528

I have to say, I really like both of the cards and all of the colours I used. What a revelation. I also loved the stencils which were so quick and easy to use.

1-DSCF7529

Hope you like the projects and maybe you could try the challenge for yourself. Let me know how you get on.

Don’t forget Sale-A-Bration ends on the 31St March, so if you would like the Perfect Pairings stamp set or the Glitter tape, or indeed any of the other items go to my online shop at http://www.stampinup.net/esuite/home/crafty-rootes and hit the ‘shop now’ button. You can pick one free item for every £45 you spend.

Looking forward to seeing you again.

Mo x