A shaker card made for a ruby wedding anniversary using the Party Alphabet Dies, Blooming Phrases stamp set and the Forever Plaid Embossing Folder by Stampin' Up!

Ruby Wedding Card

I made this shaker card to celebrate the ruby wedding anniversary (40th) of my brother and sister-in-law which is today. I made it using the new Party Alphabet dies and the Forever Plaid 3D Embossing Folder.

Colours used in this card are:


To recreate the ruby anniversary card, you will need:

Thick Basic White card – 8” by 7” scored at 3½”
Season of Elegance dsp – 7¾” by 3¼”
Thick Basic White card – 7½” by 3”
Window Sheet – 7⅜” by 2⅞” x 2
Secret Sea card – 3” by ½”


I lined the letters RUBY on the 7½” by 3” panel of Thick Basic White card making sure to get them as straight as possible. I held them in position with small pieces of Washi Tape from my stash and die cut them out. I removed the letters and set them aside as I did not need them for this card, but I did need the inner pieces from the R and the B.


A shaker card made for a ruby wedding anniversary using the Party Alphabet Dies, Blooming Phrases stamp set and the Forever Plaid Embossing Folder by Stampin' Up!

www.crafty-rootes.co.uk – The Party Alphabet Dies and Blooming Phrases stamp set used with the Forever Plaid Embossing Folders to make a shaker card for a ruby wedding anniversary

The negative die cut panel and the inner pieces from the R and B were then embossed using the Forever Plaid 3D Embossing Folder. On the back of the embossed piece, I added one of the pieces of Window Sheet using Mini Glue Dots and the inner pieces were added in the correct places with Mini Glue Dots.


A shaker card made for a ruby wedding anniversary using the Party Alphabet Dies, Blooming Phrases stamp set and the Forever Plaid Embossing Folder by Stampin' Up!

www.crafty-rootes.co.uk – The Party Alphabet Dies and Blooming Phrases stamp set used with the Forever Plaid Embossing Folders to make a shaker card for a ruby wedding anniversary

With the whole piece face down, I applied Foam Adhesive Strips around all 4 sides, between all the letters and supporting all the pieces which intrude into the letters. I dropped a pinch of sequins into each letter. I ran a bead of Multipurpose Liquid on top of the Adhesive Strip and added the second piece of Window Sheet overtop to seal the sequins in.


A shaker card made for a ruby wedding anniversary using the Party Alphabet Dies, Blooming Phrases stamp set and the Forever Plaid Embossing Folder by Stampin' Up!

www.crafty-rootes.co.uk – The Party Alphabet Dies and Blooming Phrases stamp set used with the Forever Plaid Embossing Folders to make a shaker card for a ruby wedding anniversary

The whole piece was then added to the layer of Season of Elegance dsp before being added to the Thick Basic White card front.


A shaker card made for a ruby wedding anniversary using the Party Alphabet Dies, Blooming Phrases stamp set and the Forever Plaid Embossing Folder by Stampin' Up!

www.crafty-rootes.co.uk – The Party Alphabet Dies and Blooming Phrases stamp set used with the Forever Plaid Embossing Folders to make a shaker card for a ruby wedding anniversary

I stamped the sentiment from the Blooming Phrases stamp set with Versamark ink onto the small piece of Secret Sea card. I covered it with White Embossing Powder and set it using my Heat Tool before adding it to the card front using Mini Glue Dots.


A shaker card made for a ruby wedding anniversary using the Party Alphabet Dies, Blooming Phrases stamp set and the Forever Plaid Embossing Folder by Stampin' Up!

www.crafty-rootes.co.uk – The Party Alphabet Dies and Blooming Phrases stamp set used with the Forever Plaid Embossing Folders to make a shaker card for a ruby wedding anniversary

A scattering of Sequins finished the card.


Order goodies/Join My Team

If you don’t have a Stampin’ Up! Demonstrator I would love to be yours!  If you don’t have a catalogue and live in the UK, please let me know and I will be delighted to send you one.  To order any supplies click on the “shop online” button at the top of the page. Alternatively, contact me and I would be happy to place an order for you. To join my team either click on the link above or click on the contact me button above and I will contact you with more information.

Details of the products I used for this project can be found below.

Mo x

Supplies used:


A pretty, floral anniversary card made using the Thankful Garden stamp set and dies with the Layers of Beauty stamp set from Stampin' Up!

Thankful Anniversary Card – Share It Sunday Blog Hop

Hello and welcome to the Share it Sunday Blog Hop where we are sharing something we have been working on recently. I am sharing an anniversary card made for my sister-in-law and her husband using the Thankful Garden stamp set, masks and dies.

Colours used to make this card are:


To recreate the thankful anniversary card, you will need:

Timid Tiger card base – 8¼” by 5⅞” scored at 4⅛”
Petunia Pop card – 5⅝” by 3⅞”
Basic White card – 5½” by 3¾” x 2 – one for the inside
Basic White card – 3” by 3”
Scrap Basic White and Granny Apple Green card


I glued one of the 5½” by 3¾” panels of Basic White card to the layer of Petunia Pop and then to the Timid Tiger card front.


A pretty, floral anniversary card made using the Thankful Garden stamp set and dies with the Layers of Beauty stamp set from Stampin' Up!

www.crafty-rootes.co.uk -The lovely Thankful Garden stamp set and Dies with the Layers of Beauty stamp set used to make a pretty, floral anniversary card -Share It Sunday Blog Hop

The floral images were stamped on scrap Basic White card using Pebbled Path ink and coloured using Blending Brushes and the Thankful Garden Masks. For the single flower I used Pretty in Pink for the first and second layers and Petunia Pop for the final detailed layer. For the Hydrangea I used Peach Pie for the first two layers and Timid Tiger for the detail.


A pretty, floral anniversary card made using the Thankful Garden stamp set and dies with the Layers of Beauty stamp set from Stampin' Up!

www.crafty-rootes.co.uk -The lovely Thankful Garden stamp set and Dies with the Layers of Beauty stamp set used to make a pretty, floral anniversary card -Share It Sunday Blog Hop

The larger single flowers were die cut and was the trio of blossoms from the hydrangea using the Thankful Garden Dies. I also fussy cut some of the individual hydrangea blossoms.


A pretty, floral anniversary card made using the Thankful Garden stamp set and dies with the Layers of Beauty stamp set from Stampin' Up!

www.crafty-rootes.co.uk -The lovely Thankful Garden stamp set and Dies with the Layers of Beauty stamp set used to make a pretty, floral anniversary card -Share It Sunday Blog Hop

From the square of Basic White card, I die cut a stitched circle using the Stylish Shapes dies. Onto this I stamped the sentiment, from the Layers of Beauty stamp set in Petunia Pop ink. The stamped circle was added to the card front on Dimensionals.


A pretty, floral anniversary card made using the Thankful Garden stamp set and dies with the Layers of Beauty stamp set from Stampin' Up!

www.crafty-rootes.co.uk -The lovely Thankful Garden stamp set and Dies with the Layers of Beauty stamp set used to make a pretty, floral anniversary card -Share It Sunday Blog Hop

I tucked the die cut and fussy cut flowers around the stitched circle and added some leaves die cut from scrap Granny Apple Green card.


A pretty, floral anniversary card made using the Thankful Garden stamp set and dies with the Layers of Beauty stamp set from Stampin' Up!

www.crafty-rootes.co.uk -The lovely Thankful Garden stamp set and Dies with the Layers of Beauty stamp set used to make a pretty, floral anniversary card -Share It Sunday Blog Hop

A White Baker’s Twine bow and a scattering of 2024 -2026 In Color Dots finished the card.

Please hop on to share the inspiration provided by my crafty friends.


Blog Hop Index


Order goodies/Join My Team

If you don’t have a Stampin’ Up! Demonstrator I would love to be yours!  If you don’t have a catalogue and live in the UK, please let me know and I will be delighted to send you one.  To order any supplies click on the “shop online” button at the top of the page. Alternatively, contact me and I would be happy to place an order for you. To join my team either click on the link above or click on the contact me button above and I will contact you with more information.

Details of the products I used for this project can be found below.

Mo x

Supplies used:


A floral anniversary card made using the pretty Gallery Blooms stamp set and Everyday Arches Dies from Stampin' Up!

Floral Anniversary Card

Today I am sharing a pretty, floral anniversary card made using the Gallery Blooms stamp set and Everyday Arches Dies.

Colours used to make this card are:


To recreate the floral anniversary card, you will need:

Fresh Freesia card base – 8¼” by 5⅞” – scored at 4⅛”
Basic Black card – 5¼” by 4”
Basic White card – 5” by 3½”
Basic White card – 5½” by 3¾” – for the inside


I stamped the double flower image in the upper left and lower right corners of the Fresh Freesia card front using 2nd generation Fresh Freesia ink.


A floral anniversary card made using the pretty Gallery Blooms stamp set and Everyday Arches Dies from Stampin' Up!

www.crafty-rootes.co.uk – The pretty Gallery Blooms stamp set and Everyday Arches Dies used to make a floral anniversary card

Using the Everyday Arches Dies, I die cut 2 stitched arches from the one from the piece of Basic White and the another, slightly larger from the Basic Black card.


A floral anniversary card made using the pretty Gallery Blooms stamp set and Everyday Arches Dies from Stampin' Up!

www.crafty-rootes.co.uk – The pretty Gallery Blooms stamp set and Everyday Arches Dies used to make a floral anniversary card

The spray of flowers was stamped in Memento Tuxedo Black ink onto the white arch and coloured using the Fresh Freesia, Lemon Lolly and Soft Sea Foam Blends Pens.


A floral anniversary card made using the pretty Gallery Blooms stamp set and Everyday Arches Dies from Stampin' Up!

www.crafty-rootes.co.uk – The pretty Gallery Blooms stamp set and Everyday Arches Dies used to make a floral anniversary card

The sentiment, from the Layered Beauty stamp set was stamp in Memento Tuxedo Black ink below the flower spray.


A floral anniversary card made using the pretty Gallery Blooms stamp set and Everyday Arches Dies from Stampin' Up!

www.crafty-rootes.co.uk – The pretty Gallery Blooms stamp set and Everyday Arches Dies used to make a floral anniversary card

A piece of Fresh Freesia Seam Binding Ribbon was wrapped around the black stitched arch and the white arch was glued on top. The whole piece was mounted onto the card front on Dimensionals.


A floral anniversary card made using the pretty Gallery Blooms stamp set and Everyday Arches Dies from Stampin' Up!

www.crafty-rootes.co.uk – The pretty Gallery Blooms stamp set and Everyday Arches Dies used to make a floral anniversary card

A trio of Starburst Sequins and a ribbon bow finished the card.


Order goodies/Join My Team

If you don’t have a Stampin’ Up! Demonstrator I would love to be yours!  If you don’t have a catalogue and live in the UK, please let me know and I will be delighted to send you one.  To order any supplies click on the “shop online” button at the top of the page. Alternatively, contact me and I would be happy to place an order for you. To join my team either click on the link above or click on the contact me button above and I will contact you with more information.

Details of the products I used for this project can be found below.

Mo x

Supplies used:


A bright and colourful congratulations card made using the Feathered Friends stamp set by Stampin' Up!

Feathered Friends card – Stamp ‘N Hop Blog Hop

Hello and welcome to the Stamp ‘N Hop Blog Hop where we are creating projects using a sketch for inspiration. I have used the adorable Feathered Friends stamp set which will be available from the 6th May in the new Annual Catalogue.

Colours used to make this card are:


To recreate the feathered friends’ congratulations card, you will need:

Thick Basic White card base – 8¼” by 5⅞” scored at 4⅛”
Basic Black card – 5⅜” by 3⅝”
Friends of the Ocean dsp – 5¼” by 3½”
Basic White card – 3¼” by 3¼”
Pumpkin Pie card – 1½” by ¾”
Lemon Lime Twist card – 2⅛” by ½”


The panel of Friends’s of the Ocean dsp was adhered to the Basic Black layer and then the whole piece was then glued to the Thick Basic White card front.


A bright and colourful congratulations card made using the Feathered Friends stamp set by Stampin' Up!

www.crafty-rootes.co.uk – The pretty Feathered Friends stamp set used to make a bright and colourful congratulations card – Stamp ‘N Hop Blog Hop

I die cut a stitched square from the square of Basic White card using the Stylish Shapes Dies.


A bright and colourful congratulations card made using the Feathered Friends stamp set by Stampin' Up!

www.crafty-rootes.co.uk – The pretty Feathered Friends stamp set used to make a bright and colourful congratulations card – Stamp ‘N Hop Blog Hop

The adorable budgies were stamped onto the die cut square with Memento Tuxedo Black ink. I used the following Blends Pens to colour in the images – Melon Mambo, Pumpkin Pie and Lemon Lime Twist.

Using Dimensionals, I mounted the decorated square onto the card front, tucking the strip of Pumpkin Pie card behind.


A bright and colourful congratulations card made using the Feathered Friends stamp set by Stampin' Up!

www.crafty-rootes.co.uk – The pretty Feathered Friends stamp set used to make a bright and colourful congratulations card – Stamp ‘N Hop Blog Hop

The sentiment, from the Loveliest Tree stamp set was stamped in Memento Tuxedo Black ink onto the strip of Lemon Lime Twist card before it was added to the card front.


A bright and colourful congratulations card made using the Feathered Friends stamp set by Stampin' Up!

www.crafty-rootes.co.uk – The pretty Feathered Friends stamp set used to make a bright and colourful congratulations card – Stamp ‘N Hop Blog Hop

A trio of Purple Adhesive-backed Sequins finished the card.


A bright and colourful congratulations card made using the Feathered Friends stamp set by Stampin' Up!

www.crafty-rootes.co.uk – The pretty Feathered Friends stamp set used to make a bright and colourful congratulations card – Stamp ‘N Hop Blog Hop

Please hop on to share the inspiration provided by my crafty friends.


Blog Hop Index


Order goodies/Join My Team

If you don’t have a Stampin’ Up! Demonstrator I would love to be yours!  If you don’t have a catalogue and live in the UK, please let me know and I will be delighted to send you one.  To order any supplies click on the “shop online” button at the top of the page. Alternatively, contact me and I would be happy to place an order for you. To join my team either click on the link above or click on the contact me button above and I will contact you with more information.

Details of the products I used for this project can be found below.

Mo x

Supplies used:


A silver wedding anniversary card made using the stunning Layers of Beauty stamp set, stencils and dies from Stampin' Up! - Stamping With Friends Blog Hop

Silver Anniversary Card

Hello and welcome to the Stamping With Friends Blog Hop where we are sharing a project of our own choosing. I have chosen to share the silver anniversary card made to celebrate the 25th Wedding Anniversary of one of my oldest friends and her husband.

Colours used in this card are:


To recreate the silver anniversary card, you will need:

Soft Sea Foam card base – 8¼” by 5⅞” – scored at 4⅛”
Silver Foil – 5⅜” by 3⅝”
Basic White card – 5¼” by 3½”
Basic Gray card – 4” by ¼”
Basic White card – 5½” by 3¾” – for the inside
Scrap Basic White card


Using one of the Basics 3D Embossing Folders, I embossed the 5¼” by 3½” panel of Basic White card. This was adhered to the Silver Foil layer. I then glued the piece to the Soft Sea Foam card base.


A silver wedding anniversary card made using the stunning Layers of Beauty stamp set, stencils and dies from Stampin' Up! - Stamping With Friends Blog Hop

www.crafty-rootes.com -The stunning Layers of Beauty stamp set, stencils and dies used to create a silver wedding anniversary card – Stamping With Friends Blog Hop

The large floral outline image, from the Layers of Beauty stamp set was stamped onto a large scrap of Basic White card.


A silver wedding anniversary card made using the stunning Layers of Beauty stamp set, stencils and dies from Stampin' Up! - Stamping With Friends Blog Hop

www.crafty-rootes.com -The stunning Layers of Beauty stamp set, stencils and dies used to create a silver wedding anniversary card – Stamping With Friends Blog Hop

I placed the 1st stencil over the stamped image and applied a light layer of Smoky Slate ink to the large roses with a Blending Brush. The 2nd stencil was placed over top and the next layer added with Gray Granite ink. The final layer was added with Basic Gray ink.


A silver wedding anniversary card made using the stunning Layers of Beauty stamp set, stencils and dies from Stampin' Up! - Stamping With Friends Blog Hop

www.crafty-rootes.com -The stunning Layers of Beauty stamp set, stencils and dies used to create a silver wedding anniversary card – Stamping With Friends Blog Hop

The smaller flowers were inked with Gray Granite ink and the centres coloured with Basic Gray ink. Soft Sea Foam ink was then used for the base colour of the leaves. The more detailed layer was added to the leaves using the same ink.

I die cut the coloured image using the Layers of Beauty Dies and added the whole piece to the card front on Dimensionals.


A silver wedding anniversary card made using the stunning Layers of Beauty stamp set, stencils and dies from Stampin' Up! - Stamping With Friends Blog Hop

www.crafty-rootes.com -The stunning Layers of Beauty stamp set, stencils and dies used to create a silver wedding anniversary card – Stamping With Friends Blog Hop

The sentiment, from the Sweetly Scripted stamp set was stamped in Versamark ink onto the strip of Basic Gray card. I covered it with White Embossing Powder and heat set it with my Heat Tool before adding it to the card front.


A silver wedding anniversary card made using the stunning Layers of Beauty stamp set, stencils and dies from Stampin' Up! - Stamping With Friends Blog Hop

www.crafty-rootes.com -The stunning Layers of Beauty stamp set, stencils and dies used to create a silver wedding anniversary card – Stamping With Friends Blog Hop

A scattering of Basic Gray and Smoky Slate Pearls and a silver ribbon bow completed the card.

Please hop on the see what my crafty  friends have been making recently.


Blog Hop Index

Order goodies/Join My Team

If you don’t have a Stampin’ Up! Demonstrator I would love to be yours!  If you don’t have a catalogue and live in the UK, please let me know and I will be delighted to send you one.  To order any supplies click on the “shop online” button at the top of the page. Alternatively, contact me and I would be happy to place an order for you. To join my team either click on the link above or click on the contact me button above and I will contact you with more information.

Details of the products I used for this project can be found below.

Mo x

Supplies used:


The Layered Florals Embossing Folder used with Pearlized Enamel Effects by Stampin' Up! to make a pretty anniversary card

Pearlized Layered Florals card

Here is a card made to celebrate the wedding anniversary of lovely friends using the Layered Florals 3D Embossing Folder.

Colours in this project are:


To recreate the pearlized layered florals card, you will need:

Thick Basic White card base – 8¼” by 5⅞” – scored at 4⅛”
Gorgeous Grape card – 5⅜” by 3⅝”
Basic White card – 5¼” by 3½”
Gorgeous Grape card – 5⅞” by ⅞”
Scrap Basic White card


Using the Layered Floral 3D Embossing Folder, I embossed the 5¼” by 3½” piece of Basic White card.


The Layered Florals Embossing Folder used with Pearlized Enamel Effects by Stampin' Up! to make a pretty anniversary card

www.crafty-rootes.com -The beautiful pearlized floral anniversary card made using the Layered Florals Embossing Folder

Onto the Silicon Mat I squeezed out about ½ teaspoonful of Pearlized Enamel Effects. I added 2 drops of Gorgeous Grape Re-inker and mixed with an old lolly stick.


The Layered Florals Embossing Folder used with Pearlized Enamel Effects by Stampin' Up! to make a pretty anniversary card

www.crafty-rootes.com -The beautiful pearlized floral anniversary card made using the Layered Florals Embossing Folder

Using an old piece of sponge, I applied the pearlized purple mixture to the embossed panel using circular motions. I then set it aside to dry.


The Layered Florals Embossing Folder used with Pearlized Enamel Effects by Stampin' Up! to make a pretty anniversary card

www.crafty-rootes.com -The beautiful pearlized floral anniversary card made using the Layered Florals Embossing Folder

The coloured panel was glued to the Gorgeous Grape layer and a length of the white Diagonal Striped Ribbon was wrapped around before the panel was adhered to the Thick Basic White card base.


The Layered Florals Embossing Folder used with Pearlized Enamel Effects by Stampin' Up! to make a pretty anniversary card

www.crafty-rootes.com -The beautiful pearlized floral anniversary card made using the Layered Florals Embossing Folder

The sentiment, from the Layers of Beauty stamp set was stamped in Gorgeous Grape ink onto scrap Basic White card. I punched it out using the Heartfelt Hexagon Punch. It was added over the ribbon on Dimensionals.

A trio of Purple Shimmer Gems completed the card.

Order goodies/Join My Team

If you don’t have a Stampin’ Up! Demonstrator I would love to be yours!  If you don’t have a catalogue and live in the UK, please let me know and I will be delighted to send you one.  To order any supplies click on the “shop online” button at the top of the page. Alternatively, contact me and I would be happy to place an order for you. To join my team either click on the link above or click on the contact me button above and I will contact you with more information.

Details of the products I used for this project can be found below.

Mo x

Supplies used:


A beautiful floral anniversary card made using the gorgeous Layers of Beauty stamp set, dies and stencil Bundle by Stampin' Up! - Ink & Inkspirations Blog Hop

Floral Anniversary card – Ink & Inkspirations Blog Hop

Hello and welcome to the Ink & Inkspirations Blog Hop where we are sharing projects inspired by a floral picture and a colour challenge. I used the gorgeous Layers of Beauty Bundle to make my card.


Colours used in this card are:


To recreate the floral anniversary card, you will need:

Bubble Bath card base – 8¼” by 5⅞” – scored at 4⅛”
Poppy Parade card – 5½” by 3¾”
Basic White card – 5⅜” by 3⅝”
Basic White card – 5½” by 3¾”
Scrap Basic White card


The sentiment was stamped in Memento Tuxedo Black ink in the lower left corner of the 5⅜” by 3⅝” panel of Basic White card. The panel was then glued to the Poppy Parade layer and the whole panel added to the Bubble Bath card base.


A beautiful floral anniversary card made using the gorgeous Layers of Beauty stamp set, dies and stencil Bundle by Stampin' Up! - Ink & Inkspirations Blog Hop

www.crafty-rootes.com – The gorgeous Layers of Beauty stamp set, dies and stencil Bundle used to make a beautiful floral anniversary card for the Ink & Inkspirations Blog Hop

I placed the 1st stencil onto the large piece of scrap Basic White card and applied a light layer of Bubble Bath ink to the large roses with a Blending Brush.


A beautiful floral anniversary card made using the gorgeous Layers of Beauty stamp set, dies and stencil Bundle by Stampin' Up! - Ink & Inkspirations Blog Hop

www.crafty-rootes.com – The gorgeous Layers of Beauty stamp set, dies and stencil Bundle used to make a beautiful floral anniversary card for the Ink & Inkspirations Blog Hop

The 2nd stencil was placed over top and the next added with Melon Mambo ink. The final layer was added with Poppy Parade ink.


A beautiful floral anniversary card made using the gorgeous Layers of Beauty stamp set, dies and stencil Bundle by Stampin' Up! - Ink & Inkspirations Blog Hop

www.crafty-rootes.com – The gorgeous Layers of Beauty stamp set, dies and stencil Bundle used to make a beautiful floral anniversary card for the Ink & Inkspirations Blog Hop

The smaller flowers were inked with Daffodil Delight ink and the centres coloured with Granny Apple Green ink.

A beautiful floral anniversary card made using the gorgeous Layers of Beauty stamp set, dies and stencil Bundle by Stampin' Up! - Ink & Inkspirations Blog Hop

www.crafty-rootes.com – The gorgeous Layers of Beauty stamp set, dies and stencil Bundle used to make a beautiful floral anniversary card for the Ink & Inkspirations Blog Hop

The Granny Apple Green ink was then used for the base colour of the leaves. The more detailed layer was added to the leaves with Garden Green ink.


A beautiful floral anniversary card made using the gorgeous Layers of Beauty stamp set, dies and stencil Bundle by Stampin' Up! - Ink & Inkspirations Blog Hop

www.crafty-rootes.com – The gorgeous Layers of Beauty stamp set, dies and stencil Bundle used to make a beautiful floral anniversary card for the Ink & Inkspirations Blog Hop

I die cut the coloured image using the Layers of Beauty Dies and added the whole piece to the card front on Dimensionals.

I absolutely love this bundle, so pretty.

Please hop along to share the inspiration provided by my crafty friends.


Order goodies/Join My Team

If you don’t have a Stampin’ Up! Demonstrator I would love to be yours!  If you don’t have a catalogue and live in the UK, please let me know and I will be delighted to send you one.  To order any supplies click on the “shop online” button at the top of the page. Alternatively, contact me and I would be happy to place an order for you. To join my team either click on the link above or click on the contact me button above and I will contact you with more information.

Details of the products I used for this project can be found below.

Mo x

Supplies used:


An adorable walrus themed anniversary card made using the Hearts & Hugs stamp set from Stampin' Up!

Walrus Anniversary card

Today, I am sharing a sweet anniversary card made for my sister-in-law and her husband using the adorable new Hearts & Hugs stamp set.

Colours in this card are:


To recreate the walrus anniversary card, you will need:

Balmy Blue card base – 8¼” by 5⅞” – scored at 4⅛”
Basic White card – 4⅛” by 3”
Basic Black card – 4½” by 3½”
Basic White card – 4½” by 3½”
Basic White card – 5½” by 3¾” – for the inside


Using the image of the trio of small hearts, I randomly stamped all over the Balmy Blue card front using Balmy Blue ink.


An adorable walrus themed anniversary card made using the Hearts & Hugs stamp set from Stampin' Up!

The Hearts & Hugs stamp set used to make an adorable walrus themed anniversary card.

The sentiment, from the Sweetly Scripted stamp set was stamped in Memento Tuxedo Black ink along the bottom of the 4⅛” by 3” panel of Basic White card.


An adorable walrus themed anniversary card made using the Hearts & Hugs stamp set from Stampin' Up!

www.crafty-rootes.com – The Hearts & Hugs stamp set used to make an adorable walrus themed anniversary card.

The adorable pair of walruses were stamped above the sentiment using Memento Tuxedo Black ink. I used the following Blends Pens to colour in the image – Petal Pink, Pretty In Pink, Ivory and Gray Granite.


An adorable walrus themed anniversary card made using the Hearts & Hugs stamp set from Stampin' Up!

www.crafty-rootes.com – The Hearts & Hugs stamp set used to make an adorable walrus themed anniversary card.

I ‘grounded’ the image using a light Balmy Blue Blends marker and blended in some Balmy Blue ink around the image to suggest an icy sky.


An adorable walrus themed anniversary card made using the Hearts & Hugs stamp set from Stampin' Up!

www.crafty-rootes.com – The Hearts & Hugs stamp set used to make an adorable walrus themed anniversary card.

From the 4½” by 3½” panels of Basic White and Basic Black I die cut 2 of the Perennial Postage shaped. I trimmed the top and bottom of each of the rectangles and glued them to the top and bottom of the decorated panel.


An adorable walrus themed anniversary card made using the Hearts & Hugs stamp set from Stampin' Up!

www.crafty-rootes.com – The Hearts & Hugs stamp set used to make an adorable walrus themed anniversary card.

The whole panel was mounted onto the card front on Dimensionals. A trio of Iridescent Pearls finished of the card.


Order goodies/Join My Team

If you don’t have a Stampin’ Up! Demonstrator I would love to be yours!  If you don’t have a catalogue and live in the UK, please let me know and I will be delighted to send you one.  To order any supplies click on the “shop online” button at the top of the page. Alternatively, contact me and I would be happy to place an order for you. To join my team either click on the link above or click on the contact me button above and I will contact you with more information.

Details of the products I used for this project can be found below.

Mo x

Supplies used:


A pretty floral anniversary card made using the Layers of Beauty stamp set, dies and co-ordinating masks along with the Bright and Beautiful dsp from Stampin' Up!

Masked Beauty card – Magic of Masks Blog Hop

Hello and welcome to the Magic of Masks Blog Hop where we are sharing projects made using masks or stencils. I am loving both the Enduring Beauty and new Layers of Beauty stamp sets, dies and masks and couldn’t resist using the new Layers of Beauty bundle to make my masked beauty anniversary card.

Colours used in this card are:


To recreate the masked beauty card, you will need:

Highland Heather card base – 8¼” by 5⅞” – scored at 4⅛”
Basic White card – 5⅝” by 3⅞”
Bright & Beautiful dsp – 5½” by 3¾”
Basic White card – 5½” by 3¾” – for the inside
Scrap Basic White card


Using Multipurpose Liquid Adhesive, I glued the Bright & Beautiful dsp to the 5⅝” by 3⅞” panel of Basic White card. This was then glued to the Highland Heather card front. I stamped the sentiment onto the card front using Gorgeous Grape ink.


A pretty floral anniversary card made using the Layers of Beauty stamp set, dies and co-ordinating masks along with the Bright and Beautiful dsp from Stampin' Up!

www.crafty-rootes.com -The Layers of Beauty stamp set, dies and co-ordinating masks used to create a pretty floral anniversary card – Magic of Masks Blog Hop

On scrap Basic White card, I stamped the large floral image using Memento Tuxedo Black ink.


A pretty floral anniversary card made using the Layers of Beauty stamp set, dies and co-ordinating masks along with the Bright and Beautiful dsp from Stampin' Up!

www.crafty-rootes.com -The Layers of Beauty stamp set, dies and co-ordinating masks used to create a pretty floral anniversary card – Magic of Masks Blog Hop

I placed the masks, which are helpfully numbered, one at a time on top of the stamped image. Using Blending Brushes, I added Lemon Lolly to the roses and Highland Heather to the small daisies. Each mask added another layer of colour to the flowers.


A pretty floral anniversary card made using the Layers of Beauty stamp set, dies and co-ordinating masks along with the Bright and Beautiful dsp from Stampin' Up!

www.crafty-rootes.com -The Layers of Beauty stamp set, dies and co-ordinating masks used to create a pretty floral anniversary card – Magic of Masks Blog Hop

The leaves were then inked in with Garden Green ink. I love how the colour and texture builds when you use the masks, so pretty. The inked image was then die cut using the Layers of Beauty Dies. The whole piece was then mounted onto the card front on Dimensionals.


A pretty floral anniversary card made using the Layers of Beauty stamp set, dies and co-ordinating masks along with the Bright and Beautiful dsp from Stampin' Up!

www.crafty-rootes.com -The Layers of Beauty stamp set, dies and co-ordinating masks used to create a pretty floral anniversary card – Magic of Masks Blog Hop

A trio of Tinsel Gems completed the card.


A pretty floral anniversary card made using the Layers of Beauty stamp set, dies and co-ordinating masks along with the Bright and Beautiful dsp from Stampin' Up!

www.crafty-rootes.com -The Layers of Beauty stamp set, dies and co-ordinating masks used to create a pretty floral anniversary card – Magic of Masks Blog Hop


Please hop along to share the inspiration provided by my crafty friends.


Blog Hop Index


Order goodies/Join My Team

If you don’t have a Stampin’ Up! Demonstrator I would love to be yours!  If you don’t have a catalogue and live in the UK, please let me know and I will be delighted to send you one.  To order any supplies click on the “shop online” button at the top of the page. Alternatively, contact me and I would be happy to place an order for you. To join my team either click on the link above or click on the contact me button above and I will contact you with more information.

Details of the products I used for this project can be found below.

Mo x

Supplies used:


A sweet anniversary card made for the Technique Tuesday Blog Hop using the ink refill and shaving foam technique and the Hot Air Balloons Dies by Stampin' Up!

Hot Air Balloons card for the Technique Tuesday Blog Hop

Hello and welcome to the Technique Tuesday Blog Hop where we are sharing projects made using ink refills. I had such fun with this and ended up using ink refills with having foam to make my hot air balloon anniversary card.

Colours in this card are:


To recreate the hot air balloon card, you will need:

Azure Afternoon card base – 8¼” by 5⅞” – scored at 4⅛”
Basic Black card – 5⅜” by 3⅝”
Basic White card – 5½” by 3¾” – which I cut down to 5 ¼” by 3 ½” after colouring
Basic White card – 2” by ¼”
Basic White card – 5½” by 3¾” – for the inside
Scrap Starry Sky, Azure Afternoon & Lemon Lime Twist card

 Ink Refill and shaving cream technique:

Paper Plate
Shaving foam
Ink Refills
Palette Knives
Kitchen towel


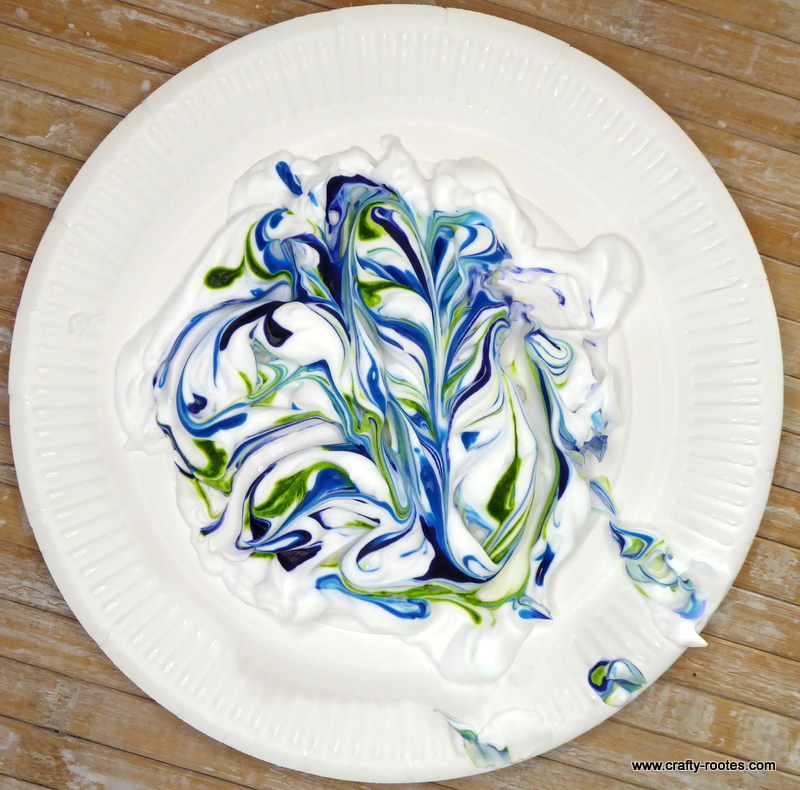
I covered the centre of a paper plate with shaving foam – it has to be foam not gel – spreading it out into a fairly even coating. I dropped dots of re inker randomly over the shaving cream – Azure Afternoon, Lemon Lime Twist and Starry Sky. Using a palette knife I swirled the colours together.


Ink refill and shaving foam technique

www.crafty-rootes.com – Ink refill and shaving foam technique

The 5½” by 3¾” panel of Basic White was then placed on top and gentle pressure applied. I carefully lifted the panel off the foam and scraped the excess off with the palette knife. The panel was left to dry.


Ink refill and shaving foam technique

www.crafty-rootes.com – Ink refill and shaving foam technique

I made multiple panels and used some of the left overs with stencils to see if that would work as well. – Very messy but such fun.


Ink refill and shaving foam technique

www.crafty-rootes.com – Ink refill and shaving foam technique


Ink refill and shaving foam technique

www.crafty-rootes.com – Ink refill and shaving foam technique

When the first panel was dry, I trimmed it down to 5¼” by 3½”and glued it to the Basic Black panel and then added the panel to the Azure Afternoon card base.


A sweet anniversary card made for the Technique Tuesday Blog Hop using the ink refill and shaving foam technique and the Hot Air Balloons Dies by Stampin' Up!

www.crafty-rootes.com – The Hot Air Balloons Dies used with the Ink refill and shaving foam technique to make a sweet anniversary card for the Technique Tuesday Blog Hop

Nest I die cut the hot air balloons, initially in black as I was thinking of a silhouette effect but after messing about for a while I decided the black was too harsh and die cut them in Starry Sky.


A sweet anniversary card made for the Technique Tuesday Blog Hop using the ink refill and shaving foam technique and the Hot Air Balloons Dies by Stampin' Up!

www.crafty-rootes.com – The Hot Air Balloons Dies used with the Ink refill and shaving foam technique to make a sweet anniversary card for the Technique Tuesday Blog Hop

From scrap Azure Afternoon and Lemon Lime Twist card I die cut the coloured panels for the balloons and added them on with Multipurpose Liquid Adhesive – if I had been thinking straight I would have added Adhesive Sheet to the back of the scrap card.


A sweet anniversary card made for the Technique Tuesday Blog Hop using the ink refill and shaving foam technique and the Hot Air Balloons Dies by Stampin' Up!

www.crafty-rootes.com – The Hot Air Balloons Dies used with the Ink refill and shaving foam technique to make a sweet anniversary card for the Technique Tuesday Blog Hop

The balloons and baskets were then added to the card front on Dimensionals.


A sweet anniversary card made for the Technique Tuesday Blog Hop using the ink refill and shaving foam technique and the Hot Air Balloons Dies by Stampin' Up!

www.crafty-rootes.com – The Hot Air Balloons Dies used with the Ink refill and shaving foam technique to make a sweet anniversary card for the Technique Tuesday Blog Hop

I stamped the sentiment in Starry Sky ink onto the thin strip of Basic White card and added it to the front of the card.


A sweet anniversary card made for the Technique Tuesday Blog Hop using the ink refill and shaving foam technique and the Hot Air Balloons Dies by Stampin' Up!

www.crafty-rootes.com – The Hot Air Balloons Dies used with the Ink refill and shaving foam technique to make a sweet anniversary card for the Technique Tuesday Blog Hop

A trio of Basic Rhinestones completed the card. I hope you like it.

Please hop along to share the inspiration provided by my crafty friends.


Blog Hop Index


Order goodies/Join My Team

If you don’t have a Stampin’ Up! Demonstrator I would love to be yours!  If you don’t have a catalogue and live in the UK, please let me know and I will be delighted to send you one.  To order any supplies click on the “shop online” button at the top of the page. Alternatively, contact me and I would be happy to place an order for you. To join my team either click on the link above or click on the contact me button above and I will contact you with more information.

Details of the products I used for this project can be found below.

Mo x

Supplies used: