A pretty self-closing box made using the Velvet Meadow designer series paper from Stampin' Up!

Self-closing Box – Stampin’ Dreams Blog Hop

Hello and welcome to the Stampin’ Dreams Blog Hop where we are sharing anything but a card. I have made a self-closing box and decorated it with the lovely Velvet Meadow dsp.

Colours used in this project are:


I created the self-closing box using the following supplies:

Berry Burst card – 8½” by 6”
Velvet Meadow dsp – 3¾” by 3¾”
Scrap Basic White card


Using my Simply Scored Scoring Tool, I scored the Berry Burst card. On the long side at 4” and 8”. On the short side at 1” and 5”.


A pretty self-closing box made using the Velvet Meadow designer series paper from Stampin' Up!

www.crafty-rootes.co.uk – The Velvet Meadow designer series paper used to make a pretty self-closing box – Stampin’ Dreams Blog Hop

With the long side at the top of the scoreboard and the ½” strip on the right I scored at 2” and 6” but only as far as the first scoreline. I repeated this on White cardstock to make it easier for you to see.
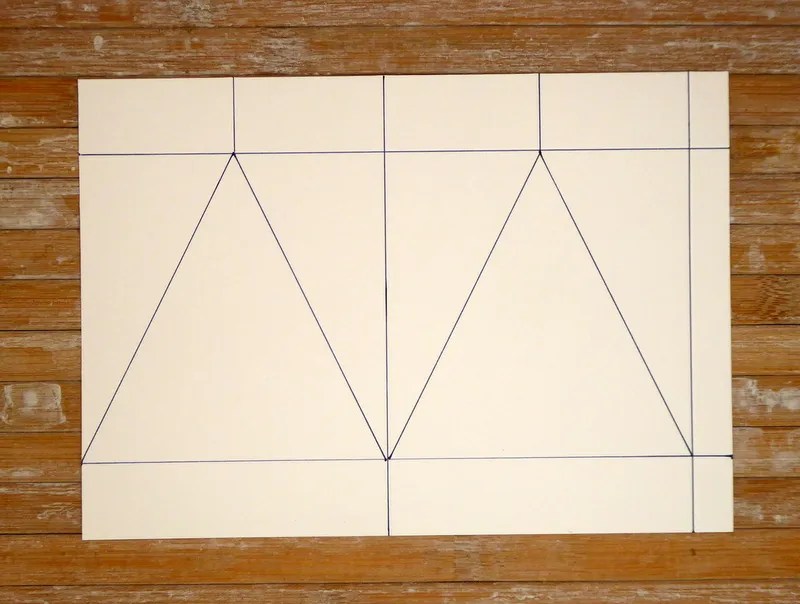
 

A pretty self-closing box made using the Velvet Meadow designer series paper from Stampin' Up!

www.crafty-rootes.co.uk – The Velvet Meadow designer series paper used to make a pretty self-closing box – Stampin’ Dreams Blog Hop

Taking a ruler and the Take Your Pick Scoring Attachment I scored from the bottom of the 2” scoreline to the right-hand corner of the rectangle and then again to the left-hand corner. I repeated this from the bottom of the 6” scoreline to both other corners.
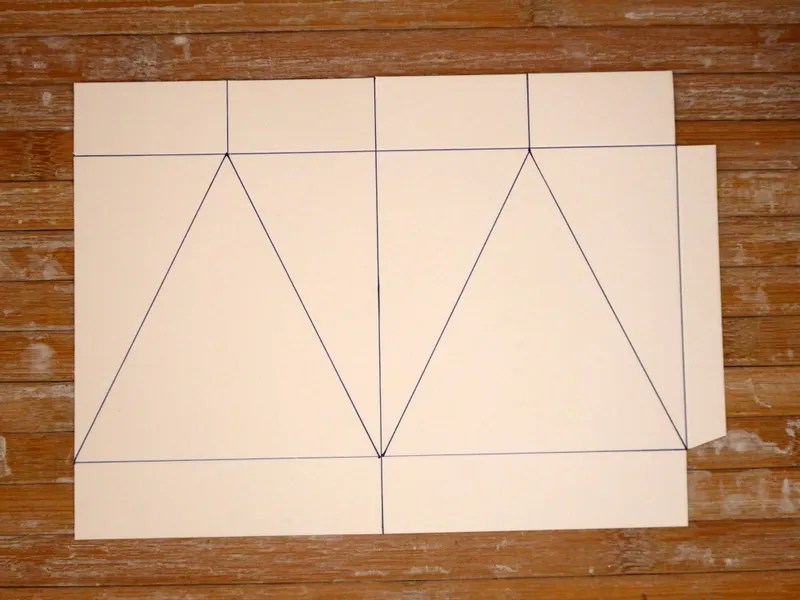
 

A pretty self-closing box made using the Velvet Meadow designer series paper from Stampin' Up!

www.crafty-rootes.co.uk – The Velvet Meadow designer series paper used to make a pretty self-closing box – Stampin’ Dreams Blog Hop

I cut away the small rectangles at either end of the ½” tab and cut up all the remaining scorelines along the long sides. I folded and burnished on all the scorelines beginning with the diagonal scorelines. The cardstock was then folded on the 4” fold and glued to the ½” tab to close the box.


A pretty self-closing box made using the Velvet Meadow designer series paper from Stampin' Up!

www.crafty-rootes.co.uk – The Velvet Meadow designer series paper used to make a pretty self-closing box – Stampin’ Dreams Blog Hop

Using a pencil, I marked one side of the 3¾” square of Velvet Meadow dsp at 1⅞”. I used my Paper Trimmer to cut from the 1⅞” mark to the lower right corner and then the lower left corner giving three triangles. These were glued to the front of the self-closing box. The four tabs forming the bottom of the box were then glued together.


A pretty self-closing box made using the Velvet Meadow designer series paper from Stampin' Up!

www.crafty-rootes.co.uk – The Velvet Meadow designer series paper used to make a pretty self-closing box – Stampin’ Dreams Blog Hop

I wrapped a length of retired Silver Edged Berry Burst Ribbon around the box and tied it in a bow at the front of the box.


A pretty self-closing box made using the Velvet Meadow designer series paper from Stampin' Up!

www.crafty-rootes.co.uk – The Velvet Meadow designer series paper used to make a pretty self-closing box – Stampin’ Dreams Blog Hop

The sentiment was then stamped on scrap Basic White card in Berry Burst ink. I die cut it using the Fragrant Layers Dies, passing it through the machine twice to make the label smaller. I added the label to the box with a Mini Glue Dot.

 Please hop on to see what my fellow crafters are sharing with us today.


Blog Hop Index


Order goodies/Join My Team

I would love to be your demonstrator if you don’t already have one and live in the UK.  I would also be delighted to send you a catalogue if you do not have a demonstrator. I would be happy to place an order for you, or you can order directly by clicking on the “shop online” button.


Contact me for information about joining my team or click on the ‘Join My Team’ button

Details of the products I used for this project can be found below.

Mo x

Supplies used:


A pretty, floral birthday card made using a paper piecing technique and the Fragrant Layers Stamp set and co-ordinating dies from Stampin' Up!

Paper Pieced Fragrant Layers Card

I have used the Fragrant Layers stamp set and dies, available from the 6th January 2026, to make a pretty paper pieced, floral card.

Colours used to make this card are:

To recreate the fragrant layers paper pieced card, you will need:

Lemon Lolly card base – 8¼” by 5⅞” scored at 4⅛”
Basic White card – 5” by 3½”
Melon Mambo card – 4½” by 3”
Basic White card – 2⅛” by ½”
Basic White card – 5½” by 3¾” for the inside
Scrap Lemon Lolly, Timid Tiger & Soft Sea Foam


Using a die from the Textured Notes set of dies I die cut a decorated rectangle from the 5” by 3½” panel of Basic White.


A pretty, floral birthday card made using a paper piecing technique and the Fragrant Layers Stamp set and co-ordinating dies from Stampin' Up!

www.crafty-rootes.co.uk – The Fragrant Layers Stamp set and co-ordinating dies used with a paper piecing technique to make a pretty, floral birthday card

I die cut the floral panel from the panel of Melon Mambo card. I kept the outline piece and discarded all the integral pieces. The whole outline piece was then adhered to decorated rectangle.


A pretty, floral birthday card made using a paper piecing technique and the Fragrant Layers Stamp set and co-ordinating dies from Stampin' Up!

www.crafty-rootes.co.uk – The Fragrant Layers Stamp set and co-ordinating dies used with a paper piecing technique to make a pretty, floral birthday card

I cut the floral panel from scrap Lemon Lolly card, Scrap Soft Sea card and scrap Soft Sea Foam card saving all the pieces.


A pretty, floral birthday card made using a paper piecing technique and the Fragrant Layers Stamp set and co-ordinating dies from Stampin' Up!

www.crafty-rootes.co.uk – The Fragrant Layers Stamp set and co-ordinating dies used with a paper piecing technique to make a pretty, floral birthday card

All the pieces were added to the outline panel using my Take Your Pick Tool, adhering them in place with a little Multipurpose Liquid Adhesive. The whole panel was added to the Lemon Lolly card front on Dimensionals.


A pretty, floral birthday card made using a paper piecing technique and the Fragrant Layers Stamp set and co-ordinating dies from Stampin' Up!

www.crafty-rootes.co.uk – The Fragrant Layers Stamp set and co-ordinating dies used with a paper piecing technique to make a pretty, floral birthday card

The sentiment was stamped on the strip of Basic White card using Melon Mambo before being added to the card front.


A pretty, floral birthday card made using a paper piecing technique and the Fragrant Layers Stamp set and co-ordinating dies from Stampin' Up!

www.crafty-rootes.co.uk – The Fragrant Layers Stamp set and co-ordinating dies used with a paper piecing technique to make a pretty, floral birthday card

A trio of Rainbow Dots completed the card.

 Order goodies/Join My Team

If you don’t have a Stampin’ Up! Demonstrator I would love to be yours!  If you don’t have a catalogue and live in the UK, please let me know and I will be delighted to send you one.  To order any supplies click on the “shop online” button at the top of the page. Alternatively, contact me and I would be happy to place an order for you. To join my team either click on the link above or click on the contact me button above and I will contact you with more information.

Details of the products I used for this project can be found below.

Mo x

Supplies used: