A sweet anniversary card made for the Technique Tuesday Blog Hop using the ink refill and shaving foam technique and the Hot Air Balloons Dies by Stampin' Up!

Hot Air Balloons card for the Technique Tuesday Blog Hop

Hello and welcome to the Technique Tuesday Blog Hop where we are sharing projects made using ink refills. I had such fun with this and ended up using ink refills with having foam to make my hot air balloon anniversary card.

Colours in this card are:


To recreate the hot air balloon card, you will need:

Azure Afternoon card base – 8¼” by 5⅞” – scored at 4⅛”
Basic Black card – 5⅜” by 3⅝”
Basic White card – 5½” by 3¾” – which I cut down to 5 ¼” by 3 ½” after colouring
Basic White card – 2” by ¼”
Basic White card – 5½” by 3¾” – for the inside
Scrap Starry Sky, Azure Afternoon & Lemon Lime Twist card

 Ink Refill and shaving cream technique:

Paper Plate
Shaving foam
Ink Refills
Palette Knives
Kitchen towel


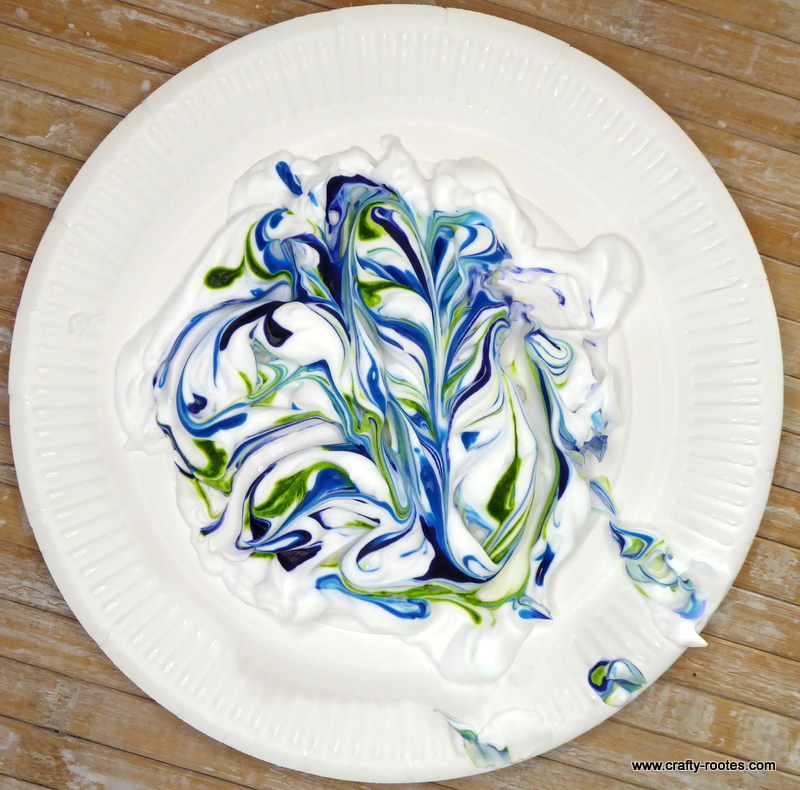
I covered the centre of a paper plate with shaving foam – it has to be foam not gel – spreading it out into a fairly even coating. I dropped dots of re inker randomly over the shaving cream – Azure Afternoon, Lemon Lime Twist and Starry Sky. Using a palette knife I swirled the colours together.


Ink refill and shaving foam technique

www.crafty-rootes.com – Ink refill and shaving foam technique

The 5½” by 3¾” panel of Basic White was then placed on top and gentle pressure applied. I carefully lifted the panel off the foam and scraped the excess off with the palette knife. The panel was left to dry.


Ink refill and shaving foam technique

www.crafty-rootes.com – Ink refill and shaving foam technique

I made multiple panels and used some of the left overs with stencils to see if that would work as well. – Very messy but such fun.


Ink refill and shaving foam technique

www.crafty-rootes.com – Ink refill and shaving foam technique


Ink refill and shaving foam technique

www.crafty-rootes.com – Ink refill and shaving foam technique

When the first panel was dry, I trimmed it down to 5¼” by 3½”and glued it to the Basic Black panel and then added the panel to the Azure Afternoon card base.


A sweet anniversary card made for the Technique Tuesday Blog Hop using the ink refill and shaving foam technique and the Hot Air Balloons Dies by Stampin' Up!

www.crafty-rootes.com – The Hot Air Balloons Dies used with the Ink refill and shaving foam technique to make a sweet anniversary card for the Technique Tuesday Blog Hop

Nest I die cut the hot air balloons, initially in black as I was thinking of a silhouette effect but after messing about for a while I decided the black was too harsh and die cut them in Starry Sky.


A sweet anniversary card made for the Technique Tuesday Blog Hop using the ink refill and shaving foam technique and the Hot Air Balloons Dies by Stampin' Up!

www.crafty-rootes.com – The Hot Air Balloons Dies used with the Ink refill and shaving foam technique to make a sweet anniversary card for the Technique Tuesday Blog Hop

From scrap Azure Afternoon and Lemon Lime Twist card I die cut the coloured panels for the balloons and added them on with Multipurpose Liquid Adhesive – if I had been thinking straight I would have added Adhesive Sheet to the back of the scrap card.


A sweet anniversary card made for the Technique Tuesday Blog Hop using the ink refill and shaving foam technique and the Hot Air Balloons Dies by Stampin' Up!

www.crafty-rootes.com – The Hot Air Balloons Dies used with the Ink refill and shaving foam technique to make a sweet anniversary card for the Technique Tuesday Blog Hop

The balloons and baskets were then added to the card front on Dimensionals.


A sweet anniversary card made for the Technique Tuesday Blog Hop using the ink refill and shaving foam technique and the Hot Air Balloons Dies by Stampin' Up!

www.crafty-rootes.com – The Hot Air Balloons Dies used with the Ink refill and shaving foam technique to make a sweet anniversary card for the Technique Tuesday Blog Hop

I stamped the sentiment in Starry Sky ink onto the thin strip of Basic White card and added it to the front of the card.


A sweet anniversary card made for the Technique Tuesday Blog Hop using the ink refill and shaving foam technique and the Hot Air Balloons Dies by Stampin' Up!

www.crafty-rootes.com – The Hot Air Balloons Dies used with the Ink refill and shaving foam technique to make a sweet anniversary card for the Technique Tuesday Blog Hop

A trio of Basic Rhinestones completed the card. I hope you like it.

Please hop along to share the inspiration provided by my crafty friends.


Blog Hop Index


Order goodies/Join My Team

If you don’t have a Stampin’ Up! Demonstrator I would love to be yours!  If you don’t have a catalogue and live in the UK, please let me know and I will be delighted to send you one.  To order any supplies click on the “shop online” button at the top of the page. Alternatively, contact me and I would be happy to place an order for you. To join my team either click on the link above or click on the contact me button above and I will contact you with more information.

Details of the products I used for this project can be found below.

Mo x

Supplies used:


Above the Clouds Hot Air Balloon card for a Stamp'N Hop blog hop colour challenge

Above the Clouds for the Stamp ‘N Hop colour challenge

No photo description available.

Welcome to the August Stamp ‘N Hop Blog Hop where this month we have a colour challenge. The colours we have been given are Granny Apple Green, Blueberry Bushel, Lovely Lipstick and Silver, all great colours. If you have hopped over from the lovely Libby I am sure you have been inspired by her project.

To recreate the Above the Clouds card you will need;

Granny Apple Green card base 8¼” by 5⅞” scored at 4⅛” – rounded upper right corner
Silver Foil 5½” by 3¾” – rounded upper right corner
Whisper White 5⅜” by 3⅝” – rounded upper right corner
Scrap Whisper White cardstock

I choose to use the Above the Clouds stamp set for this card and stamped 3 balloons in Memento Tuxedo Black ink onto a scrap piece of Whisper White cardstock. I stamped the solid fill in balloon image over the top – one in Lovely Lipstick ink , one in Blueberry Bushel ink and the last in Granny Apple Green ink. I stamped the top of the balloons inall three colours on the scrap Whisper White.

Above the Clouds Hot Air Balloon card for a Stamp'N Hop blog hop colour challenge

www.crafty-rootes.com -Above the Clouds stap set used for the Stamp ‘N Hop blog hop colour challenge

The balloons and the tops of the ballons were then punched out using the co-ordinating Hot Air Balloon Punch. I then cut away the top part of the partial balloons, mixed up the colours glued the pieces together with Dimensionals.

Above the Clouds Hot Air Balloon card for a Stamp'N Hop blog hop colour challenge

www.crafty-rootes.com -Above the Clouds stap set used for the Stamp ‘N Hop blog hop colour challenge

I punched 3 ‘baskets’ from the Silver Foil layer taking care to stay away from the edge. The baskets were attached to the bottom of each balloon using Multipurpose Liquid Adhesive.

Above the Clouds Hot Air Balloon card for a Stamp'N Hop blog hop colour challenge

www.crafty-rootes.com -Above the Clouds stap set used for the Stamp ‘N Hop blog hop colour challenge

The clouds were inked up with Blueberry Bushel ink, stamped off x 2 onto the Grip Paper then stamped randomly onto one of the Whisper White panels.

Above the Clouds Hot Air Balloon card for a Stamp'N Hop blog hop colour challenge

www.crafty-rootes.com -Above the Clouds stap set used for the Stamp ‘N Hop blog hop colour challenge

The balloons were added on to to the cloud stamped layer with the Multipurpose Liquid Adhesive. The whole topper was the glued to the Silver Foil piece.

After rubbing a piece of scrap Blueberry Bushel cardstock with my embossing buddy I stamped the sentiment in Versamark ink, covered the ink with Silver Embossing Powder and set it using my Heat Tool. I flagged the end with scissors and added it to the card front.

Above the Clouds Hot Air Balloon card for a Stamp'N Hop blog hop colour challenge

www.crafty-rootes.com -Above the Clouds stap set used for the Stamp ‘N Hop blog hop colour challenge

The clouds were stamped again on the remaining Whisper White panel and added to the inside of the card and the front of the envelope.

I am really happy with the card, I hope you also like it.

Please hop on the see what the talented Rebecca-Jo has to share with us this month.

If you don’t have a Stampin’ Up! Demonstrator I would love to be yours!  If you don’t have a catalogue and live in the UK please let me know and I will be delighted to send you one.  To order any supplies click on the “shop online” button at the top of the page. Alternatively, contact me and I would be happy to place an order for you.

Thanks for visiting my blog today, I love to read what you think of my projects so please do let me know. In line with new Data Protection Legislation (GDPR), by commenting you do so in the knowledge that your name & comment are visible to all who visit this blog and you thereby consent to the use of that personal information for that specific purpose. Please stop by again soon.

Details of the products I used for this project can be found below.

Mo x

Supplies


Gorgeous cards made at a Stamp-a-Stack featuring the Bird Ballard designer series paper

A Bird Ballard Stamp-a-Stack

Today I am sharing the projects made by the ladies who came to my Bird Ballard Stamp-a-Stack yesterday. On arrival each lady was given a kit bag containing a pack of the Bird Ballard designer series paper (dsp), a pack of the Iridescent sequins, 20 co-ordinating card bases, 20 envelopes and all the pre-cut layers to make 20 cards; 2 each of 10 designs. They also had a little chocolate treat to keep them going.

Above the Clouds

Gorgeous cards made at a Stamp-a-Stack featuring the Bird Ballard designer series paper

www,crafty-rootes.com -Bird Ballard Designer Series Paper used for the July Stamp-a-Stack

Sailing Home

Gorgeous cards made at a Stamp-a-Stack featuring the Bird Ballard designer series paper

Free As A Bird

Gorgeous cards made at a Stamp-a-Stack featuring the Bird Ballard designer series paper

www,crafty-rootes.com -Bird Ballard Designer Series Paper used for the July Stamp-a-Stack

Vibrant Vases

Gorgeous cards made at a Stamp-a-Stack featuring the Bird Ballard designer series paper

www,crafty-rootes.com -Bird Ballard Designer Series Paper used for the July Stamp-a-Stack

Wishing You

Gorgeous cards made at a Stamp-a-Stack featuring the Bird Ballard designer series paper

www,crafty-rootes.com -Bird Ballard Designer Series Paper used for the July Stamp-a-Stack

I love the Stamp-a-Stacks; we always have lots to talk and laugh about and it is great to craft with friends.

Gorgeous cards made at a Stamp-a-Stack featuring the Bird Ballard designer series paper


www,crafty-rootes.com -Bird Ballard Designer Series Paper used for the July Stamp-a-Stack

I hope you like the projects as much as the ladies did.

If you don’t have a Stampin’ Up! Demonstrator I would love to be yours!  If you don’t have a catalogue and live in the UK please let me know and I will be delighted to send you one.  To order any supplies click on the “shop online” button at the top of the page. Alternatively, contact me and I would be happy to place an order for you.

Thanks for visiting my blog today, I love to read what you think of my projects so please do let me know. In line with new Data Protection Legislation (GDPR), by commenting you do so in the knowledge that your name & comment are visible to all who visit this blog and you thereby consent to the use of that personal information for that specific purpose. Please stop by again soon.

Details of the products I used for this project can be found below.

Mo x

Supplies used:


A lovely cheerful thank you card featuring Hot Air Balloons and Stampin' Up! products

Above the Clouds

Oooh this is such a cute card made using the Above the Clouds stamp set and Hot Air Balloon Punch. I love balloons they always look so serene drifting across the sky. I was lucky enough to take a balloon ride over the Valley of the  Kings in Egypt a few years ago, a truly magical experience.

To recreate the Above the Clouds card you will need;

Night of Navy card base 8¼” by 5⅞” scored at 4⅛” – rounded lower right corner
Poppy Parade 5⅝” by 3⅞” – rounded lower right corner
Whisper White 5½” by 3¾” – rounded lower right corner x 2
Night of Navy 5½” by ⅛” x 2
Scrap Whisper White and Crumb Cake

I used Post It tape to mask off an area on one of the Whisper White panels. I dabbed a bit of Balmy Blue ink and Blueberry Bushel ink onto a clear block and added a little glycerine. This makes the ink gone on more smoothly and gives a better blended effect. I applied the inks using Sponge Daubers starting with the Balmy Blue and adding in the Blueberry Bushel towards the bottom. I left the panel to dry.

A lovely cheerful thank you card featuring Hot Air Balloons and Stampin' Up! products

www,crafty-rootes.com – A bright and colourful thank you card made using the Above the clouds stamp set

I stamped the outline balloons in Memento Tuxedo Black ink, then stamped the solid infill colour in Poppy Parade ink and Pineapple Punch ink and punched them out using the Hot Air Balloon Punch. The baskets were stamped in Crumb Cake onto Crumb Cake cardstock and punched them out as well.

A lovely cheerful thank you card featuring Hot Air Balloons and Stampin' Up! products

www,crafty-rootes.com – A bright and colourful thank you card made using the Above the clouds stamp set

I added the ⅛” Night of Navy strips either side of the ink blended area and glued the panel to the Poppy Parade layer. This was then added to a Night of Navy card base.

A lovely cheerful thank you card featuring Hot Air Balloons and Stampin' Up! products

www,crafty-rootes.com – A bright and colourful thank you card made using the Above the clouds stamp set

The balloons and baskets were then added to the card front on Dimensionals. I stamped the sentiment in Blueberry Bushel ink.

A lovely cheerful thank you card featuring Hot Air Balloons and Stampin' Up! products

www,crafty-rootes.com – A bright and colourful thank you card made using the Above the clouds stamp set

The smaller balloons were stamped on the remaining panel of Whisper White and the adhered on the inside of the card. The same image was also stamped on the envelope.

A lovely cheerful thank you card featuring Hot Air Balloons and Stampin' Up! products

www,crafty-rootes.com – A bright and colourful thank you card made using the Above the clouds stamp set

I love the bright and cheerful colours of this card. I hope you like it.

If you don’t have a Stampin’ Up! Demonstrator I would love to be yours!  If you don’t have a catalogue and live in the UK please let me know and I will be delighted to send you one.  To order any supplies click on the “shop online” button at the top of the page. Alternatively, contact me and I would be happy to place an order for you.

Thanks for visiting my blog today, I love to read what you think of my projects so please do let me know. In line with new Data Protection Legislation (GDPR), by commenting you do so in the knowledge that your name & comment are visible to all who visit this blog and you thereby consent to the use of that personal information for that specific purpose. Please stop by again soon.

Details of the products I used for this project can be found below.

Mo x

Supplies used:


Lift me up stamp set and Up & away dies for an anniversary card

Lift Me Up Anniversary Card

Today I have used the Lift Me Up stamp set and Up & Away dies to make an anniversary card for my lovely husband.

Making the Lift Me Up card

I started with a piece of Whisper White cardstock. I then took a clear block and added some Balmy Blue ink by pressing the ink pad to the block. I added a drop of glycerine and mixed it with the Balmy Blue ink, I read somewhere that this gives a smoother ink blend and it absolutely does. It was amazing; the ink went on smoothly with no streaks and blobs. I added this panel to the front of a Thick Whisper White card base.

Lift me up stamp set and Up & away dies for an anniversary card

www.crafty-rootes.com -Lift me up anniversary card

I stamped the large hot air balloon in Granny Apple Green ink onto a scrap of Granny Apple Green cardstock and die cut it using the Up & Away dies and my Big Shot. I stamped the small hot air balloon in Bermuda Bay onto Bermuda Bay cardstock and again in Pacific Point on Pacific Point cardstock and die cut them out. While I had the Big Shot out I also die cut some of the cloud shapes from scrap Whisper White cardstock.

Lift me up stamp set and Up & away dies for an anniversary card

www.crafty-rootes.com -Lift me up anniversary card

I stamped the sentiment from the Itty Bitty Greetings stamp set in Pacific Point ink onto a cloud. The clouds were then added onto the inked piece using Multipurpose Liquid Adhesive. I added the Bermuda Bay balloon with Multipurpose Liquid Adhesive. The other two balloons were added on Stampin’ Dimensionals.

Lift me up stamp set and Up & away dies for an anniversary card

www.crafty-rootes.com -Lift me up anniversary card

A really simple but sweet card. I hope my husband likes it

If you don’t have a Stampin’ Up! Demonstrator I would love to be yours!  If you don’t have a catalogue and live in the UK please let me know and I will be delighted to send you one.  To order any supplies click on the “shop online” button at the top of the page. Alternatively, contact me and I would be happy to place an order for you.

Thanks for visiting my blog today, I love to read what you think of my projects so please do let me know. In line with new Data Protection Legislation (GDPR), by commenting you do so in the knowledge that your name & comment are visible to all who visit this blog and you thereby consent to the use of that personal information for that specific purpose. Please stop by again soon.

Details of the products I used for this project can be found below.

Mo x

Supplies Used