Designed by Mo Rootes of crafty-rootes UK Independant Stampin' Up! Demonstrator . Shop for stampin up products or join my team through my online store or blog - www.crafty-rootes.com

Boutique Blossoms Anniversary Card – Ink. Stamp. Share Blog Hop


Hello and welcome to the Ink. Stamp. Share Blog Hop where we are sharing something we have been working on recently. I made this fun fold card for friends who have recently celebrated their 60th wedding anniversary using the Boutique Blossoms stamp set and dies and the Flourish & Frames Hot Foil Dies.


Colours used to make this card are:


I created the boutique blossoms anniversary card using the following supplies:

Thick Basic White card base – 8¼” by 5⅞” scored at 4⅛” and the front panel folded in half, back on itself
Violet Dreams dsp – 5¾” (or a smidgeon less) by 1⅞”
Violet Dreams dsp – 5¾” (or a smidgeon less) by 4”
Basic White – 5” by 4” x 2
Scrap Basic White and Gold Foil


The two pieces of Violet Dreams dsp were adhered to the card base, the smaller piece to the front flap and the larger piece to the inside.


Designed by Mo Rootes of crafty-rootes UKIndependant Stampin' Up! Demonstrator . Shop for stampin up products or join my team through my online store or blog - www.crafty-rootes.com

A handmade anniversary card made using Stampin’ Up! product featuring the Boutique Blossoms stamp set and the Flourish & Frames Hot Foil Dies

Using the Hot Foil System and Gold Hot Foil I foiled the largest frame from the Flourish & Frames Hot Foil Dies, twice onto the two pieces of Basic White card. I die cut both frames using the co-ordinating Flourish & Frames Dies.

I stamped the sentiment, from the Reason to Celebrate stamp set with Secret Sea ink onto one of the die cut pieces and glued it to the front flap.


Designed by Mo Rootes of crafty-rootes UKIndependant Stampin' Up! Demonstrator . Shop for stampin up products or join my team through my online store or blog - www.crafty-rootes.com

A handmade anniversary card made using Stampin’ Up! product featuring the Boutique Blossoms stamp set and the Flourish & Frames Hot Foil Dies

From scrap Gold Foil card, I die cut the numbers 6 and 0 using the retired Little Numbers Dies. I placed these onto the second die cut frame and stamped the sentiment above and below before gluing the numbers to the frame. The frame was then adhered to the back panel so that it was hidden by the framed piece on the front.


Designed by Mo Rootes of crafty-rootes UKIndependant Stampin' Up! Demonstrator . Shop for stampin up products or join my team through my online store or blog - www.crafty-rootes.com

A handmade anniversary card made using Stampin’ Up! product featuring the Boutique Blossoms stamp set and the Flourish & Frames Hot Foil Dies

On scrap Basic White card, I stamped one of each flower and a selection of leaves from the Boutique Blossoms stamp set using Secret Sea ink. These images were coloured using the Daffodil Delight, Golden Glow and Peaceful Pine Blends Pens before being die cut using the co-ordinating dies.


Designed by Mo Rootes of crafty-rootes UKIndependant Stampin' Up! Demonstrator . Shop for stampin up products or join my team through my online store or blog - www.crafty-rootes.com

A handmade anniversary card made using Stampin’ Up! product featuring the Boutique Blossoms stamp set and the Flourish & Frames Hot Foil Dies

The large flower and some of the leaves were glued to the frame on the front of the card and the smaller flower and a leaf to the inside frame.


Designed by Mo Rootes of crafty-rootes UKIndependant Stampin' Up! Demonstrator . Shop for stampin up products or join my team through my online store or blog - www.crafty-rootes.com

A handmade anniversary card made using Stampin’ Up! product featuring the Boutique Blossoms stamp set and the Flourish & Frames Hot Foil Dies

A scattering Moody Palette Glossy Dots finished the card.

Please hop on to see what my fellow crafters have created to share with us today.


Blog Hop Index


Order goodies/Join My Team

I would love to be your demonstrator if you don’t already have one and live in the UK.  I would also be delighted to send you a catalogue if you do not have a demonstrator. I would be happy to place an order for you, or you can order directly by clicking on the “shop online” button.


Contact me for information about joining my team or click on the ‘Join My Team’ button

Details of the products I used for this project can be found below.

Mo x

Supplies used:


A special birthday card made using the Wild Bunch stamp set and the Mixed-up Patterns designer series paper from Stampin' Up!

Wild Bunch Fun Fold Card

Here is a pretty, fun fold card made using the Wild Bunch stamp set for a friend’s special birthday.


Colours used to make this card are:


I created the wild bunch fun fold card using the following supplies:

Thick Basic White card base – 10” by 5” scored at 5” on the long side
Mixed-up Patterns dsp – 4¾” by 4¾” x 3
Secret Sea – 2⅝” by 2⅝”
Basic White – 2½” by 2½”
Flirty Flamingo – 3½” by 1¼”
Thick Basic White – 10” by 1½” – fold in half on the long side then fold each half in half again
Secret Sea – 2¼” by 2¼” x 3
Basic White – 2⅛” by 2⅛” x 3
Scrap Flirty Flamingo


I began by gluing the 3 panels of Mixed-up Patterns dsp to the Thick Basic White card base measuring 10” by 5”, one on the front and the remaining 2 panels on the inside.


A special birthday card made using the Wild Bunch stamp set and the Mixed-up Patterns designer series paper from Stampin' Up!

www.crafty-rootes.co.uk – The Wild Bunch stamp set used with the Mixed-up Patterns designer series paper to make a fun fold card for a special birthday

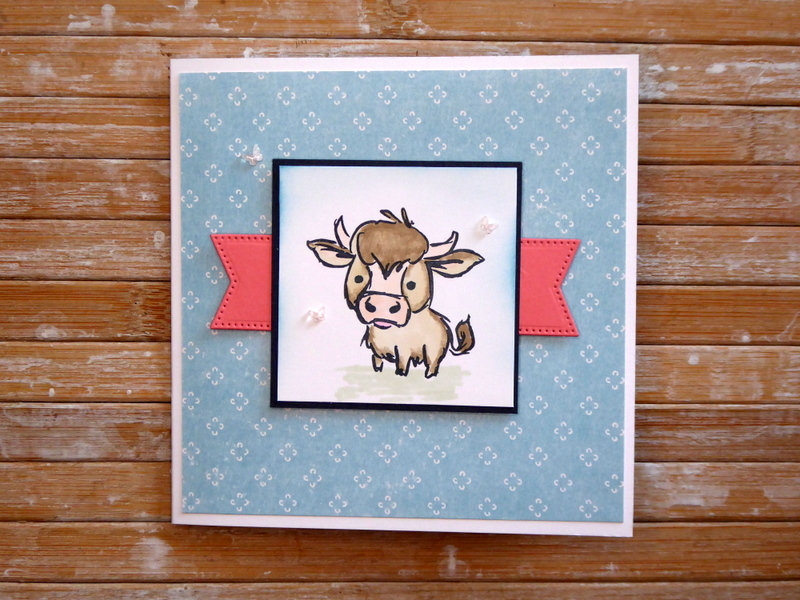
The highland cow was stamped on the larger Basic White square using Secret Sea ink. I used Petal Pink and Crumb Cake Blends Pen to colour in the cow. A Soft Sea Foam Blends Pen added some ‘ground’ and I used a Blending Brush and Balmy Blue ink to give the illusion of sky. The decorated panel was then glued to the larger Secret Sea square. I die cut the largest banner from the strip of Flirty Flamingo card using the Stylish Shapes Dies.  The die cut banner was cut in half and added to either side of the decorated panel. The whole piece was then mounted onto the card front on Dimensionals.


A special birthday card made using the Wild Bunch stamp set and the Mixed-up Patterns designer series paper from Stampin' Up!

www.crafty-rootes.co.uk – The Wild Bunch stamp set used with the Mixed-up Patterns designer series paper to make a fun fold card for a special birthday

I folded the 10” by 1 ½” strip as detailed above and glued the left end to the inside of the card base on the left side. The right end was then glued to the right side of the card base on the inside.


A special birthday card made using the Wild Bunch stamp set and the Mixed-up Patterns designer series paper from Stampin' Up!

www.crafty-rootes.co.uk – The Wild Bunch stamp set used with the Mixed-up Patterns designer series paper to make a fun fold card for a special birthday

I stamped one animal on 3 of the smaller pieces of Basic White card. The snail was coloured with Crumb Cake, Flirty Flamingo Blends Pens. The Koala was coloured with Gray Granite, Petal Pink and the penguin with Secret Sea and Daffodil Delight.


A special birthday card made using the Wild Bunch stamp set and the Mixed-up Patterns designer series paper from Stampin' Up!

www.crafty-rootes.co.uk – The Wild Bunch stamp set used with the Mixed-up Patterns designer series paper to make a fun fold card for a special birthday

Ground was added with Soft Sea Foam. I used a Blending Brush to added Balmy Blue ink to each panel giving ‘sky’. Each panel was adhered to a small Secret Sea square and then to the long strip inside the card.


A special birthday card made using the Wild Bunch stamp set and the Mixed-up Patterns designer series paper from Stampin' Up!

www.crafty-rootes.co.uk – The Wild Bunch stamp set used with the Mixed-up Patterns designer series paper to make a fun fold card for a special birthday

On the remaining Basic White square I stamped the HAPPY BIRTHDAY, masking off and stamping one word at a time. The numbers were die cut from scrap Flirty Flamingo using the retired Little Numbers Dies. These were then glued to the panel. I mounted the panel on the remaining Secret Sea square and then added it to the long strip.


A special birthday card made using the Wild Bunch stamp set and the Mixed-up Patterns designer series paper from Stampin' Up!

www.crafty-rootes.co.uk – The Wild Bunch stamp set used with the Mixed-up Patterns designer series paper to make a fun fold card for a special birthday

A trio of 2026 – 2028 In Color Butterflies finished the card.


Order goodies/Join My Team

I would love to be your demonstrator if you don’t already have one and live in the UK.  I would also be delighted to send you a catalogue if you do not have a demonstrator. I would be happy to place an order for you, or you can order directly by clicking on the “shop online” button.


Contact me for information about joining my team or click on the ‘Join My Team’ button

Details of the products I used for this project can be found below.

Mo x

Supplies used:
 

A special double Z fold card made using the Pop-up Petals stamp set and co-ordinating dies and the Country Woods designer series paper from Stampin' Up!

Pop-up Petals Double Z Fold card

Today I am sharing a special double Z fold card made for a team-mate and friend’s special birthday using the Pop-up Petals stamp set and dies.

Colours used to make this card are:


To recreate the Pop-up Petals Birthday Double Z Fold Card, you will need:

Night of Navy card – 11” by 5½” – scored and folded on the long side at 2¾” and 5½”
Basic White card – 5¼” by 5¼”
Basic White – 5¼” by 2½” x 2
Country Woods dsp – 5⅛” by 2⅜”
Country Woods dsp – 5” by 2¼” x 2
Strawberry Slush card – 5⅛” by 5⅛”
Basic White card – 5” by 5”

Bubble Bath card – 9¼” by 4¼” – scored and folded on the long side at 2¾” and 5½”
Strawberry Slush card – 4⅛” by 3⅝”
Strawberry Slush card – 4⅛” by 2½” x 2
Basic White – 3⅞” by 3⅜”
Basic White – 3⅞” by 2⅜” x 2
Scrap Basic White and Silver Foil


The three panels of Country Woods dsp were adhered to the three Basic White panels, one measuring 5¼” by 5¼” and two measuring 5¼” by 2½”. These were then adhered to the three panels of the Night of Navy card base.


A special double Z fold card made using the Pop-up Petals stamp set and co-ordinating dies and the Country Woods designer series paper from Stampin' Up!

www.crafty-rootes.co.uk – The Pop-up Petals stamp set and co-0rdinating dies used with the Country Woods designer series paper to make a special double Z fold card

The sentiment, from the Reason to Celebrate stamp set was stamped in the upper right corner of the 3⅞” by 3⅜” panel of Basic White card. The HAPPY was stamped in Strawberry Slush ink and the BIRTHDAY in Night of Navy ink.


A special double Z fold card made using the Pop-up Petals stamp set and co-ordinating dies and the Country Woods designer series paper from Stampin' Up!

www.crafty-rootes.co.uk – The Pop-up Petals stamp set and co-ordinating dies used with the Country Woods designer series paper to make a special double Z fold card

On scrap Basic White card, I stamped the tall vase in Night of Navy ink, the bowl in Strawberry Slush ink. The outline daisies and rose were stamped in Secret Sea ink. I die cut all the images using the Pop-up Petals Dies.


A special double Z fold card made using the Pop-up Petals stamp set and co-ordinating dies and the Country Woods designer series paper from Stampin' Up!

www.crafty-rootes.co.uk – The Pop-up Petals stamp set and co-ordinating dies used with the Country Woods designer series paper to make a special double Z fold card

The daisies were coloured using the infill stamps, petals in bubble Bath and flower centres in Cloud Cover. The rose was coloured with 2nd generation Strawberry Slush ink and the leaves with Cloud Cover ink. These were added to the Basic White panel on Dimensionals. The whole piece was glued to the slightly larger Strawberry Slush panel and then to the Bubble Bath card base.


A special double Z fold card made using the Pop-up Petals stamp set and co-ordinating dies and the Country Woods designer series paper from Stampin' Up!

www.crafty-rootes.co.uk – The Pop-up Petals stamp set and co-ordinating dies used with the Country Woods designer series paper to make a special double Z fold card

The outline of the daisies was stamped with Secret Sea ink onto one of the 3⅞” by 2⅜” panels of Basic White card. The petals were stamped in Strawberry Slush ink and the flower centres with Cloud Cover ink.


A special double Z fold card made using the Pop-up Petals stamp set and co-ordinating dies and the Country Woods designer series paper from Stampin' Up!

www.crafty-rootes.co.uk – The Pop-up Petals stamp set and co-ordinating dies used with the Country Woods designer series paper to make a special double Z fold card

The HAPPY was stamped in Night of Navy ink and the BIRTHDAY in Strawberry Slush ink. I add the 40th, die cut from Silver Foil using the retired Small Numbers Dies. The whole panel was glued to the 4⅛” by 2½” piece of Strawberry Slush card before being added to the Bubble Bath card base.


A special double Z fold card made using the Pop-up Petals stamp set and co-ordinating dies and the Country Woods designer series paper from Stampin' Up!

www.crafty-rootes.co.uk – The Pop-up Petals stamp set and co-ordinating dies used with the Country Woods designer series paper to make a special double Z fold card

The tall vase was stamped in the remaining 3⅞” by 2⅜” piece of Basic White card, the outline rose was added using Secret Sea ink. The flower was coloured with Bubble Bath ink and the leaves with Cloud Cover ink. The decorated panel was glued to the remaining piece of Strawberry Slush card measuring 4⅛” by 2½” before being added to the Bubble Bath card base.


A special double Z fold card made using the Pop-up Petals stamp set and co-ordinating dies and the Country Woods designer series paper from Stampin' Up!

www.crafty-rootes.co.uk – The Pop-up Petals stamp set and co-ordinating dies used with the Country Woods designer series paper to make a special double Z fold card

The two card bases were then adhered together.


A special double Z fold card made using the Pop-up Petals stamp set and co-ordinating dies and the Country Woods designer series paper from Stampin' Up!

www.crafty-rootes.co.uk – The Pop-up Petals stamp set and co-ordinating dies used with the Country Woods designer series paper to make a special double Z fold card

The tall vase was stamped in Strawberry Slush ink on the remaining Basic White panel. I stamped the same image on a Post It Note, cut it out and applied it over the stamped vase. The vase was then stamped in Cloud Cover ink, overlapping the first image. With the mask still in place I stamped the bowl in Night of Navy ink and removed the mask.


A special double Z fold card made using the Pop-up Petals stamp set and co-ordinating dies and the Country Woods designer series paper from Stampin' Up!

www.crafty-rootes.co.uk – The Pop-up Petals stamp set and co-ordinating dies used with the Country Woods designer series paper to make a special double Z fold card

The outline rose image was stamped in Secret Sea ink and colour added with Bubble Bath and Cloud Cover inks. A butterfly was added with Secret Sea ink. The decorated panel was glued to the remaining Strawberry Slush layer and the panel was then adhered to the back of the card ready for me to sign.


A special double Z fold card made using the Pop-up Petals stamp set and co-ordinating dies and the Country Woods designer series paper from Stampin' Up!

www.crafty-rootes.co.uk – The Pop-up Petals stamp set and co-ordinating dies used with the Country Woods designer series paper to make a special double Z fold card

A trio of Rainbow Dots completed the card.

Order goodies/Join My Team

If you don’t have a Stampin’ Up! Demonstrator I would love to be yours!  If you don’t have a catalogue and live in the UK, please let me know and I will be delighted to send you one.  To order any supplies click on the “shop online” button at the top of the page. Alternatively, contact me and I would be happy to place an order for you. To join my team either click on the link above or click on the contact me button above and I will contact you with more information.

Details of the products I used for this project can be found below.

Mo x

Supplies used:


A penguin themed congratulations card made using the Sweet & Precious stamp set and the Mini Alphabet and Little Numbers Dies from Stampin' Up!

Penguin Themed Congratulations Card

This penguin themed card was created to celebrate the fact that my husband has spent part of each year for the last 50 years working in Antarctica, a huge achievement. I used a lot of retired products to make this card including the Sweet & Precious stamp set, Mini Alphabet and Small Numbers Dies.

Colours used to create this card are:


To recreate the penguin card, you will need:

Misty Moonlight card base – 8 ¼” by 5⅞” scored at 4⅛”
Basic White card – 5¼” by 3½”
Thoughtful Journey dsp – 5” by 3¼”
Basic White card – 3½” by 3”
Basic White card – 5½” by 3¾” for the inside
Scrap Basic White and Silver Foil.


The panel of Thoughtful Journey dsp was adhered to the 5¼” by 3½” piece of Basic White card and the whole piece was then glued to the Misty Moonlight card front.


A penguin themed congratulations card made using the Sweet & Precious stamp set and the Mini Alphabet and Little Numbers Dies from Stampin' Up!

www.crafty-rootes.co.uk – The Sweet & Precious stamp set used with the Mini Alphabet and Little Numbers Dies to make a penguin themed congratulations card

From the 3½” by 3” panel of Basic White card I die cut a label using the Nested Essentials Dies.


A penguin themed congratulations card made using the Sweet & Precious stamp set and the Mini Alphabet and Little Numbers Dies from Stampin' Up!

www.crafty-rootes.co.uk – The Sweet & Precious stamp set used with the Mini Alphabet and Little Numbers Dies to make a penguin themed congratulations card

The penguin and chick image, from the retired Sweet & Precious stamp set was then stamped onto the die cut label using Secret Sea ink. Snowflakes, from the Woodland Scenery stamp set were then stamped, randomly above the penguins using Misty Moonlight ink. The decorated piece was then added to the card front on Dimensionals.


A penguin themed congratulations card made using the Sweet & Precious stamp set and the Mini Alphabet and Little Numbers Dies from Stampin' Up!

www.crafty-rootes.co.uk – The Sweet & Precious stamp set used with the Mini Alphabet and Little Numbers Dies to make a penguin themed congratulations card

The word ‘congratulations’ from the Extraordinary Flora stamp set was stamped on scrap Basic White card before being trimmed out and tucked beneath the raised panel.


A penguin themed congratulations card made using the Sweet & Precious stamp set and the Mini Alphabet and Little Numbers Dies from Stampin' Up!

www.crafty-rootes.co.uk – The Sweet & Precious stamp set used with the Mini Alphabet and Little Numbers Dies to make a penguin themed congratulations card

From scrap Silver Foil I die cut the number 5 and 0 using the Little Numbers Dies (retired) and glued them to the card front. The word YEARS was die cut from scrap Basic White card using the Mini Alphabet Dies (retired). I adhered this in place with liquid glue.


A penguin themed congratulations card made using the Sweet & Precious stamp set and the Mini Alphabet and Little Numbers Dies from Stampin' Up!

www.crafty-rootes.co.uk – The Sweet & Precious stamp set used with the Mini Alphabet and Little Numbers Dies to make a penguin themed congratulations card

A trio of loose snowflakes (retired) finished the card.

 Order goodies/Join My Team

If you don’t have a Stampin’ Up! Demonstrator I would love to be yours!  If you don’t have a catalogue and live in the UK, please let me know and I will be delighted to send you one.  To order any supplies click on the “shop online” button at the top of the page. Alternatively, contact me and I would be happy to place an order for you. To join my team either click on the link above or click on the contact me button above and I will contact you with more information.

Details of the products I used for this project can be found below.

Mo x