Designed by Mo Rootes of crafty-rootes UK Independant Stampin' Up! Demonstrator . Shop for stampin up products or join my team through my online store or blog - www.crafty-rootes.com

Christmas Deer Card – Christmas Stampathon

I made these pretty Christmas cards for the metallic themed Christmas Stampathon using lots of retired products including the Most Wonderful Time dsp and the Itty Bitty Christmas stamp set.

Colours used in these cards are:


I created the Christmas Deer card using the following supplies:

Smoky Slate and Old Olive card bases – 8¼” by 5⅞” scored at 4⅛” on the long side – 2 of each
Smoky Slate and Old Olive Mats – 5⅜” by 3⅛” – 2 of each
Most Wonderful Time dsp – 5¼” by 3” x 4
Basic White – 5½” by 3¾” for the inside x 4
Scrap Smoky Slate, Old Olive & Gold Foil


I adhered the panels of Most Wonderful Time dsp to the Smoky Slate and Old Olive Mats and wrapped a length of Old Olive Twine (retired) around each panel before gluing the panels to the card bases. I then glued the panels to the card fronts.


Designed by Mo Rootes of crafty-rootes UK Independant Stampin' Up! Demonstrator . Shop for stampin up products or join my team through my online store or blog - www.crafty-rootes.com

A handmade card made using Stampin’ Up! product featuring the Most Wonderful Time Medley and the Itty Bitty Christmas stamp set.

From scrap Smoky Slate and Old Olive card I punch four circles using the 2 ¼” Circle Punch, two of each colour.


Designed by Mo Rootes of crafty-rootes UK Independant Stampin' Up! Demonstrator . Shop for stampin up products or join my team through my online store or blog - www.crafty-rootes.com

A handmade card made using Stampin’ Up! product featuring the Most Wonderful Time Medley and the Itty Bitty Christmas stamp set.

The sentiment from the Itty Bitty Christmas stamps et was stamped at the bottom of each punched circle in Secret Sea ink. These circles were then added to Gold Foil circles punced from scrap card using the 2½” Circle Punch.


Designed by Mo Rootes of crafty-rootes UK Independant Stampin' Up! Demonstrator . Shop for stampin up products or join my team through my online store or blog - www.crafty-rootes.com

A handmade card made using Stampin’ Up! product featuring the Most Wonderful Time Medley and the Itty Bitty Christmas stamp set.

I chose 4 deer from the Most Wonderful Time sticker sheets and adhered one to each of the circles before adding the circles to the card fronts on Dimensionals.


Designed by Mo Rootes of crafty-rootes UK Independant Stampin' Up! Demonstrator . Shop for stampin up products or join my team through my online store or blog - www.crafty-rootes.com

A handmade card made using Stampin’ Up! product featuring the Most Wonderful Time Medley and the Itty Bitty Christmas stamp set

A twine bow and a trio of Gold Adhesive-backed Dots finished each card.


Designed by Mo Rootes of crafty-rootes UK Independant Stampin' Up! Demonstrator . Shop for stampin up products or join my team through my online store or blog - www.crafty-rootes.com

A handmade card made using Stampin’ Up! product featuring the Most Wonderful Time Medley and the Itty Bitty Christmas stamp set

Order goodies/Join My Team

I would love to be your demonstrator if you don’t already have one and live in the UK.  I would also be delighted to send you a catalogue if you do not have a demonstrator. I would be happy to place an order for you, or you can order directly by clicking on the “shop online” button.


Contact me for information about joining my team or click on the ‘Join My Team’ button

Details of the products I used for this project can be found below.

Mo x

Supplies used:


A special birthday card made using the Wild Bunch stamp set and the Mixed-up Patterns designer series paper from Stampin' Up!

Wild Bunch Fun Fold Card

Here is a pretty, fun fold card made using the Wild Bunch stamp set for a friend’s special birthday.


Colours used to make this card are:


I created the wild bunch fun fold card using the following supplies:

Thick Basic White card base – 10” by 5” scored at 5” on the long side
Mixed-up Patterns dsp – 4¾” by 4¾” x 3
Secret Sea – 2⅝” by 2⅝”
Basic White – 2½” by 2½”
Flirty Flamingo – 3½” by 1¼”
Thick Basic White – 10” by 1½” – fold in half on the long side then fold each half in half again
Secret Sea – 2¼” by 2¼” x 3
Basic White – 2⅛” by 2⅛” x 3
Scrap Flirty Flamingo


I began by gluing the 3 panels of Mixed-up Patterns dsp to the Thick Basic White card base measuring 10” by 5”, one on the front and the remaining 2 panels on the inside.


A special birthday card made using the Wild Bunch stamp set and the Mixed-up Patterns designer series paper from Stampin' Up!

www.crafty-rootes.co.uk – The Wild Bunch stamp set used with the Mixed-up Patterns designer series paper to make a fun fold card for a special birthday

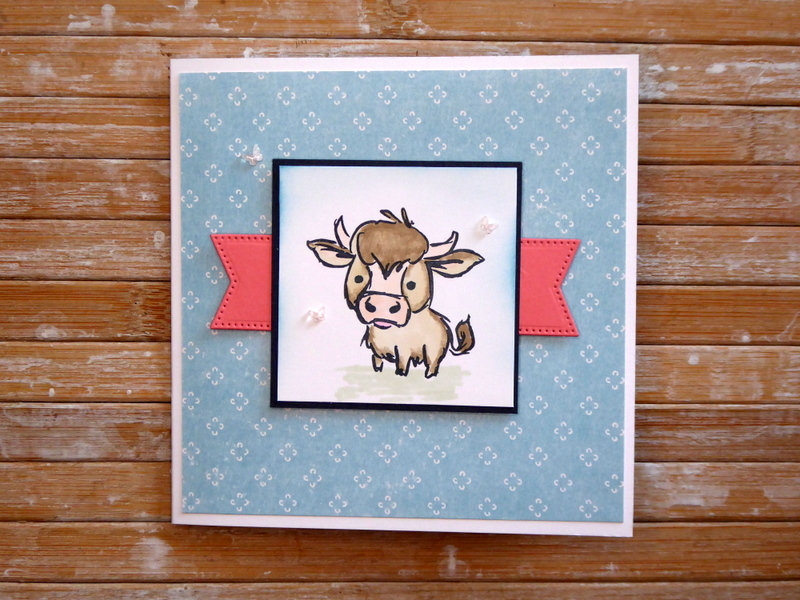
The highland cow was stamped on the larger Basic White square using Secret Sea ink. I used Petal Pink and Crumb Cake Blends Pen to colour in the cow. A Soft Sea Foam Blends Pen added some ‘ground’ and I used a Blending Brush and Balmy Blue ink to give the illusion of sky. The decorated panel was then glued to the larger Secret Sea square. I die cut the largest banner from the strip of Flirty Flamingo card using the Stylish Shapes Dies.  The die cut banner was cut in half and added to either side of the decorated panel. The whole piece was then mounted onto the card front on Dimensionals.


A special birthday card made using the Wild Bunch stamp set and the Mixed-up Patterns designer series paper from Stampin' Up!

www.crafty-rootes.co.uk – The Wild Bunch stamp set used with the Mixed-up Patterns designer series paper to make a fun fold card for a special birthday

I folded the 10” by 1 ½” strip as detailed above and glued the left end to the inside of the card base on the left side. The right end was then glued to the right side of the card base on the inside.


A special birthday card made using the Wild Bunch stamp set and the Mixed-up Patterns designer series paper from Stampin' Up!

www.crafty-rootes.co.uk – The Wild Bunch stamp set used with the Mixed-up Patterns designer series paper to make a fun fold card for a special birthday

I stamped one animal on 3 of the smaller pieces of Basic White card. The snail was coloured with Crumb Cake, Flirty Flamingo Blends Pens. The Koala was coloured with Gray Granite, Petal Pink and the penguin with Secret Sea and Daffodil Delight.


A special birthday card made using the Wild Bunch stamp set and the Mixed-up Patterns designer series paper from Stampin' Up!

www.crafty-rootes.co.uk – The Wild Bunch stamp set used with the Mixed-up Patterns designer series paper to make a fun fold card for a special birthday

Ground was added with Soft Sea Foam. I used a Blending Brush to added Balmy Blue ink to each panel giving ‘sky’. Each panel was adhered to a small Secret Sea square and then to the long strip inside the card.


A special birthday card made using the Wild Bunch stamp set and the Mixed-up Patterns designer series paper from Stampin' Up!

www.crafty-rootes.co.uk – The Wild Bunch stamp set used with the Mixed-up Patterns designer series paper to make a fun fold card for a special birthday

On the remaining Basic White square I stamped the HAPPY BIRTHDAY, masking off and stamping one word at a time. The numbers were die cut from scrap Flirty Flamingo using the retired Little Numbers Dies. These were then glued to the panel. I mounted the panel on the remaining Secret Sea square and then added it to the long strip.


A special birthday card made using the Wild Bunch stamp set and the Mixed-up Patterns designer series paper from Stampin' Up!

www.crafty-rootes.co.uk – The Wild Bunch stamp set used with the Mixed-up Patterns designer series paper to make a fun fold card for a special birthday

A trio of 2026 – 2028 In Color Butterflies finished the card.


Order goodies/Join My Team

I would love to be your demonstrator if you don’t already have one and live in the UK.  I would also be delighted to send you a catalogue if you do not have a demonstrator. I would be happy to place an order for you, or you can order directly by clicking on the “shop online” button.


Contact me for information about joining my team or click on the ‘Join My Team’ button

Details of the products I used for this project can be found below.

Mo x

Supplies used:
 

A highland cow themed anniversary card made using the Wild Bunch stamp set from Stampin' Up! and the mirror technique

Highland Cow Anniversary Card

I designed this card, using the adorable Highland cows from the Wild Bunch stamp set for my daughter and son in law who are celebrating their sixth wedding anniversary. I used the Stamp Positioner and a Silicon Mat to mirror stamp the highland cow inspired by a video from Amanda Fowler of Inspiring Inkin’ 

Colours used in making this card are:


I created the highland cow anniversary card using the following supplies:

Balmy Blue card base – 8¼” by 5⅞” scored at 4⅛” on the long side
Early Espresso – 5⅛” by 3⅜”
Basic White – 5” by 3¼”
Basic White – 5½” by 3¾” – for the inside
Early Espresso – 2 ¾” by ⅜”


I placed the 5” by 3¼” piece of Basic White card onto the Stamp Positioner and marked the centre point with a pencil. I lined the Highland cow up with its right ear against the centre line and picked the stamp up with the clear positioner plate.


A highland cow themed anniversary card made using the Wild Bunch stamp set from Stampin' Up! and the mirror technique

www.crafty-rootes.co.uk – The Wild Bunch stamp set used with the mirror technique to make a highland cow themed anniversary card

The card stock panel was removed and the Silicon mat replaced it on the Positioner. I inked up the stamp with Early Espresso ink and stamped it onto the Silicon Mat; I repeated this to make sure the image was well inked.


A highland cow themed anniversary card made using the Wild Bunch stamp set from Stampin' Up! and the mirror technique

www.crafty-rootes.co.uk – The Wild Bunch stamp set used with the mirror technique to make a highland cow themed anniversary card

I carefully placed the panel of Basic White card onto the Silicon mat and when it was in position I stamped again without re-inking. This makes sure there is good contact with the inked image on the Silicon Mat. The white panel was then lifted up and the Silicon Mat removed.


A highland cow themed anniversary card made using the Wild Bunch stamp set from Stampin' Up! and the mirror technique

www.crafty-rootes.co.uk – The Wild Bunch stamp set used with the mirror technique to make a highland cow themed anniversary card

The Basic White panel was then turned over to reveal the mirror image of he cow before it was placed down into the original position. I inked up the image again and stamped it onto the panel and hey presto there are two cows.


A highland cow themed anniversary card made using the Wild Bunch stamp set from Stampin' Up! and the mirror technique

www.crafty-rootes.co.uk – The Wild Bunch stamp set used with the mirror technique to make a highland cow themed anniversary card

The cows were then coloured using the following Blends Pens – SU 700, Petal Pink, Golden Glow, Cajun Craze, Crumb Cake & Pecan Pie. I added a Balmy Blue ink to the background using a Blending Brush. The whole panel was adhered to the Ealy Espresso layer and then to the Balmy Blue card front.


A highland cow themed anniversary card made using the Wild Bunch stamp set from Stampin' Up! and the mirror technique

www.crafty-rootes.co.uk – The Wild Bunch stamp set used with the mirror technique to make a highland cow themed anniversary card

I stamped the sentiment in Versamark ink, covered it with White Embossing Powder and set it using my Heat Tool. I added it to the card front along with a trio of Drusy Adhesive-backed Embellishments.


Order goodies/Join My Team

I would love to be your demonstrator if you don’t already have one and live in the UK.  I would also be delighted to send you a catalogue if you do not have a demonstrator. I would be happy to place an order for you, or you can order directly by clicking on the “shop online” button.


Contact me for information about joining my team or click on the ‘Join My Team’ button

Details of the products I used for this project can be found below.

Mo x

Supplies used:


A sweet Koala themed birthday card made using the Wild Bunch stamp set from Stampin' Up! for the Stamping With Friends Product of the Month Blog Hop

Birthday Koala Card – Stamping With Friends Blog Hop

Hello and welcome to the Stamping With Friends Blog Hop where we are sharing projects featuring a product of the month. I have made my card using the Wild Bunch stamp set.


Colours used when creating this card are:


I created the birthday koala card using the following supplies:

Gray Granite card base – 8¼” by 5⅞” scored at 4⅛” on the long side
Poppy Parade – 5⅛” by 3⅜”
Basic White – 5” by 3¼”
Basic White – 5½” by 3¾” – for the inside
Basic White – 2¾” by 1”
Poppy Parade – 2¾” by ⅛”
Scrap Basic White


I stamped the sweet koala with Basic Gray ink onto the smaller panel of Basic White card.


A sweet Koala themed birthday card made using the Wild Bunch stamp set from Stampin' Up! for the Stamping With Friends Product of the Month Blog Hop

www.crafty-rootes.co.uk – The Wild Bunch stamp set used to make a sweet Koala themed birthday card – Stamping With Friends Blog Hop

The image was coloured using the Barely Blush, Gray Granite, Smoky Slate and Basic Black. The panel was then glued to the Poppy Parade layer before being added to the Gray Granite card front on Dimensionals.


A sweet Koala themed birthday card made using the Wild Bunch stamp set from Stampin' Up! for the Stamping With Friends Product of the Month Blog Hop

www.crafty-rootes.co.uk – The Wild Bunch stamp set used to make a sweet Koala themed birthday card – Stamping With Friends Blog Hop

The party hat was stamped on scrap Basic White card. I coloured the pom-pom and added stripes with a Poppy Parade Blends Pen and fussy cut the hat out. I glued it to the head of the koala.


A sweet Koala themed birthday card made using the Wild Bunch stamp set from Stampin' Up! for the Stamping With Friends Product of the Month Blog Hop

www.crafty-rootes.co.uk – The Wild Bunch stamp set used to make a sweet Koala themed birthday card – Stamping With Friends Blog Hop

The sentiment was stamped in Basic Gray ink onto the strip of Basic White card and punched out using the Three Banner Punch.


A sweet Koala themed birthday card made using the Wild Bunch stamp set from Stampin' Up! for the Stamping With Friends Product of the Month Blog Hop

www.crafty-rootes.co.uk – The Wild Bunch stamp set used to make a sweet Koala themed birthday card – Stamping With Friends Blog Hop

The strip of Poppy Parade card was glued to the back of the sentiment label and the whole piece glued to the card front.


A sweet Koala themed birthday card made using the Wild Bunch stamp set from Stampin' Up! for the Stamping With Friends Product of the Month Blog Hop

www.crafty-rootes.co.uk – The Wild Bunch stamp set used to make a sweet Koala themed birthday card – Stamping With Friends Blog Hop

A trio of Adhesive-backed Peppermints completed the card.

Please hop on to see what my crafty friends have to share with us today.


Blog Hop Index


Order goodies/Join My Team

I would love to be your demonstrator if you don’t already have one and live in the UK.  I would also be delighted to send you a catalogue if you do not have a demonstrator. I would be happy to place an order for you, or you can order directly by clicking on the “shop online” button.


Contact me for information about joining my team or click on the ‘Join My Team’ button

Details of the products I used for this project can be found below.

Mo x

Supplies used:


A pretty snail themed card madeusing the Wild Bunch stamp set and the Country Woods designer series paper from Stampin' Up!

Friendly Snail Card

This sweet card was made using the adorable Wild Bunch stamp set which was June’s product of the month and proved very popular.


Colours used in making this card are:


I created the friendly snail card using the following supplies:

Coastal Cabana card base – 8¼” by 5⅞” scored at 4⅛” on the long side
Secret Sea – 5⅛” by 3⅜”
Basic White – 5” by 3¼”
Basic White – 5½” by 3¾” – for the inside
Scrap Country Woods dsp


I stamped the cute snail – can snails be thought of as cute? Onto the smaller panel of Basic White card with Secret Sea ink.


A pretty snail themed card madeusing the Wild Bunch stamp set and the Country Woods designer series paper from Stampin' Up!

www.crafty-rootes.co.uk – The Wild Bunch stamp set used with the Country Woods designer series paper to make a pretty snail themed card

The snail was coloured using the Light & Dark Gray Granite Blends Pens.


A pretty snail themed card madeusing the Wild Bunch stamp set and the Country Woods designer series paper from Stampin' Up!

www.crafty-rootes.co.uk – The Wild Bunch stamp set used with the Country Woods designer series paper to make a pretty snail themed card

The snail image was stamped again, using the same ink onto a scrap of Country Woods dsp and fussy cut out the shell. I added the shell onto the stamped snail with Multipurpose Liquid Adhesive.


A pretty snail themed card madeusing the Wild Bunch stamp set and the Country Woods designer series paper from Stampin' Up!

www.crafty-rootes.co.uk – The Wild Bunch stamp set used with the Country Woods designer series paper to make a pretty snail themed card

The sentiment was stamped in Secret Sea ink in the upper left corner and I used the fine Journaling Pen to draw a frame around all four sides.


A pretty snail themed card madeusing the Wild Bunch stamp set and the Country Woods designer series paper from Stampin' Up!

www.crafty-rootes.co.uk – The Wild Bunch stamp set used with the Country Woods designer series paper to make a pretty snail themed card

A trio of Rainbow Dots finished the card.


A pretty snail themed card madeusing the Wild Bunch stamp set and the Country Woods designer series paper from Stampin' Up!

www.crafty-rootes.co.uk – The Wild Bunch stamp set used with the Country Woods designer series paper to make a pretty snail themed card

Order goodies/Join My Team

I would love to be your demonstrator if you don’t already have one and live in the UK.  I would also be delighted to send you a catalogue if you do not have a demonstrator. I would be happy to place an order for you, or you can order directly by clicking on the “shop online” button.


Contact me for information about joining my team or click on the ‘Join My Team’ button

Details of the products I used for this project can be found below.

Mo x

Supplies used:


Penguin themed Christmas fun fold cards made using the Wild Bunch stamp set from Stampin' Up!

Christmas Penguins Card – Christmas Stampathon

Today’s cards were made for the June Christmas Stampathon where our theme is ‘Fun Folds’. I have used the adorable penguin from the Wild Bunch stamp set and the retired Beary Cute dsp.


Colours used in this card are:


I created the Christmas Penguin card using the following supplies:

Balmy Blue card base – 8¼” by 5¾” – scored at 4⅛”. With the front at 1” on the right of the trimmer cut from the top down to 1¾” and from the bottom up to 3⅛”. Score the remaining 1” tab.
Beary Christmas dsp – 5¾” by 3”
Basic White – 5⅝” by 4” -for the inside
Thick Basic White – 3” by 3” – for the focal point
Balmy Blue – 2⅞” by 2⅞”
Basic White – 2¾” by 2¾”


The panel of Beary Christmas dsp was glued to the front of the Balmy Blue card base.


Penguin themed Christmas fun fold cards made using the Wild Bunch stamp set from Stampin' Up!

www.crafty-rootes.co.uk – The Wild Bunch stamp set used to make penguin themed Christmas fun fold cards for the Christmas Stampathon

The inner panel of Basic White card was then added to the inside.


Penguin themed Christmas fun fold cards made using the Wild Bunch stamp set from Stampin' Up!

www.crafty-rootes.co.uk – The Wild Bunch stamp set used to make penguin themed Christmas fun fold cards for the Christmas Stampathon

I stamped the penguin, from the Wild Bunch stamp set onto the 2¾” by 2¾” piece of Basic White card with Secret Sea ink and used the following Blends Pens to colour in the image – Balmy Blue, Daffodil Delight and Secret Sea.


Penguin themed Christmas fun fold cards made using the Wild Bunch stamp set from Stampin' Up!

www.crafty-rootes.co.uk – The Wild Bunch stamp set used to make penguin themed Christmas fun fold cards for the Christmas Stampathon


Penguin themed Christmas fun fold cards made using the Wild Bunch stamp set from Stampin' Up!

www.crafty-rootes.co.uk – The Wild Bunch stamp set used to make penguin themed Christmas fun fold cards for the Christmas Stampathon

The sentiment from the retired Itty Bitty Christmas stamp set was stamped with the same Secret Sea ink. The whole panel was then glued to the Balmy Blue Layer and then to the square of Thick Basic White card.


Penguin themed Christmas fun fold cards made using the Wild Bunch stamp set from Stampin' Up!

www.crafty-rootes.co.uk – The Wild Bunch stamp set used to make penguin themed Christmas fun fold cards for the Christmas Stampathon

I added Multipurpose Liquid Adhesive to the 1” tab and placed the decorated square in position, holding it until the glue set. A trio of retired Iridescent Snowflakes finished the cards.


Penguin themed Christmas fun fold cards made using the Wild Bunch stamp set from Stampin' Up!

www.crafty-rootes.co.uk – The Wild Bunch stamp set used to make penguin themed Christmas fun fold cards for the Christmas Stampathon

Order goodies/Join My Team

I would love to be your demonstrator if you don’t already have one and live in the UK.  I would also be delighted to send you a catalogue if you do not have a demonstrator. I would be happy to place an order for you, or you can order directly by clicking on the “shop online” button.


Contact me for information about joining my team or click on the ‘Join My Team’ button

Details of the products I used for this project can be found below.

Mo x

Supplies used:


An adorable penguin themed thank you card made using the Wild Bunch stamp set from Stampin' Up!

Adorable Penguins Card

Today I am sharing an adorable Penguin card made using the Wild Bunch stamp set and a simple masking technique.

Colours used when making this card are:


I created the adorable penguins card using the following supplies:

Cloud Cover card base – 8¼” by 5⅞” scored at 4⅛” on the long side
Basic Black – 5⅛” by 3⅜”
Basic White – 5” by 3¼”
Basic White – 5½” by 3¾” – for the inside


I stamped a penguin in the centre of the smaller piece of Basic White card using Black ink.


An adorable penguin themed thank you card made using the Wild Bunch stamp set from Stampin' Up!

www.crafty-rootes.co.uk – The Wild Bunch stamp set used to make an adorable penguin themed thank you card

The same image was then stamped onto Masking Paper and fussy cut out using sharp scissors. The mask was then added over the original stamped image.


An adorable penguin themed thank you card made using the Wild Bunch stamp set from Stampin' Up!

www.crafty-rootes.co.uk – The Wild Bunch stamp set used to make an adorable penguin themed thank you card

A penguin was the stamped on either side of the original penguin using the same ink. The mask was then removed.


An adorable penguin themed thank you card made using the Wild Bunch stamp set from Stampin' Up!

www.crafty-rootes.co.uk – The Wild Bunch stamp set used to make an adorable penguin themed thank you card

I added colour using the Dark Smoky Slate and Light Black Blends Pens. The feet and beak were coloured using the Dark Lemon Lolly Blends Pen and I outlined the images with the Light Cloud Cover Blends Pen. I used the Color Lifter to blur the colour around the penguins.


An adorable penguin themed thank you card made using the Wild Bunch stamp set from Stampin' Up!

www.crafty-rootes.co.uk – The Wild Bunch stamp set used to make an adorable penguin themed thank you card

The sentiment was stamped with Black ink and a Journaling Pen used to add a frame around the panel.


An adorable penguin themed thank you card made using the Wild Bunch stamp set from Stampin' Up!

www.crafty-rootes.co.uk – The Wild Bunch stamp set used to make an adorable penguin themed thank you card

A trio of Moody Palette Glossy Dots finished the card.


Order goodies/Join My Team

I would love to be your demonstrator if you don’t already have one and live in the UK.  I would also be delighted to send you a catalogue if you do not have a demonstrator. I would be happy to place an order for you, or you can order directly by clicking on the “shop online” button.


Contact me for information about joining my team or click on the ‘Join My Team’ button

Details of the products I used for this project can be found below.

Mo x

Supplies used:


A dog themed birthday card made using the Cutest Crew stamp set and co-ordinating dies from Stampin' Up!

Cutest Crew Card

I have been playing with the Cutest Crew stamp set and dies and have made a birthday card featuring the row of dogs.

Colours used to make this card are:


I created the cutest crew card using the following supplies:

Poppy Parade card base – 8¼” by 5⅞” scored at 4⅛” on the long side
Pecan Pie – 5½” by 3¾”
Basic Beige – 5⅜” by 3⅝”
Pecan Pie – 4” by ¾”
Basic White – 5½” by 3¾” for the inside
Scrap Basic White


I placed the image of the row of dogs onto the small plate of the new Stamp Positioner, available in my online store from the 5th May 2026. I then stamped the image down the Basic Beige layer using Basic Beige ink. The stamped layer was then adhered to the Pecan Pie panel and then to the Poppy Parade card front.


A dog themed birthday card made using the Cutest Crew stamp set and co-ordinating dies from Stampin' Up!

www.crafty-rootes.co.uk – The Cutest Crew stamp set and co-ordinating dies used to make do themed birthday card

The same image was then stamped on scrap Basic White card with Early Espresso ink and die cut using the Cutest Crew dies.


A dog themed birthday card made using the Cutest Crew stamp set and co-ordinating dies from Stampin' Up!

www.crafty-rootes.co.uk – The Cutest Crew stamp set and co-ordinating dies used to make dog themed birthday card

Using the following Blends Pens I coloured in the image – Light, Medium, Deep, Dark Crumb, Light Pecan. Dark Poppy & light Granny. The die cut piece was then mounted onto the card front on Dimensionals.


A dog themed birthday card made using the Cutest Crew stamp set and co-ordinating dies from Stampin' Up!

www.crafty-rootes.co.uk – The Cutest Crew stamp set and co-ordinating dies used to make dog themed birthday card

From the strip of Pecan Pie card I die cut the row of paw prints and tucked it under the row of dogs having trimmed it down first.


A dog themed birthday card made using the Cutest Crew stamp set and co-ordinating dies from Stampin' Up!

www.crafty-rootes.co.uk – The Cutest Crew stamp set and co-ordinating dies used to make dog themed birthday card

The sentiment, from the Garden Gatherings stamp set was stamped in Poppy Parade ink onto scrap Basic White card. I trimmed it out and added it to the card front.


A dog themed birthday card made using the Cutest Crew stamp set and co-ordinating dies from Stampin' Up!

www.crafty-rootes.co.uk – The Cutest Crew stamp set and co-ordinating dies used to make dog themed birthday card

A trio of Poppy Parade stars from my stash completed the card.

 Order goodies/Join My Team

I would love to be your demonstrator if you don’t already have one and live in the UK.  I would also be delighted to send you a catalogue if you do not have a demonstrator. I would be happy to place an order for you, or you can order directly by clicking on the “shop online” button.


Contact me for information about joining my team or click on the ‘Join My Team’ button

Details of the products I used for this project can be found below.

Mo x

Supplies used:


A sweet birthday card made using ink blending and the Notes of Spring stamp set from Stampin' Up!

Spring Fawn Card

I made this sweet birthday card using the Notes of Spring stamp set, Stampin’ Up!’s product of the month for March 2026.

Colours used to make this card are:


I created the garden Spring fawn using the following supplies:

Basic Beige card base – 8¼” by 5⅞” scored at 4⅛” on the long side
Garden Green – 5½” by 3¾”
Basic White – 5⅜” by 3⅝”
Basic White – 5½” by 3¾” – for the inside
Scrap Basic White


In the centre of a large scrap panel of Basic White card I die cut a circle using the largest of the circle dies from the Stylish Shapes dies. This was placed over the smaller piece of Basic White card to act as a mask, held in place with washi tape. I used a Blending Brush to apply Basic Beige ink to the negative space, slowly building up the colour. The mask was then removed.


A sweet birthday card made using ink blending and the Notes of Spring stamp set from Stampin' Up!

www.crafty-rootes.co.uk – The Notes of Spring stamp set and some ink blending used to make a sweet birthday card

The large grassy image was stamped, overlapping, the inked circle with 1st and 2nd generation Garden Green ink The smaller grassy image was then stamped using the same ink.


A sweet birthday card made using ink blending and the Notes of Spring stamp set from Stampin' Up!

www.crafty-rootes.co.uk – The Notes of Spring stamp set and some ink blending used to make a sweet birthday card

I added the ground image, from the Blessed Beginnings stamp set with Early Espresso ink. The sentiment was added with the same ink. The panel was then adhered to the Garden Green layer and then to the Basic Beige card front.


A sweet birthday card made using ink blending and the Notes of Spring stamp set from Stampin' Up!

www.crafty-rootes.co.uk – The Notes of Spring stamp set and some ink blending used to make a sweet birthday card

The deer was stamped in Early Espresso ink onto scrap Basic White card. I add the colour with Pecan Pie ink and fussy cut the image using sharp scissors. The deer was added to the card front on Dimensionals.


A sweet birthday card made using ink blending and the Notes of Spring stamp set from Stampin' Up!

www.crafty-rootes.co.uk – The Notes of Spring stamp set and some ink blending used to make a sweet birthday card

A trio of Sparkle Dot Essentials were added to complete the card.

Order goodies/Join My Team

I would love to be your demonstrator if you don’t already have one and live in the UK.  I would also be delighted to send you a catalogue if you do not have a demonstrator. I would be happy to place an order for you, or you can order directly by clicking on the “shop online” button.


Contact me for information about joining my team or click on the ‘Join My Team’ button

Details of the products I used for this project can be found below.

Mo x

Supplies used:


A split front card made using the Woolly Friends stamp set and co-ordinating Punch used with the nested Essentials Dies from Stampin' Up!

Split Front Birthday Card – Ink. Stamp. Share Blog Hop

Hello and welcome to the Ink. Stamp. Share Blog Hop where we are showcasing something we have been creating recently. I have made a sweet split front birthday card for a friend using the adorable Woolly Friends stamp set and Woolly Friends Builder Punch.

Colours used to make this card are:


I created the split front birthday card using the following supplies:

Lemon Lolly card base – 7” by 4⅛” – scored at 5⅞”
Lemon Lolly – 4⅛” by 1⅜”
Basic White – 5¾” by 4” – for the inside
Basic White by 4” by 1”
Basic White – 4” by 1⅛”
Balmy Blue – 5½” by 3¼”
Basic White – 5” by 3”
Scrap Basic White card


I embossed the two 4” strips of Basic White card using the Stone & Vine 3D Embossing Folder and adhered one to the top of the card front and the other to the strip of Lemon Lolly card.


A split front card made using the Woolly Friends stamp set and co-ordinating Punch used with the nested Essentials Dies from Stampin' Up!

www.crafty-rootes.co.uk – The Woolly Friends stamp set and co-ordinating Punch used with the nested Essentials Dies to make a split front card – Ink. Stamp. Share Blog Hop

I stamped the trio of tulips with Granny Apple Green ink onto the 5¾” by 4” piece of Basic White card and adhered the panel to the inside of the card. I added colour to the flowers with Pretty In Pink ink.


A split front card made using the Woolly Friends stamp set and co-ordinating Punch used with the nested Essentials Dies from Stampin' Up!

www.crafty-rootes.co.uk – The Woolly Friends stamp set and co-ordinating Punch used with the nested Essentials Dies to make a split front card – Ink. Stamp. Share Blog Hop

From the piece of Balmy Blue card, I cut a label using the Nested Essentials Dies. Using the same set of dies I also cut a smaller label from the 5” by 3” piece of Basic White card.


A split front card made using the Woolly Friends stamp set and co-ordinating Punch used with the nested Essentials Dies from Stampin' Up!

www.crafty-rootes.co.uk – The Woolly Friends stamp set and co-ordinating Punch used with the nested Essentials Dies to make a split front card – Ink. Stamp. Share Blog Hop

The sentiment, from the Branching Out stamp set was stamped in Memento Tuxedo Black ink onto the white label and added a row of grass with Granny Apple Green ink.


A split front card made using the Woolly Friends stamp set and co-ordinating Punch used with the nested Essentials Dies from Stampin' Up!

www.crafty-rootes.co.uk – The Woolly Friends stamp set and co-ordinating Punch used with the nested Essentials Dies to make a split front card – Ink. Stamp. Share Blog Hop

I stamped two sheep bodies and 2 sheep heads in Memento Tuxedo Black ink and punched them out using the Woolly Friends Builder Punch. I added colour to the sheep’s bodies with either Pretty In Pink or Lemon Lolly ink. One was added with liquid glue and the other on Dimensionals.


A split front card made using the Woolly Friends stamp set and co-ordinating Punch used with the nested Essentials Dies from Stampin' Up!

www.crafty-rootes.co.uk – The Woolly Friends stamp set and co-ordinating Punch used with the nested Essentials Dies to make a split front card – Ink. Stamp. Share Blog Hop

A trio rainbow dots completed the card.

Please hop on to see what my fellow crafters have made to share with us today.


Blog Hop Index

Order goodies/Join My Team

I would love to be your demonstrator if you don’t already have one and live in the UK.  I would also be delighted to send you a catalogue if you do not have a demonstrator. I would be happy to place an order for you, or you can order directly by clicking on the “shop online” button.


Contact me for information about joining my team or click on the ‘Join My Team’ button

Details of the products I used for this project can be found below.

Mo x

Supplies used: