Hello and welcome to the Stamping Dreams Blog Hop where we are using the new 2026 – 2028 In Colors. I have made my card using the lovely Artisan Sketched Garden dsp to make my card.
I created the artisan vases card using the following supplies:
Hydrangea Hue card base – 8¼” by 5⅞” scored at 4⅛” on the long side Basic White – 5¼” by 4” Basic White – 4⅛” by 2¼” Basic Black – 4⅛” by ¼” Basic White – 5½” by 3¾ “- for the inside Scrap Artisan Sketched Garden dsp
I ran the strip of Basic White card through the Stampin’ Cut & Emboss Machine with the Lazy Daisy Embossing Folder and glued it to the Hydrangea Hue card front. I added the strip of Basic Black card above it.
www.crafty-rootes.co.uk – The Artisan Sketched Garden dsp used with the Everyday Arches Dies to make a pretty floral themed card
I die cut an arch from the 5¼” by 4” panel of Basic White card using the Everyday Arches dies. And mounted it onto the card front on Dimensionals.
www.crafty-rootes.co.uk – The Artisan Sketched Garden dsp used with the Everyday Arches Dies to make a pretty floral themed card
From a sheet of Artisan Sketched Garden dsp I fussy cut three of the vases of flowers.
www.crafty-rootes.co.uk – The Artisan Sketched Garden dsp used with the Everyday Arches Dies to make a pretty floral themed card
I used the following colours to colour in the images – Barely Blush, Crisp Cantaloupe, Golden Glow, Hydrangea Hue and Peaceful Pine.
www.crafty-rootes.co.uk – The Artisan Sketched Garden dsp used with the Everyday Arches Dies to make a pretty floral themed card
I arranged the vases on the die cut panel and finished the card with a trio of 2026 – 2028 In Color Butterflies.
www.crafty-rootes.co.uk – The Artisan Sketched Garden dsp used with the Everyday Arches Dies to make a pretty floral themed card
Please hop on to share the inspiration provided by my crafty friends.
I would love to be your demonstrator if you don’t already have one and live in the UK. I would also be delighted to send you a catalogue if you do not have a demonstrator. I would be happy to place an order for you, or you can order directly by clicking on the “shop online” button.
Contact me for information about joining my team or click on the ‘Join My Team’ button
Details of the products I used for this project can be found below.
I created the Floral card using the following supplies:
Flirty Flamingo card base – 8¼” by 5⅞” scored at 4⅛” on the long side Basic Black – 5⅜” by 3⅝” Hydrangea Hue- 5¼” by 3½” Basic White – 5⅛” by 3½” Basic White – 4½” by 2¼” Basic White – 5½” by 3¾” for the inside
I used the Lovely Stripes Embossing Folder to emboss the 5⅛” by 3½” panel of Basic White card. I wrapped a piece of Black Baker’s Twine around the layer before adding it to the Hydrangea Hue panel, then the Basic Black panel. Finally, the whole piece was glued to the Flirty Flamingo card base.
www.crafty-rootes.co.uk – The Flowers Fair stamp set used with the Lovely Stripes Embossing Folder to make a floral thank you card
Using sharp scissors, I fussy cut the group of flowers from one of the sheets from the pack of Artisan Sketched Garden dsp.
www.crafty-rootes.co.uk – The Flowers Fair stamp set used with the Lovely Stripes Embossing Folder to make a floral thank you card
The larger flowers were coloured using the Flirty Flamingo Blends Pens and the smaller flowers with Hydrangea Hue Blends Pens, one of the new in colors which will be available in my online shop from the 5th May.
www.crafty-rootes.co.uk – The Flowers Fair stamp set used with the Lovely Stripes Embossing Folder to make a floral thank you card
I coloured the leaves with Lost Lagoon Blends Pens.
www.crafty-rootes.co.uk – The Flowers Fair stamp set used with the Lovely Stripes Embossing Folder to make a floral thank you card
I cut a label from the 4½” by 2¼” piece of Basic White card using the Nested Essentials Dies. The sentiment, from the Lovely Arrangements stamp set was stamped on the label in Hydrangea Hue ink. The label was then added to the card front on Dimensionals.
www.crafty-rootes.co.uk – The Flowers Fair stamp set used with the Lovely Stripes Embossing Folder to make a floral thank you card
A trio of 2026 – 2028 In Color Dots and a Black Baker’s Twine bow completed the card.
Order goodies/Join My Team
I would love to be your demonstrator if you don’t already have one and live in the UK. I would also be delighted to send you a catalogue if you do not have a demonstrator. I would be happy to place an order for you, or you can order directly by clicking on the “shop online” button.
Contact me for information about joining my team or click on the ‘Join My Team’ button
Details of the products I used for this project can be found below.
Hello and welcome to the Ink & Inspirations Blog Hop where we are being inspired by a sketch to create a card. I have used embossing folders as the focus of my design today.
I created the Embossed Sketch card using the following supplies:
Pool Party card base – 8¼” by 5⅞” scored at 4⅛” on the long side Secret Sea – 5⅝” by 3⅞ Basic White – 5½” by 3¾” x 2 – one for the inside Secret Sea – 4⅝” by ⅞” x 3 Berry Burst – 4½” by ¾” Pool Party – 4½” by ¾” Fresh Freesia – 4½” by ¾” Basic White – 2¼” by 2¼”
I began by embossing the 3 strips of coloured card – The Berry Burst strip was embossed with the Lazy Daisy Embossing Folder, The Pool Party strip with the Turtle Textures Embossing Folder and the Fresh Freesia strip with the Lovely Stripes Embossing Folder, at an angle.
www.crafty-rootes.co.uk – The Lazy Daisy, Turtle Textures & Lovely Stripes Embossing Folders used to make a card for a sketch challenge – Ink & Inspirations Blog Hop
Each embossed strip was then glued to the strips of Secret Sea card. These were mounted onto one of the Basic White layer with Dimensionals.
www.crafty-rootes.co.uk – The Lazy Daisy, Turtle Textures & Lovely Stripes Embossing Folders used to make a card for a sketch challenge – Ink & Inspirations Blog Hop
I added the larger layer of Secret Sea to the back of the panel and wrapped the whole panel with Black Baker’s Twine. The panel was then adhered to the Pool Party card front.
The sentiment, from the Balloon Festoon stamp set was stamped on the square of Basic White card with Secret Sea ink.
www.crafty-rootes.co.uk – The Lazy Daisy, Turtle Textures & Lovely Stripes Embossing Folders used to make a card for a sketch challenge – Ink & Inspirations Blog Hop
The sentiment was then punched out using a 2” Circle Punch before being mounted onto the card front.
www.crafty-rootes.co.uk – The Lazy Daisy, Turtle Textures & Lovely Stripes Embossing Folders used to make a card for a sketch challenge – Ink & Inspirations Blog Hop
A Baker’s Twine bow and a trio of Basic Rhinestones finished the card.
Please hop on to see what my fellow crafters have made to share with us today.
I would love to be your demonstrator if you don’t already have one and live in the UK. I would also be delighted to send you a catalogue if you do not have a demonstrator. I would be happy to place an order for you, or you can order directly by clicking on the “shop online” button.
Contact me for information about joining my team or click on the ‘Join My Team’ button
Details of the products I used for this project can be found below.
Hello and welcome to the Stamping With Friends Blog Hop where we are sharing projects using one of our products of the month. I have chosen to make my card using the Painted Illusions dsp, February’s product of the month which is still available.
I created the quilted painted illusions card using the following supplies:
Lost Lagoon card base – 8¼” by 5⅞” scored at 4⅛” on the long side Night of Navy – 5⅜” by 3⅝” Basic White – 5¼” by 3½” Painted Illusions dsp – 1” squares x 9 Backing – 3” by 3” – I used grid paper but copy paper would do Basic White – 3” by ¼” x 4 Basic White – 5½” by 3¾” for the inside Scrap Night of Navy
I ran the 5¼” by 3½” Basic White layer through the Cut & Emboss Machine using the Lazy Daisy Embossing Folder and adhered the embossed panel to the panel of Night of Navy card. The layer was then glued to the Lost Lagoon card base using Multipurpose Liquid Adhesive.
www.crafty-rootes.co.uk -The Painted Illusions designer series paper used with the Greenery Lane dies used to make a friendship card – Stamping With Friends Blog Hop
I laid out the 1” squares of Painted Illusions dsp on the 3” by 3” piece of grid paper creating a pattern. When I was happy with the layout, I used liquid glue to adhere the 1” squares to the grid paper.
www.crafty-rootes.co.uk -The Painted Illusions designer series paper used with the Greenery Lane dies used to make a friendship card – Stamping With Friends Blog Hop
I glued the ¼” strips over the dsp panel and ran the whole piece through the Cut & Emboss Machine with the Lazy Daisy Embossing Folder. The panel was added to the card front on Dimensionals.
www.crafty-rootes.co.uk -The Painted Illusions designer series paper used with the Greenery Lane dies used to make a friendship card – Stamping With Friends Blog Hop
From scrap Night of Navy card I die cut a spray of leaves using the Greenery Lane Dies and glued it to the quilted piece on the card front.
www.crafty-rootes.co.uk -The Painted Illusions designer series paper used with the Greenery Lane dies used to make a friendship card – Stamping With Friends Blog Hop
The sentiment, from the Cutest Crew stamp set was stamped on scrap Night of Navy card with Versamark ink. I covered it with White Embossing Powder and set it using a heat tool. The sentiment was then die cut using the Stylish Shapes Dies before being added to the card front.
www.crafty-rootes.co.uk -The Painted Illusions designer series paper used with the Greenery Lane dies used to make a friendship card – Stamping With Friends Blog Hop
A trio of Rainbow Dots finishes the card.
Please hop on to share the inspiration provided by my crafty friends.
I would love to be your demonstrator if you don’t already have one and live in the UK. I would also be delighted to send you a catalogue if you do not have a demonstrator. I would be happy to place an order for you, or you can order directly by clicking on the “shop online” button.
Contact me for information about joining my team or click on the ‘Join My Team’ button
Details of the products I used for this project can be found below.
I created the extraordinary flora card using the following supplies:
Petunia Pop card base – 8¼” by 5⅞” scored at 4⅛” on the long side Summer Splash – 5⅜” by 3⅝” Basic White – 5¼” by 3½” Basic White – 4½” by 3½” Basic White – 5¾” by 3½” Basic White 5½” by 3¾” for the inside
I ran the 5¼” by 3½” panel of Basic White card through the Cut & Emboss Machine with the Lovely Stripes Embossing Folder. This piece was then glued to the Summer Splash panel and then to the Petunia Pop card front.
www.crafty-rootes.co.uk – The Extraordinary Flora stamp set and dies used with the Beautifully Created dies to make a floral thank you card
From the smallest panel of Basic White card I cut a label using the Beautifully Created Dies.
www.crafty-rootes.co.uk – The Extraordinary Flora stamp set and dies used with the Beautifully Created dies to make a floral thank you card
The sentiment, from the Notes of Spring stamp set was added to the label with Secret Sea ink. The label was mounted onto the card front on Dimensionals.
www.crafty-rootes.co.uk – The Extraordinary Flora stamp set and dies used with the Beautifully Created dies to make a floral thank you card
I stamped the large floral image onto the Basic White panel measuring 5¾” by 3½” using Secret Sea ink and used the following colours of Blends Pens – Pretty in Pink, Petunia Pop, Lemon Lolly, Peach Pie, Summer Splash, Soft Sea Foam & Old Olive. The images were then die cut using the Extraordinary Flora die.
www.crafty-rootes.co.uk – The Extraordinary Flora stamp set and dies used with the Beautifully Created dies to make a floral thank you card
The flowers and leaves were then arranged around the label on the card front and adhered in place with Multipurpose Liquid Adhesive and/or Dimensionals.
www.crafty-rootes.co.uk – The Extraordinary Flora stamp set and dies used with the Beautifully Created dies to make a floral thank you card
A White Baker’s Twine bow and a trio of 2024 – 2026 In Color Flat Pearls completes the card.
Order goodies/Join My Team
I would love to be your demonstrator if you don’t already have one and live in the UK. I would also be delighted to send you a catalogue if you do not have a demonstrator. I would be happy to place an order for you, or you can order directly by clicking on the “shop online” button.
Contact me for information about joining my team or click on the ‘Join My Team’ button
Details of the products I used for this project can be found below.
Hello and welcome to the Stampin Dreams Blog Hop where we are sharing birthday cards. Fortuitously, today is the last of my March classes where we have been making birthday cards using the gorgeous Lovely Arrangements stamp set and dies.
Thick Basic White card base – 8” by 5⅞”” scored on the long-side at 2”, 4” and 6” Cloud Cover- 5¾” by 1⅞” x 4 Thick Basic White base – 3” by 6” scored at 3” Secret Sea – 2⅞” by 2 ⅞” x 2 Basic White 2¾” by 2¾” x 2 Scrap Basic White
The 4 pieces of Cloud Cover card were placed in a row, butted up against each other. The leafy sprig was then randomly stamped all over the panels with Cloud Cover ink. The stamped panels were then adhered to the larger Thick White card base, one in each of the sections.
www.crafty-rootes.co.uk – The Lovely Arrangements stamp set and co-ordinating dies used to make a trio of cards for my April 2026 classes
www.crafty-rootes.co.uk – The Lovely Arrangements stamp set and co-ordinating dies used to make a trio of cards for my April 2026 classes
The sentiment, from the Simply Said stamp set was stamped in Secret Sea ink onto one of the squares of Basic White card. I added a swirl of Cloud Cover ink using a Blending Brush before gluing the panel to the Secret Sea square and then to the other piece of Thick Basic White card.
www.crafty-rootes.co.uk – The Lovely Arrangements stamp set and co-ordinating dies used to make a trio of cards for my April 2026 classes
A little Cloud Cover ink was then added to the remaining Basic White square before it was glued to the remaining Secret Sea square and then to the other side of the Thick Basic White panel.
www.crafty-rootes.co.uk – The Lovely Arrangements stamp set and co-ordinating dies used to make a trio of cards for my April 2026 classes
With the larger card base folded up, accordion style I adhered the left-hand side of the decorated panel to the front of the accordion panel, taking care that it would fit in a standard C6 Envelope. I repeated this step to glue the back panel of the pop out portion.
www.crafty-rootes.co.uk – The Lovely Arrangements stamp set and co-ordinating dies used to make a trio of cards for my April 2026 classes
The flowers were stamped on scrap Basic White card with Secret Sea ink and the leaves with Granny Apple Green ink. These were then cut out using the Lovely Arrangements dies. I added colour to the flowers with Petal Pink Blends Pens. These were then added to the card front.
www.crafty-rootes.co.uk – The Lovely Arrangements stamp set and co-ordinating dies used to make a trio of cards for my April 2026 classes
Petal Pink Flowers Card
Granny Apple Green card – 8¼” by 5⅞” scored at 4⅛” on the long side Secret Sea – 5¼” by 3½” Basic White – 5⅛” by 3⅜” Lovely Blossoms dsp – 4” by ¾” Cloud Cover – 3¾” by ¾” Cloud Cover – 3” by ⅜” Scrap Basic White
We ran the 5⅛” by 3⅜” panel of Basic White card through the Cut & Emboss machine with the Lovely Stripes Embossing Folder and adhered it to the Secret Sea layer and then to the Granny Apple Green card front.
www.crafty-rootes.co.uk – The Lovely Arrangements stamp set and co-ordinating dies used to make a trio of cards for my April 2026 classes
We die cut a row of circles from the piece of Cloud Cover card measuring 3¾” by ¾” and adhered it to the back of the piece of Lovely Blossoms dsp and then glued it to the card front.
www.crafty-rootes.co.uk – The Lovely Arrangements stamp set and co-ordinating dies used to make a trio of cards for my April 2026 classes
The flowers were stamped on scrap Basic White card with Secret Sea ink and the leaves with Granny Apple Green ink. These were then cut out using the Lovely Arrangements dies. I added colour to the flowers with Petal Pink Blends Pens. These were then added to the card front.
www.crafty-rootes.co.uk – The Lovely Arrangements stamp set and co-ordinating dies used to make a trio of cards for my April 2026 classes
The sentiment, from the Simply Said stamp set was stamped in Secret Sea ink onto the small strip of Cloud Cover card which was then added to the dsp panel and the flowers and leaves tucked around it.
www.crafty-rootes.co.uk – The Lovely Arrangements stamp set and co-ordinating dies used to make a trio of cards for my April 2026 classes
Pair of White Flowers Card
Thick Basic White – 8¼” by 5⅞” scored at 4⅛” on the long side Basic White – 5½” by 3¾” Secret Sea – 3 ¾” by 2½” Cloud Cover card – 3” by ⅜” Scrap Basic White
We ran the 5⅛” by 3⅜” panel of Basic White card through the Cut & Emboss machine with the Lovely Stripes Embossing Folder and adhered it to the Thick Basic White card front.
www.crafty-rootes.co.uk – The Lovely Arrangements stamp set and co-ordinating dies used to make a trio of cards for my April 2026 classes
From the piece of Secret Sea card, we die cut the panel of circles and adhered it to the card front.
www.crafty-rootes.co.uk – The Lovely Arrangements stamp set and co-ordinating dies used to make a trio of cards for my April 2026 classes
The flowers were stamped on scrap Basic White card with Secret Sea ink and the leaves with Granny Apple Green ink. These were then cut out using the Lovely Arrangements dies. These were then added to the card front. On Dimensionals.
www.crafty-rootes.co.uk – The Lovely Arrangements stamp set and co-ordinating dies used to make a trio of cards for my April 2026 classes
The sentiment, from the Simply Said stamp set was stamped in Secret Sea ink onto the small strip of Cloud Cover card which was then added to the card front.
www.crafty-rootes.co.uk – The Lovely Arrangements stamp set and co-ordinating dies used to make a trio of cards for my April 2026 classes
I hope you like these cards.
www.crafty-rootes.co.uk – The Lovely Arrangements stamp set and co-ordinating dies used to make a trio of cards for my April 2026 classes
Please hop on to see what my fellow crafters have created to share with us today.
I would love to be your demonstrator if you don’t already have one and live in the UK. I would also be delighted to send you a catalogue if you do not have a demonstrator. I would be happy to place an order for you, or you can order directly by clicking on the “shop online” button.
Contact me for information about joining my team or click on the ‘Join My Team’ button
Details of the products I used for this project can be found below.
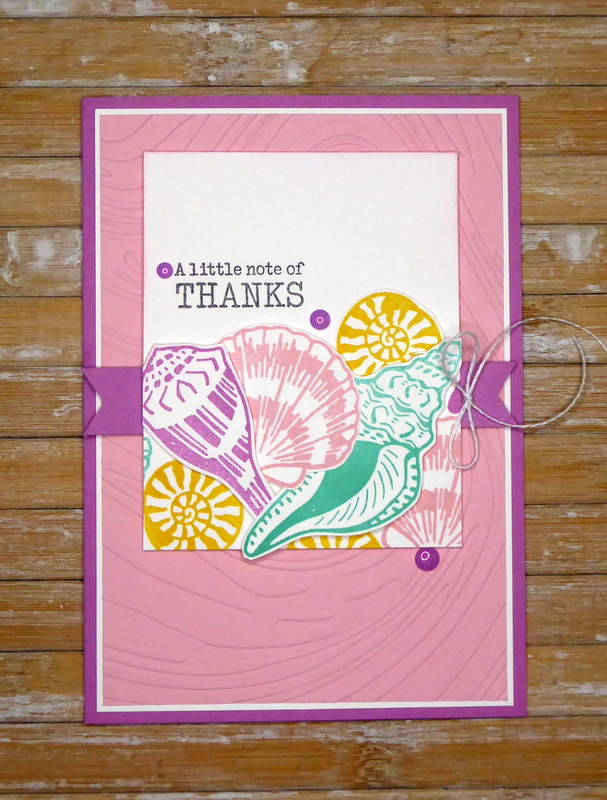
Hello and welcome to the Crafty Challenge Blog Hop where we have a sketch to give us inspiration today. I have made my card using the Shell Collecting stamp set and So Swirly Embossing Folder.
I created the shell collecting card using the following supplies:
Petunia Pop card base – 8¼” by 5⅞” scored at 4⅛” on the long side Basic White – 5⅝” by 3⅞” Pretty In Pink – 5½” by 3¾” Basic White – 3 ¾” by 2⅞” Petunia Pop – 4⅛” by ⅝” Basic White – 5½” by 3¾” for the inside
I embossed the panel of Pretty In Pink card using the So Swirly Embossing Folder and adhered it to the largest panel of Basic White card. The whole piece was glued to the Petunia Pop card base.
www.crafty-rootes.co.uk – The Shell Collecting and Notes of Spring stamp sets used with the So Swirly Embossing Folder to make a thank you card – Crafty Challenge Blog Hop
I stamped the seashells on scrap Basic White card using Pretty In Pink, Petunia Pop, Daffodil Delight and Summer Splash inks. These were fussy cut out using sharp scissors.
www.crafty-rootes.co.uk – The Shell Collecting and Notes of Spring stamp sets used with the So Swirly Embossing Folder to make a thank you card – Crafty Challenge Blog Hop
I placed them on the smaller piece of Basic White card and stamped in the gaps using the same images and ink colours. The fussy cut images were then added on Dimensionals to the panel.
www.crafty-rootes.co.uk – The Shell Collecting and Notes of Spring stamp sets used with the So Swirly Embossing Folder to make a thank you card – Crafty Challenge Blog Hop
The sentiment, from the Notes of Spring stamp set was stamped in Memento Tuxedo Black ink onto the decorated panel. I flagged the ends of the thin strip of Petunia Popp card, glued it to the back of the decorated panel before adding the whole piece to the card front on Dimensionals.
www.crafty-rootes.co.uk – The Shell Collecting and Notes of Spring stamp sets used with the So Swirly Embossing Folder to make a thank you card – Crafty Challenge Blog Hop
A trio of 2024 – 2026 In Color Flat Pearls and a White Baker’s Twine bow finishes the card.
www.crafty-rootes.co.uk – The Shell Collecting and Notes of Spring stamp sets used with the So Swirly Embossing Folder to make a thank you card – Crafty Challenge Blog Hop
Please hop onto share the inspiration provided by my crafty friends.
I would love to be your demonstrator if you don’t already have one and live in the UK. I would also be delighted to send you a catalogue if you do not have a demonstrator. I would be happy to place an order for you, or you can order directly by clicking on the “shop online” button.
Contact me for information about joining my team or click on the ‘Join My Team’ button
Details of the products I used for this project can be found below.
Hello and welcome to the Share It Sunday Blog Hop where we are sharing projects we have been working on recently. This is a card made as a sample for my April classes using the Lovely Arrangements stamp set and dies.
I created the lemon flower card using the following supplies:
Secret Sea card base – 8¼” by 5⅞” scored at 4⅛” on the long side Cloud Cover – 5⅜” by 3⅝” Basic White – 5¼” by 3½” Cloud Cover – 4” by 3” Lemon Lolly – 3” by 2¾” Basic White – 2⅞” by 2⅝” Basic White – 5½” by 3¾” for the inside Scrap Basic White
I embossed the 5¼” by 3½” piece of Basic White card using the Lovely Stripes Embossing Folder and adhered the embossed panel to the slightly larger layer of Cloud Cover card. The whole piece was then glued to the Secret Sea card base.
www.crafty-rootes.co.uk – The Lovely Arrangements stamp set and co-ordinating dies used with the Lovely Stripes Embossing Folder to make a birthday card – Share It Sunday Blog Hop
Using the Lovely Arrangement Dies I die cut the panel of circles from the small piece of Cloud Cover card and added it to the card front on Dimensionals.
www.crafty-rootes.co.uk – The Lovely Arrangements stamp set and co-ordinating dies used with the Lovely Stripes Embossing Folder to make a birthday card – Share It Sunday Blog Hop
The sentiment, from the Simply Said stamp set was stamped onto the piece of Basic White card measuring 2⅞” by 2⅝” with Secret Sea ink, glued it to the small piece of Lemon Lolly card and added it to the die cut panel of circles on the card front.
www.crafty-rootes.co.uk – The Lovely Arrangements stamp set and co-ordinating dies used with the Lovely Stripes Embossing Folder to make a birthday card – Share It Sunday Blog Hop
I stamped the larger flower and 2 sets of flowers on scrap Basic White card with Secret Sea ink and die cut all three images with the Lovely Arrangements Dies. Colour was added to the flower using Light and Dark Lemon Lolly Blends Pens. The die cut pieces were then added to the card front.
www.crafty-rootes.co.uk – The Lovely Arrangements stamp set and co-ordinating dies used with the Lovely Stripes Embossing Folder to make a birthday card – Share It Sunday Blog Hop
A trio of Moody Palette Dots completed the card.
www.crafty-rootes.co.uk – The Lovely Arrangements stamp set and co-ordinating dies used with the Lovely Stripes Embossing Folder to make a birthday card – Share It Sunday Blog Hop
Please hop on to see what my fellow hoppers have been crafting with lately.
Order goodies/Join My Team
I would love to be your demonstrator if you don’t already have one and live in the UK. I would also be delighted to send you a catalogue if you do not have a demonstrator. I would be happy to place an order for you, or you can order directly by clicking on the “shop online” button.
Contact me for information about joining my team or click on the ‘Join My Team’ button
Details of the products I used for this project can be found below.
Hello and welcome to the Ink. Stamp. Share Blog Hop where we are showcasing something we have been creating recently. I have made a sweet split front birthday card for a friend using the adorable Woolly Friends stamp set and Woolly Friends Builder Punch.
I created the split front birthday card using the following supplies:
Lemon Lolly card base – 7” by 4⅛” – scored at 5⅞” Lemon Lolly – 4⅛” by 1⅜” Basic White – 5¾” by 4” – for the inside Basic White by 4” by 1” Basic White – 4” by 1⅛” Balmy Blue – 5½” by 3¼” Basic White – 5” by 3” Scrap Basic White card
I embossed the two 4” strips of Basic White card using the Stone & Vine 3D Embossing Folder and adhered one to the top of the card front and the other to the strip of Lemon Lolly card.
www.crafty-rootes.co.uk – The Woolly Friends stamp set and co-ordinating Punch used with the nested Essentials Dies to make a split front card – Ink. Stamp. Share Blog Hop
I stamped the trio of tulips with Granny Apple Green ink onto the 5¾” by 4” piece of Basic White card and adhered the panel to the inside of the card. I added colour to the flowers with Pretty In Pink ink.
www.crafty-rootes.co.uk – The Woolly Friends stamp set and co-ordinating Punch used with the nested Essentials Dies to make a split front card – Ink. Stamp. Share Blog Hop
From the piece of Balmy Blue card, I cut a label using the Nested Essentials Dies. Using the same set of dies I also cut a smaller label from the 5” by 3” piece of Basic White card.
www.crafty-rootes.co.uk – The Woolly Friends stamp set and co-ordinating Punch used with the nested Essentials Dies to make a split front card – Ink. Stamp. Share Blog Hop
The sentiment, from the Branching Out stamp set was stamped in Memento Tuxedo Black ink onto the white label and added a row of grass with Granny Apple Green ink.
www.crafty-rootes.co.uk – The Woolly Friends stamp set and co-ordinating Punch used with the nested Essentials Dies to make a split front card – Ink. Stamp. Share Blog Hop
I stamped two sheep bodies and 2 sheep heads in Memento Tuxedo Black ink and punched them out using the Woolly Friends Builder Punch. I added colour to the sheep’s bodies with either Pretty In Pink or Lemon Lolly ink. One was added with liquid glue and the other on Dimensionals.
www.crafty-rootes.co.uk – The Woolly Friends stamp set and co-ordinating Punch used with the nested Essentials Dies to make a split front card – Ink. Stamp. Share Blog Hop
A trio rainbow dots completed the card.
Please hop on to see what my fellow crafters have made to share with us today.
I would love to be your demonstrator if you don’t already have one and live in the UK. I would also be delighted to send you a catalogue if you do not have a demonstrator. I would be happy to place an order for you, or you can order directly by clicking on the “shop online” button.
Contact me for information about joining my team or click on the ‘Join My Team’ button
Details of the products I used for this project can be found below.
Hello and welcome to the Stamping With Friends Blog Hop where we are CASEing one of our fellow hoppers. CASEing means either copy and share everything or copy and selectively edit. I have chosen to CASE a card designed by the lovely Helen Jennings – I don’t have the set of dies Helen used so have swapped in BBQ Master stamp set instead.
I created the CASE card using the following supplies:
Blueberry Bushel card base – 8¼” by 5⅞” scored at 4⅛” on the long side Secret Sea – 5½” by 3¾” Basic White – 5½” by 3⅝” Basic White – 5½” by 3½” for the inside Scrap Basic White, Blueberry Bushel and Secret Sea
I ran the 5½” by 3⅝” piece of Basic White card through the Cut & Emboss Machine with the Mini Corrugated Embossing Folder. The embossed panel was then glued to the Secret Sea layer.
www.crafty-rootes.co.uk – The BBQ Master stamp set used with the Stylish Shapes and Perennial Postage dies to CASE a card for the Stamping With Friends Blog Hop
A length of Bordered Open Weave Ribbon was wrapped around the panel, secured on the back with Sellotape before the panel was adhered to the Blueberry Bushel card front. I opted not to add the Vellum layer.
www.crafty-rootes.co.uk – The BBQ Master stamp set used with the Stylish Shapes and Perennial Postage dies to CASE a card for the Stamping With Friends Blog Hop
From scrap Basic White card, I die cut 3 stitched rectangles and from scrap Secret Sea I die cut 3 slightly larger squares using the Perennial Postage dies.
www.crafty-rootes.co.uk – The BBQ Master stamp set used with the Stylish Shapes and Perennial Postage dies to CASE a card for the Stamping With Friends Blog Hop
On the white stitched squares I stamped the oven glove, one in Poppy Parade, one in Blueberry Bushel and the last in Gorgeous Grape. The stamped squares were then adhered to the Secret Sea squares before they were all added to the card front using Black Dimensionals.
www.crafty-rootes.co.uk – The BBQ Master stamp set used with the Stylish Shapes and Perennial Postage dies to CASE a card for the Stamping With Friends Blog Hop
The sentiments from the Reason To Celebrate stamp set were stamped in Secret Sea ink on scrap Basic White card. I backed the sentiments with scrap Blueberry Bushel card and added them to the card with Liquid Adhesive.
www.crafty-rootes.co.uk – The BBQ Master stamp set used with the Stylish Shapes and Perennial Postage dies to CASE a card for the Stamping With Friends Blog Hop
Really like how this card turned out. Thank you for the inspiration Helen.
Order goodies/Join My Team
I would love to be your demonstrator if you don’t already have one and live in the UK. I would also be delighted to send you a catalogue if you do not have a demonstrator. I would be happy to place an order for you, or you can order directly by clicking on the “shop online” button.
Contact me for information about joining my team or click on the ‘Join My Team’ button
Details of the products I used for this project can be found below.
Mo x
Supplies used:
Loading Comments...
By continuing to use the site, you agree to the use of cookies. more information
The cookie settings on this website are set to "allow cookies" to give you the best browsing experience possible. If you continue to use this website without changing your cookie settings or you click "Accept" below then you are consenting to this.